Why I Built This
I wanted my photos, movies, documents, and passwords to live on my own hardware instead of being spread across five subscriptions. I also wanted AI to help organize my paperwork without sending my bank statements to someone else’s cloud.
This guide is how I set up these self-hosted tools, with local AI, on my 24 GB MacBook Pro M5 Pro. (The same tools also run on Windows and Linux, but GPU and networking details differ there.) It uses:
- Docker Compose, so every service is a small text file you can version, copy, and rebuild.
- Local AI only, on the GPU. Document AI runs on Ollama installed directly on the Mac (using the Apple Silicon GPU), never on a cloud API.
- Tailscale, so you can reach everything from your phone or laptop without opening ports on your router.
- LM Link (LM Studio’s built-in Tailscale connection), so I can chat with the models on my Mac from my phone, with end-to-end encryption.
- Least privilege. Each AI tool gets only the access it really needs, and some services (like your password manager) get no AI access at all.
You don’t need to install everything at once. Each section stands on its own, so pick what you need and add more later.
How this guide is organized:
- Part 1: Local AI and the Apps That Use It. Ollama/LM Studio (plus LM Link for chatting from your phone), the Paperless document stack, Immich, Jellyfin, and Home Assistant with a local voice assistant (Whisper + Piper). This is what I actually run on my Mac, and the configs match my setup.
- Part 2: Supporting Services (No AI). Portainer, Dockge, Tailscale, and Vaultwarden. They are deliberately kept away from AI. Portainer, Dockge, and Vaultwarden run on my Mac too, all bound to
127.0.0.1 so only the Mac can reach them.
Before you start: the configs below are examples. Swap in your own paths and passwords, back up anything you care about, and never put an admin page directly on the public internet. This guide isn’t a complete security or backup plan, but it’s a solid starting point.
One thing to understand first: “who can reach this port?”
You’ll see two styles of port mapping in this guide, and the difference matters:
If a service has no login screen of its own, or it’s an admin tool, use the 127.0.0.1: style. I’ll point out which ones as we go.
Part 1: Local AI and the Apps That Use It
This part covers the AI engine itself and the apps that connect to it: the Paperless document stack (where AI does the most work), plus Immich, Jellyfin, and Home Assistant, which each have a small, optional AI use. Every AI tool here talks only to a model running on your own Mac.
1. Local AI Engines: Ollama and LM Studio
My setup: I run Ollama natively on the Mac (Ollama.app), using the Apple Silicon GPU. All the AI containers (Open WebUI, Paperless-AI, Paperless-GPT) connect to it at http://host.docker.internal:11434. The Ollama container that comes with the Paperless stack is commented out in its compose.yaml.
New to local models? My earlier post AI Model Basics: Understanding Size, Hardware, and Setup explains what “7B” or “20B” means, how much memory each size needs, and why bigger isn’t always better.
Why not run Ollama in Docker? The Mac has no GPU inside Docker
Docker Desktop on macOS can’t pass the Apple Silicon GPU through to containers, so Ollama inside a container runs on CPU only. Ollama installed directly on the Mac uses the Metal GPU instead. On my Mac, llama3.2:3b runs 100% on the GPU at about 190 tokens per second, many times faster than CPU in Docker.
Your containers can still reach a native app on the Mac through the special address host.docker.internal:
| Where the model runs | Address containers use | API it speaks |
|---|
| Ollama on the Mac (GPU), what I use | http://host.docker.internal:11434 | Ollama API |
| LM Studio on the Mac (GPU) | http://host.docker.internal:1234/v1 | OpenAI API |
| Another computer with a GPU (for example a Linux PC with NVIDIA) | http://100.x.y.z:11434 (its Tailscale IP) | Ollama API |
| Ollama in Docker (CPU only) | http://ollama:11434 | Ollama API |
Setting up Ollama on the Mac:
- Install it from ollama.com/download and open Ollama.app. It starts automatically at login and listens on
127.0.0.1:11434, so it isn’t visible on your home network. - Download models from the Terminal:
ollama pull llama3.2:3b - Check it’s really using the GPU: run
ollama ps while a model is loaded. The PROCESSOR column should say 100% GPU.
Ollama vs. LM Studio: they speak two different APIs. To switch an app to LM Studio, you have to change its provider type to OpenAI-compatible, not just paste the new URL into an OLLAMA_... setting. (Section 2 shows exactly what to change.)
Chat from your phone: LM Studio + LM Link (what I use on mobile)
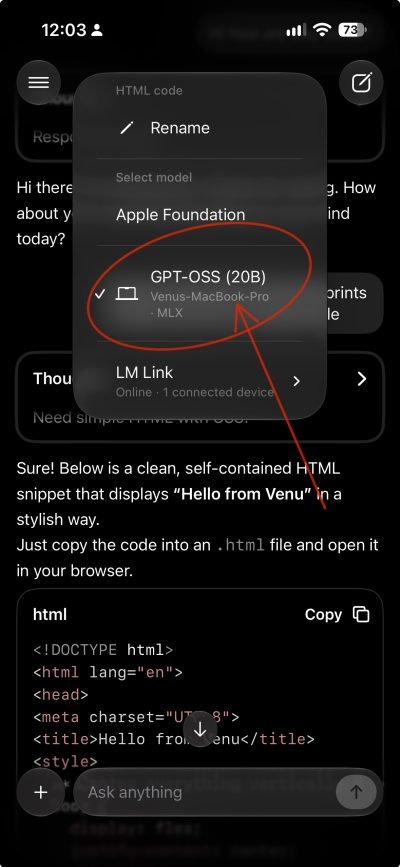
My setup: On my phone I use Locally, LM Studio’s mobile app. It connects to LM Studio on my Mac through LM Link, so the model runs on the Mac’s GPU and the phone only sends prompts and gets answers back. Nothing goes to a cloud AI.
LM Link is LM Studio’s built-in way to use models on another of your devices as if they were local. It’s built with Tailscale. LM Studio includes tsnet, Tailscale’s mesh VPN library, so your devices get a private, end-to-end encrypted (WireGuard) connection without any port forwarding. It works on cellular, through CGNAT, and behind firewalls. According to LM Studio, neither Tailscale nor LM Studio can read your prompts or replies; their servers only see the list of devices you’ve linked.
See the screenshot below of my phone connected to the local LLM running on my Mac through LM Link. The model runs entirely on my Mac’s GPU, while I can interact with it remotely from my phone.
Setting it up:
- On the Mac: install LM Studio (0.4.16 or later), sign in with a free LM Studio account, and download a model. I use
openai/gpt-oss-20b for everyday chat (see below). - Open Settings → LM Link and turn on Enable LM Link.
- Load the model. Only turn on Allow loading models on this machine if you want the phone to choose and load models itself. With it off, the phone can only use models you’ve already loaded on the Mac, which follows the least-privilege rule.
- On the phone: install Locally (iPhone/iPad), sign in with the same LM Studio account, and turn on LM Link in its settings. Pick your Mac and a model. Remote models are labeled Linked.
- Test it for real: turn off Wi-Fi and chat over cellular. If the Mac’s GPU usage goes up while the phone answers, the request went through LM Link.
From a laptop, too. LM Link isn’t only for phones. I also use my Mac’s models from my work laptop, a Windows machine without a strong GPU. That laptop runs LM Studio, signed in to the same account, with no models downloaded. I wrote about that setup, including calling the models from Python, JavaScript, C#, and cURL, in I Turned My 24GB MacBook M5 Pro into a Personal AI Server and What I use it from My Official Laptop over an Encrypted Tunnel.
My everyday chat model: GPT-OSS 20B
gpt-oss-20b is OpenAI’s open-weight model. It’s free to download and runs completely on your own Mac. I use it for normal chat on the Mac and on my phone, and keep the small Ollama models for Paperless and Home Assistant.
| Where it runs | LM Studio on the Mac (GPU), model openai/gpt-oss-20b |
| Size | About 12 GB (it’s a mixture-of-experts model, so only a small part of it works on each word, which keeps it fast) |
| Good at | Everyday questions, writing, summaries, explanations, light coding |
| Reasoning | It “thinks” before answering. Set Reasoning Effort (low / medium / high) in LM Studio’s model settings. Use low for quick chat and high for harder problems. |
Download it in LM Studio’s Discover tab (search gpt-oss), or from the Terminal:
lms get openai/gpt-oss-20b
lms load openai/gpt-oss-20b
lms ps # check it's loaded
Using it in Open WebUI too: don’t download it a second time in Ollama. Instead, add LM Studio to Open WebUI as an OpenAI connection (see the next section), and openai/gpt-oss-20b shows up next to your Ollama models.
Good to know:
- The Mac has to stay on with LM Studio open. If it goes to sleep, the phone loses access. System Settings → Energy → Prevent automatic sleeping when the display is off fixes that.
- You don’t need the Tailscale app for this. LM Link has its own Tailscale built in, and it doesn’t touch your system VPN or routing. It also runs separately from your own tailnet (Section 7), so your phone can use LM Link without access to Paperless, Vaultwarden, and the rest.
- Leave LM Studio’s server on localhost. LM Link doesn’t need Serve on Local Network. Keep that off so port 1234 stays visible only to the Mac. Your containers can still reach it at
http://host.docker.internal:1234/v1. - Mind the memory. Ollama and LM Studio share the same Mac memory, and by default macOS lets the GPU use only about two-thirds to three-quarters of it. On my 24 GB Mac,
gpt-oss-20b (12 GB) plus minicpm-v:8b (5.5 GB) plus llama3.2:3b (2 GB) is already too much at once, and everything slows down or a model fails to load. Unload whatever you aren’t using (ollama stop <model>, lms unload <model>, or eject it in LM Studio). Also keep Paperless-GPT’s OCR runs for times when you aren’t chatting with GPT-OSS. Before you download a new model, check whether it will fit with llmfit. It reads your hardware and predicts which models will run and how fast. I wrote about it in Stop Guessing, Download Smarter, Run Faster: llmfit helps you pick the right LLMs your hardware can handle. - Who you’re trusting: your LM Studio account decides which devices get linked. Give it a strong password, and remove any device you no longer use.
- Android? Locally only runs on iPhone and iPad for now. On Android, use any OpenAI-compatible chat app (for example Chatbox) and share LM Studio’s server on your own tailnet with
tailscale serve --bg --https=8444 1234 (Section 7). Never forward port 1234 on your router.
Or use Open WebUI for Ollama on your phone
LM Link only works with LM Studio. For Ollama, use Open WebUI (port 3001, part of the Paperless stack in Section 2) as your phone chat app instead. It talks to the same Ollama on the Mac’s GPU, so you get the same models as Paperless-AI and Home Assistant.
| | LM Link + Locally | Open WebUI |
|---|
| Model engine | LM Studio | Ollama (or LM Studio, added as an OpenAI connection) |
| Phone needs | Locally app (iPhone/iPad) | Any browser + the Tailscale app |
| Private connection | LM Link’s built-in Tailscale | Your own tailnet + tailscale serve |
| Login | LM Studio account | Open WebUI account (first one is admin) |
| Works on Android | Not yet | Yes |
Setting it up:
- Keep Open WebUI bound to localhost (
"127.0.0.1:3001:8080" in compose.yaml, Section 2, Step 2). - Share it on your tailnet over HTTPS:
tailscale serve --bg --https=8443 3001
- Install the Tailscale app on your phone and sign in to the same tailnet.
- Open
https://your-mac-name.your-tailnet.ts.net:8443 and log in. - Make it feel like an app: use Share → Add to Home Screen (iPhone) or ⋮ → Add to Home screen (Android). Open WebUI then opens full-screen, like a native app.
Good to know:
- HTTPS matters. Voice input with the mic and installing it as a home-screen app both need HTTPS, and Tailscale Serve gives you that.
- Turn off open sign-ups. Once your account exists, set Admin Panel → Settings → General → Default User Role to
pending (or turn off Enable New Sign Ups). Then nobody else on your tailnet can create an account and start using your GPU. - You can use both engines here. Add LM Studio under Admin Panel → Settings → Connections → OpenAI API with
http://host.docker.internal:1234/v1. Open WebUI then lists Ollama and LM Studio models side by side.
Stay safe:
- Keep model APIs private (localhost or Tailscale). Ollama has no password, so anyone who can reach port 11434 can use it.
- “Local model” doesn’t automatically mean “everything is local.” Check each app’s settings. Paperless-GPT, for example, can also talk to OpenAI or Anthropic if you configure it that way.
2. Paperless-ngx + AI: A Searchable Archive for All Your Paperwork
This is my favorite part of the whole setup.
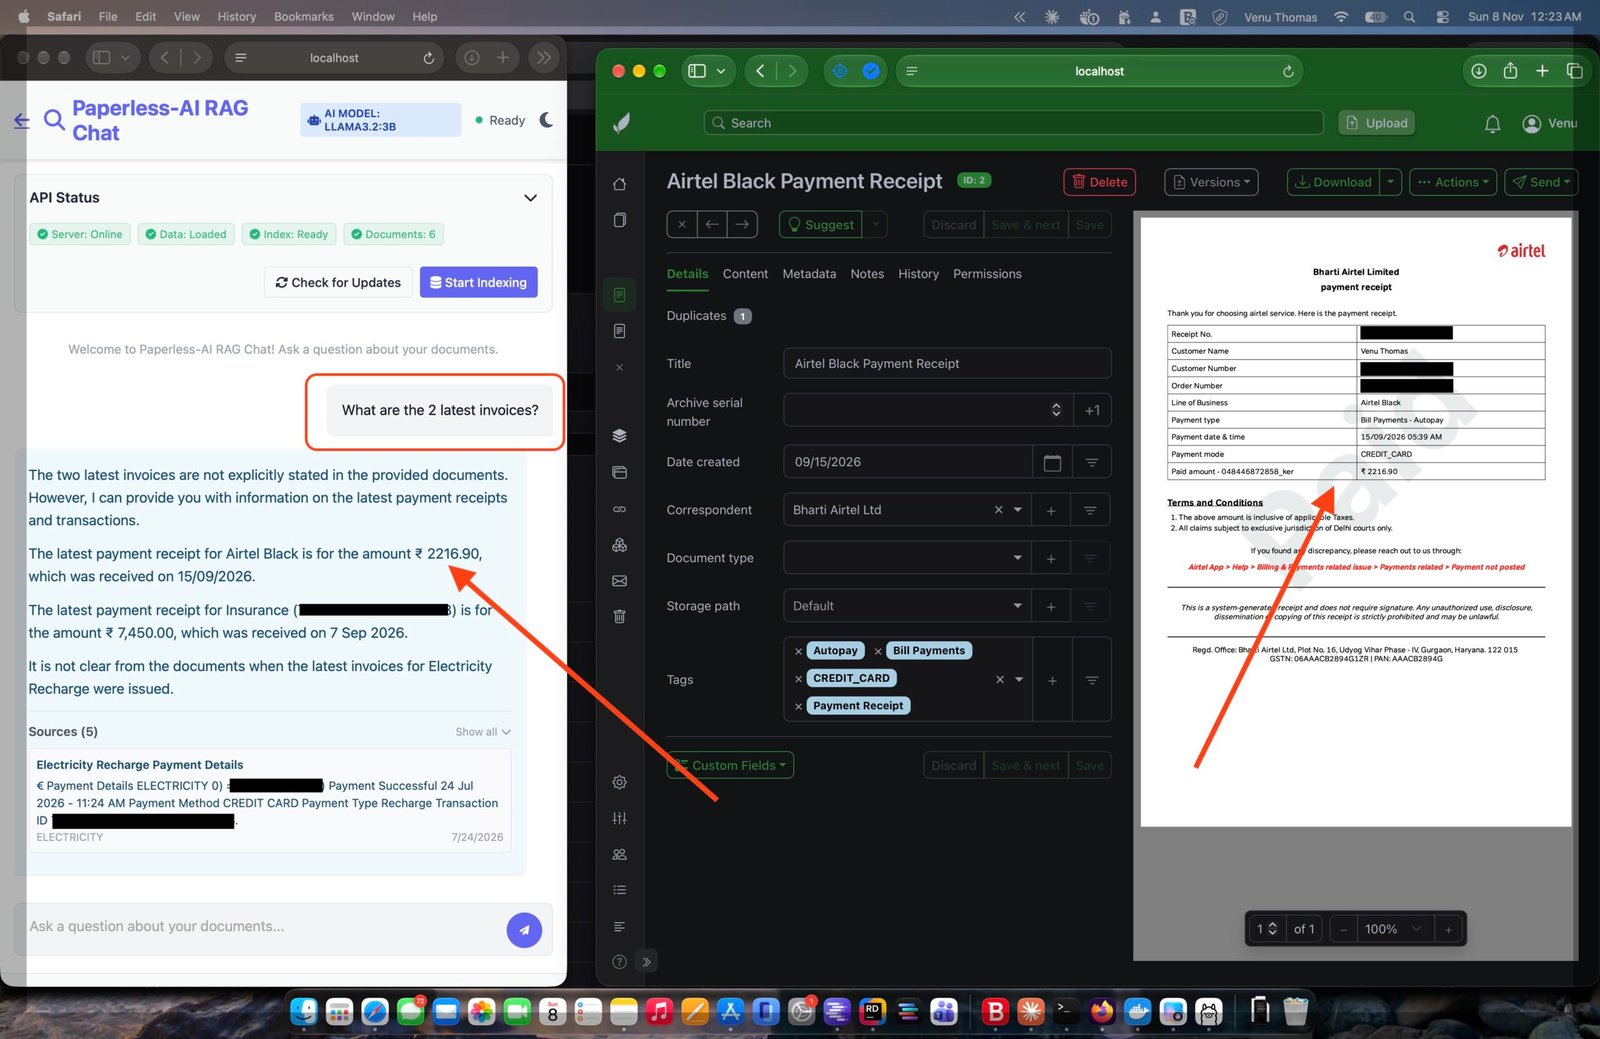
Paperless-ngx takes scanned bills, receipts, warranties, and bank statements, reads the text out of them (OCR), and makes everything searchable. “Where’s that fridge warranty from 2021?” becomes a two-second search.
Instead of wiring up the database and helper services by hand, I use timothystewart6/paperless-stack, a single Compose project that bundles everything, including an optional local-AI layer.
What’s in the box:
| Component | What it does | Port |
|---|
| Paperless-ngx | The document archive: OCR, tags, search | 8000 |
| PostgreSQL + Redis | Database and task queue | (internal) |
| Gotenberg + Apache Tika | Convert and read Office files, emails, and so on | (internal) |
| Ollama | Runs the local AI models. I comment this out and use Ollama on the Mac’s GPU instead (Step 4). | (internal) |
| Open WebUI | Chat with models and download new ones | 3001 |
| Paperless-AI | Suggests titles, tags, correspondents, and dates | 3000 |
| Paperless-GPT | AI-powered OCR plus metadata | 3002 |
| Dozzle | Live log viewer for all containers | 8080 |
Step 1: Download
git clone https://github.com/timothystewart6/paperless-stack.git
cd paperless-stack
The stack uses one .env file per service (for example ./paperless/.env and ./postgres/.env).
Step 2: Lock down the ports (important)
Out of the box, the stack publishes its web ports to your whole home network, and Paperless-GPT and Dozzle have no login at all. Before you start anything, open compose.yaml and add 127.0.0.1: to those two:
  paperless-gpt:
    ports:
      - "127.0.0.1:3002:8080"

  dozzle:
    ports:
      - "127.0.0.1:8080:8080"
It’s worth doing the same for Open WebUI (3001) and Paperless-AI (3000) too. Then use tailscale serve (Section 7) when you want to reach them from other devices.
Step 3: Set the basic secrets
./postgres/.env: set a strong POSTGRES_PASSWORD../paperless/.env: set PAPERLESS_DBPASS to the same password, and set a long random PAPERLESS_SECRET_KEY../paperless/.env: if you’ll open Paperless through Tailscale, add PAPERLESS_URL=https://your-mac-name.your-tailnet.ts.net. Without it, logins from that address can fail with a CSRF error../paperless/.env (optional): add PAPERLESS_OCR_LANGUAGE=eng (or eng+hin, and so on) to match your documents.
Quick way to make a random secret: openssl rand -hex 32
Step 4: Use Ollama on the Mac’s GPU (what I do)
The compose.yaml you download from the paperless-stack repo includes its own Ollama container. On a Mac, that container can only use the CPU. So I comment it out and point everything at Ollama.app running on the Mac’s GPU (see Section 1 to install it).
4a. Comment out the ollama service in the downloaded compose.yaml:
  # ollama now runs NATIVELY on the Mac (Ollama.app, Metal GPU).
  # Containers reach it at http://host.docker.internal:11434
  # To go back to CPU-only Ollama in Docker, uncomment this service and
  # set the URLs in open-webui/.env, paperless-ai/.env and paperless-gpt/.env
  # back to http://ollama:11434
  # ollama:
  #   image: ollama/ollama:latest
  #   container_name: ollama
  #   env_file:
  #     - ./ollama/.env
  #   environment:
  #     OLLAMA_NUM_PARALLEL: "1"
  #   volumes:
  #     - ./ollama/data/:/root/.ollama
  #     - ./ollama/models:/ollama-models
  #   restart: unless-stopped
4b. Remove - ollama from depends_on: in the open-webui, paperless-ai, and paperless-gpt services. If you skip this, Docker Compose refuses to start because those services depend on one that no longer exists. For example:
  paperless-ai:
    depends_on:
      - paperless        # "- ollama" removed
4c. Point the three AI services at the Mac’s Ollama. Change http://ollama:11434 to http://host.docker.internal:11434:
# ./open-webui/.env
OLLAMA_BASE_URL=http://host.docker.internal:11434

# ./paperless-ai/.env
OLLAMA_API_URL=http://host.docker.internal:11434

# ./paperless-gpt/.env   (this file uses "KEY: value" style)
OLLAMA_HOST: "http://host.docker.internal:11434"
4d. Quick test. Before you start the stack, check that a container can reach the Mac’s Ollama:
docker run --rm curlimages/curl -s http://host.docker.internal:11434/api/version
You should see something like {"version":"0.40.14"}.
Already ran the stack with the Docker Ollama? Two apps remember the old address and ignore the .env change:
- Paperless-AI saves its settings in
./paperless-ai/data/.env. Change OLLAMA_API_URL there too, or update it on its Settings page. - Open WebUI saves the connection in its database. Change it in Admin Panel → Settings → Connections to
http://host.docker.internal:11434.
Then run docker compose up -d --force-recreate --remove-orphans. The --remove-orphans flag removes the old Ollama container. Your previously downloaded models stay in ./ollama/models until you delete that folder.
Prefer to keep Ollama in Docker (CPU only)? Click for the Mac fixes.
Step 5: Start it and create your account
docker compose up -d
Open http://localhost:8000 and create your admin account. If you don’t see a sign-up screen, create one from the terminal:
docker compose exec paperless createsuperuser
At this point Paperless works fully without any AI. Drop a PDF into ./paperless/consume/ and watch it show up, searchable, a minute later. The AI layer is optional.
Step 6: Download the AI models
Since Ollama runs on the Mac, pull the models from the Mac’s Terminal:
ollama pull llama3.2:3b     # small text model: titles, tags, summaries
ollama pull minicpm-v:8b    # vision model that "reads" scanned pages for OCR
ollama list                 # check both are there
The names must match what’s set in ./paperless-ai/.env (OLLAMA_MODEL) and ./paperless-gpt/.env (LLM_MODEL, VISION_LLM_MODEL).
Then open Open WebUI at http://localhost:3001 and create your account right away, because the first account created becomes the admin. It shows the same models, because it talks to the same Ollama on the Mac. You can also pull new models from there.
With the GPU you have room for bigger models, for example llama3.1:8b for text or qwen2.5vl:7b for OCR. Just update the model names in the .env files to match.
The AI tools need an API token, and you can only create one after Paperless is running, which is why this step comes last.
- In Paperless, open your profile (top right) → API Auth Token → Create, and copy it.
- Paste it as
PAPERLESS_API_TOKEN in ./paperless-ai/.env and ./paperless-gpt/.env. - In
./paperless-ai/.env, set PAPERLESS_USERNAME to your Paperless username. - Recreate the containers so they pick up the changes:
docker compose up -d --force-recreate paperless-ai paperless-gpt
Tip: you need --force-recreate (or at least up -d) after any .env change. A plain docker compose restart does not reload .env files.
Don’t want AI at all? Comment out open-webui, paperless-ai, and paperless-gpt in compose.yaml (and ollama, if you kept it). Paperless works exactly the same without them.
Meet the AI helpers
Paperless-AI (port 3000) reads your documents and fills in titles, tags, correspondents, and dates using the local model. Open it once to finish its setup screen.
 Heads up: by default it writes changes directly to your documents. With
SCAN_INTERVAL=*/30 * * * *, it checks for new documents every 30 minutes. It does not wait for your approval unless you set it up that way. My advice:
- Start with a handful of test documents and check the results.
- In its settings, limit processing to documents with a specific tag, and have it add a tag like
ai-processed so you can always find (and undo) its work. - Its History page shows what it changed.
Paperless-GPT (port 3002) goes further. It uses the vision model to re-read scanned pages, which is often much better than classic OCR on blurry receipts and phone photos. It can also suggest titles, tags, correspondents, and custom fields. You control it with tags in Paperless (these names match my .env, so check yours):
| Tag you add | What happens |
|---|
paperless-gpt-manual | Shows up in the Paperless-GPT UI for you to review |
paperless-gpt-auto | Processed and applied automatically |
paperless-gpt-ocr-auto | OCR only, run automatically |
 Paperless-GPT has no login, so keep it on
127.0.0.1 (Step 2).
Dozzle (port 8080) is a live log viewer for every container. When something stops working (“why didn’t my receipt get tagged?”), look here first, or run docker compose logs -f paperless-ai. Note that it reads the Docker socket and has no login by default, so keep it on localhost too.
Other GPU options: LM Studio or another computer
Ollama on the Mac (Step 4) is what I use, but there are two other ways to get GPU speed.
LM Studio on the Mac. It speaks the OpenAI API, so switch the provider, not just the URL:
- Paperless-AI: choose the Custom (OpenAI-compatible) provider in its settings, with base URL
http://host.docker.internal:1234/v1. - Paperless-GPT: set
LLM_PROVIDER: "openai" and OPENAI_BASE_URL: "http://host.docker.internal:1234/v1", and use the model name exactly as LM Studio shows it.
Another computer with a GPU (for example a Linux PC with an NVIDIA card running Ollama):
- On that computer, make Ollama listen on the network:
sudo systemctl edit ollama
# add:
# [Service]
# Environment="OLLAMA_HOST=0.0.0.0:11434"
sudo systemctl restart ollama
- Use its Tailscale IP in the three
.env files, for example http://100.x.y.z:11434. Containers on a Mac don’t always understand Tailscale’s short machine names, so the IP is more reliable. - Ollama has no password. Only reach it over Tailscale, and never forward port 11434 on your router.
After either change, run docker compose up -d --force-recreate.
Backups and updates
- Back up these folders:
./paperless/data, ./paperless/media, and ./postgres/data. - Even better, also export regularly. Paperless’s built-in exporter makes a clean, restorable copy:
docker compose exec paperless document_exporter ../export
That lands in ./paperless/export/. Copy it off the Mac.
- Updates:
docker compose pull && docker compose up -d. Before you pull, check the release notes, especially for Paperless and Postgres. Never bump the Postgres major version (like 18 → 19) without a proper dump and restore. - Updating the repo itself: you’ve edited the downloaded
compose.yaml (Ollama commented out), so a later git pull of paperless-stack may conflict. Run git stash, then git pull, then git stash pop, and re-check that the ollama service is still commented out. - Updating Ollama: Ollama.app on the Mac updates itself. Just restart it when it asks.
How the Document-AI Workflow Fits Together
scanner / phone / email
        │
        ▼
consume folder ──▶ Paperless-ngx ──OCR + archive──▶ searchable library
                        │
        ┌───────────────┼───────────────────┐
        ▼               ▼                   ▼
  Paperless-AI    Paperless-GPT       Dozzle (logs)
  titles, tags,   vision OCR,
  dates           custom fields
        └───────────────┬───────────────────┘
                        ▼
   Ollama.app on the Mac, Metal GPU (llama3.2:3b + minicpm-v:8b)
          via http://host.docker.internal:11434
                        ▲
            Open WebUI (download/manage models)
The rules I follow:
- One local brain on the GPU. Ollama on the Mac serves every AI tool, and nothing goes to a cloud API.
- AI helps, you decide. Test on a few documents first, use review tags where you can, and always check money amounts against the original document.
- Least privilege. Each tool has its own API token, and Vaultwarden stays completely outside the AI loop.
- The archive is the source of truth. Paperless stores and searches; AI only organizes. If an AI tool messes up, your original files are untouched.
3. Immich: Your Own Google Photos
Immich is a photo and video library with phone backup, face recognition, and “search by what’s in the picture.” It’s excellent, but it moves fast, so keep a separate backup of your original photos.
Always start from the official release files:
mkdir -p ~/self-hosted/immich && cd ~/self-hosted/immich
curl -L https://github.com/immich-app/immich/releases/latest/download/docker-compose.yml -o docker-compose.yml
curl -L https://github.com/immich-app/immich/releases/latest/download/example.env -o .env
Edit .env:
UPLOAD_LOCATION=./library           # where your photos go
DB_DATA_LOCATION=./postgres         # keep this on a local disk, not a network share
IMMICH_VERSION=v3                   # pin a major version instead of "release"
TZ=Asia/Kolkata
DB_PASSWORD=use-letters-and-numbers-only
Then start it:
docker compose up -d
Open http://localhost:2283 and create your admin account.
Good to know:
- Database backups are built in. Immich automatically dumps its database into
UPLOAD_LOCATION/backups. Just make sure that folder is part of your real backup, along with the photos themselves. - Hardware acceleration doesn’t apply on a Mac. Immich’s GPU options (CUDA, OpenVINO, ARM NN, and so on) are for Linux hardware, so on Docker Desktop face recognition and smart search run on the CPU. That’s fine; the first scan of a big library just takes a while.
- Upgrades: read the release notes before you change
IMMICH_VERSION, because breaking changes do happen. - Password tip: stick to letters and numbers in
DB_PASSWORD to avoid escaping problems.
Where AI fits: an assistant can search photos through Immich’s API. Give it a scoped API key, and don’t send private photos to an outside model.
4. Jellyfin: Your Own Netflix
Jellyfin organizes and streams your own movies, TV shows, and music. It’s free, with no account or subscription.
services:
  jellyfin:
    image: jellyfin/jellyfin:10
    container_name: jellyfin
    ports:
      - "8096:8096"
    volumes:
      - ./config:/config
      - ./cache:/cache
      - /Users/yourname/Movies/films:/media/films:ro
      - /Users/yourname/Movies/tv:/media/tv:ro
    environment:
      TZ: Asia/Kolkata
      JELLYFIN_PublishedServerUrl: http://your-mac-name.your-tailnet.ts.net:8096
    restart: unless-stopped
Open http://localhost:8096, create your account, and add the /media/films and /media/tv folders as libraries.
Good to know:
:ro mounts your media read-only, so Jellyfin can’t accidentally delete or change anything.PublishedServerUrl is the address Jellyfin advertises to apps. Include the port.- Transcoding is CPU-only in Docker on a Mac. The container can’t use Apple’s VideoToolbox hardware encoder. Direct play (when your TV or phone can play the file as-is) works great. If you do a lot of transcoding, the native macOS Jellyfin app can use hardware acceleration.
Where AI fits: read-only library questions (“what haven’t I watched yet?”) through Jellyfin’s API are a safe start.
5. Home Assistant: Smart Home Control
Home Assistant brings all your smart devices and automations into one place. I use it with SmartThings appliances and Tuya-based switches and lights.
services:
  homeassistant:
    image: ghcr.io/home-assistant/home-assistant:stable
    container_name: homeassistant
    environment:
      TZ: Asia/Kolkata
    volumes:
      - ./config:/config
      - /etc/localtime:/etc/localtime:ro
    ports:
      - "8123:8123"
    restart: unless-stopped
Open http://localhost:8123 and follow the onboarding wizard.
Good to know:
- Auto-discovery is limited on a Mac. Docker Desktop can’t pass mDNS/multicast traffic through, so devices that need local discovery (Chromecast, some Wi-Fi bulbs, HomeKit devices) may not show up automatically. Cloud-based integrations like SmartThings and Tuya work fine. If discovery matters to you, run Home Assistant OS in a VM (for example with UTM). That’s the officially recommended route on macOS.
- Create a separate long-lived access token for each integration (Profile → Security), so you can revoke one without breaking the others.
- Back up
./config. Your automations are plain YAML in there.
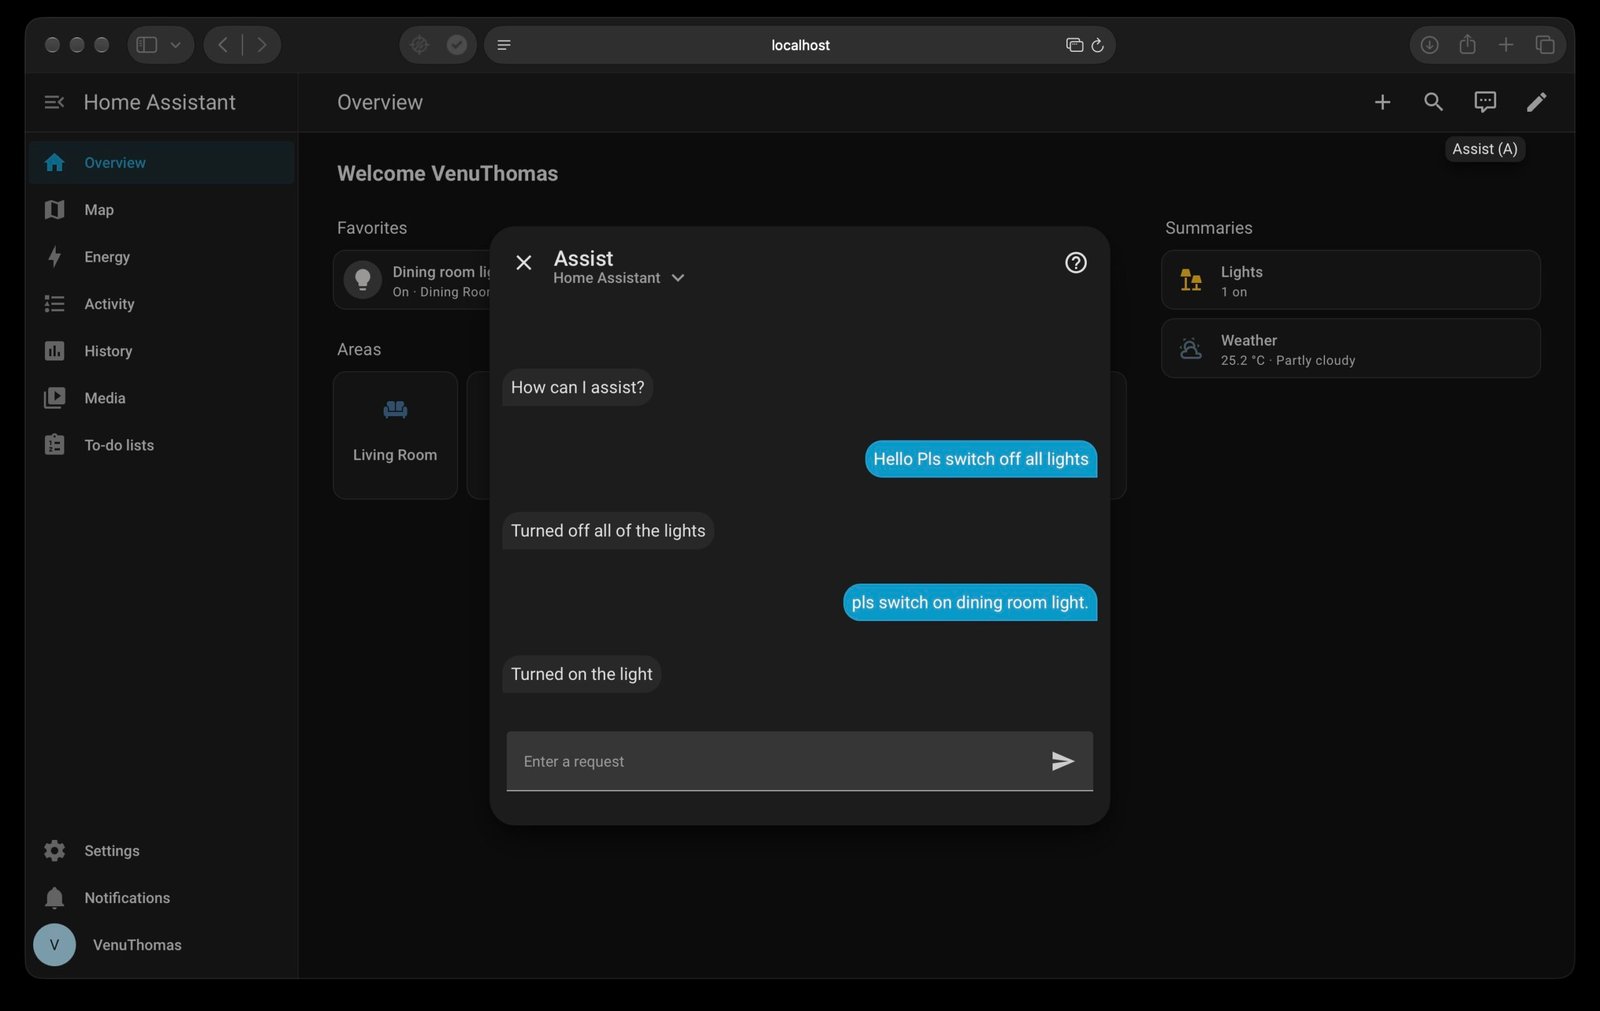
Local voice assistant: Ollama + Whisper + Piper (what I run)
This turns Home Assistant into a fully local voice assistant, like Alexa or Google Home but without the cloud. Three pieces work together:
| Piece | Job | Where it runs |
|---|
| Whisper (faster-whisper) | Speech → text (“turn off the hall light”) | Docker container wyoming-whisper, port 10300 |
Ollama (llama3.2:3b) | Understands the request and controls devices | Natively on the Mac’s GPU (Section 1) |
| Piper | Text → speech (speaks the reply) | Docker container wyoming-piper, port 10200 |
Whisper and Piper talk to Home Assistant over the Wyoming protocol. I add them to the same docker-compose.yml as Home Assistant. That puts them on the same Docker network, so Home Assistant reaches them by name and they don’t need any published ports:
  # Speech-to-text (Wyoming, port 10300)
  wyoming-whisper:
    image: rhasspy/wyoming-whisper:latest
    container_name: wyoming-whisper
    command: --model base-int8 --language en
    volumes:
      - ./wyoming/whisper-data:/data
    restart: unless-stopped

  # Text-to-speech (Wyoming, port 10200)
  wyoming-piper:
    image: rhasspy/wyoming-piper:latest
    container_name: wyoming-piper
    command: --voice en_US-lessac-medium
    volumes:
      - ./wyoming/piper-data:/data
    restart: unless-stopped
Then run docker compose up -d. The first start downloads the speech model and the voice into ./wyoming/. Wait until both logs say Ready (docker logs wyoming-whisper).
Good to know:
- Whisper runs on the CPU (Docker on a Mac has no GPU).
base-int8 is a good balance. Use tiny-int8 for more speed or small-int8 for better accuracy. Drop --language en if you speak several languages. - Want another voice? Browse the Piper voice samples and change
--voice, for example en_GB-alba-medium.
Connect everything in Home Assistant (all in the web UI):
- Add Whisper: go to Settings → Devices & services → Add integration → Wyoming Protocol, and enter host
wyoming-whisper, port 10300. - Add Piper: add Wyoming Protocol again, with host
wyoming-piper, port 10200. - Add Ollama: go to Add integration → Ollama, enter URL
http://host.docker.internal:11434, and pick the model llama3.2:3b. In the Ollama agent’s options, set Control Home Assistant to Assist so it can actually control devices. The model needs tool support; llama3.2:3b has it. A larger model like qwen3:8b follows instructions more reliably, and the GPU can handle it. - Create the assistant: go to Settings → Voice assistants → Add assistant and choose:
- Conversation agent: Ollama
- Speech-to-text: faster-whisper
- Text-to-speech: piper
Turn on “Prefer handling commands locally”. Simple commands like “turn on the kitchen light” are then handled instantly by Home Assistant itself, and only harder questions go to Ollama.
- Choose what the AI may control: on the Expose tab in Voice assistants, expose only the devices you’re happy for it to control.
- Test it: open the Assist button (💬, top right of a dashboard). Type or tap the mic and say “What’s the temperature?” or “Turn off the bedroom light.”
Where AI fits, and its limits:
- 🔒 The Expose list is your safety switch. The AI can only see and control exposed devices. Don’t expose locks, alarms, gas or heating appliances, or anything safety-related. Keep those on manual or on automations you wrote yourself.
- 🎤 The browser mic needs HTTPS (or
localhost). On the Mac, http://localhost:8123 works. On your phone, use the Home Assistant Companion app or the Tailscale HTTPS address. - Small local models sometimes misunderstand. If it does something odd, check Settings → Voice assistants → ⋮ → Debug to see exactly what it heard and did.
Part 2: Supporting Services (No AI)
These services keep the server running, reachable, and secure, but they have nothing to do with AI, and that’s on purpose. Container managers have admin-level control of Docker, Tailscale is just the private network path between your devices, and Vaultwarden holds your passwords. None of them should ever be connected to an AI assistant.
6. Managing Containers: Portainer and Dockge (Optional)
Everything here runs in Docker containers. These two tools give you a friendly web page for managing them, so you don’t have to remember every docker command. You only need one of them.
- Portainer is a full-featured container dashboard.
- Dockge is simpler and built around Compose files. It keeps your YAML as plain files on disk, which I like.
Portainer
services:
  portainer:
    image: portainer/portainer-ce:latest
    container_name: portainer
    ports:
      - "127.0.0.1:9443:9443"
    volumes:
      - /var/run/docker.sock:/var/run/docker.sock
      - ./portainer-data:/data
    restart: unless-stopped
Dockge
services:
  dockge:
    image: louislam/dockge:1
    container_name: dockge
    ports:
      - "127.0.0.1:5001:5001"
    volumes:
      - /var/run/docker.sock:/var/run/docker.sock
      - ./data:/app/data
      # Dockge needs the SAME path inside and outside the container
      - /Users/yourname/AIServerTools:/Users/yourname/AIServerTools
    environment:
      DOCKGE_STACKS_DIR: /Users/yourname/AIServerTools
    restart: unless-stopped
Good to know:
- Mounting
/var/run/docker.sock gives the tool full control over Docker, which is basically admin access to your server. That’s why both are bound to 127.0.0.1. Open them on the Mac itself, or reach them through Tailscale Serve (see Section 7). - Dockge needs the stacks folder to have the same path inside and outside the container. If the paths differ, relative paths like
./data in your Compose files will point to the wrong place. - Dockge only looks one folder deep: each subfolder with a
docker-compose.yml or compose.yaml becomes a stack. In my layout that’s HomeAssistant, jellyfin, Portainer, Dockge, and Vaultwarden. Stacks nested deeper, like immich/immich-app and PaperLess/paperless-stack, don’t show up in its list, but their containers still appear in Portainer. - First login: open
https://localhost:9443 for Portainer (accept the self-signed certificate warning) or http://localhost:5001 for Dockge, and create the admin account. Do Portainer within 5 minutes of starting it. After that it locks the setup page for security. If you miss it, run docker restart portainer and try again.
7. Tailscale: Reach Home From Anywhere, Safely (Recommended)
Tailscale builds a private network between your devices (your tailnet). Your phone at a café can reach your Mac at home as if they were on the same Wi-Fi, and you never open a port on your router.
The easy way is to install Tailscale natively on the Mac (Mac App Store or tailscale.com). After that:
- Services published on all interfaces (like
"8000:8000") are reachable at http://your-mac-name:8000 from any of your devices. - Services bound to
127.0.0.1 can be shared with Tailscale Serve, which also gives you real HTTPS:
# Share Paperless (localhost:8000) at https://your-mac-name.your-tailnet.ts.net
tailscale serve --bg 8000

# Share more services on other HTTPS ports
tailscale serve --bg --https=8443 3001    # Open WebUI
tailscale serve --bg --https=9443 8081    # Vaultwarden

tailscale serve status                     # see what's shared
tailscale serve reset                      # undo everything
Serve only shares things inside your tailnet. (Its sibling, tailscale funnel, puts things on the public internet, so don’t use that for any of these services.)
LM Link is separate. LM Studio’s LM Link (Section 1) has its own Tailscale built in and makes its own private connection between your LM Studio devices. You don’t need this tailnet, or the Tailscale app, to chat with your Mac’s models from your phone. The two run side by side without conflicting.
8. Vaultwarden: Your Own Password Manager (Optional)
Vaultwarden is a lightweight, unofficial server that works with the official Bitwarden apps and browser extensions. It’s great for personal use, but this one holds the keys to everything, so treat it with extra care.
services:
  vaultwarden:
    image: vaultwarden/server:1.37.5     # pinned; check release notes before bumping
    container_name: vaultwarden
    environment:
      DOMAIN: "https://your-mac-name.your-tailnet.ts.net:9443"
      SIGNUPS_ALLOWED: "false"
      INVITATIONS_ALLOWED: "false"
    volumes:
      - ./vw-data:/data
    ports:
      - "127.0.0.1:8081:80"              # 8081, because Dozzle already uses 8080
    restart: unless-stopped
Then share it over HTTPS on your tailnet:
tailscale serve --bg --https=9443 8081
Good to know:
HTTPS isn’t optional. The web vault and the Bitwarden apps won’t work over plain http:// (browsers block the crypto features they need). Tailscale Serve gives you a valid certificate for free.
No Tailscale yet? Use local HTTPS with Caddy (what I do for now). The Bitwarden apps show “Insecure URL not allowed. All URLs must use HTTPS” for any http:// address, even localhost. So I put a tiny Caddy proxy in front of Vaultwarden. It makes its own local certificate (tls internal) and serves the vault at https://localhost:8443:
# added to the same docker-compose.yml; remove the vaultwarden "ports:" lines
# and set DOMAIN: "https://localhost:8443"
  caddy:
    image: caddy:2
    container_name: vaultwarden-caddy
    ports:
      - "127.0.0.1:8443:8443"
    volumes:
      - ./Caddyfile:/etc/caddy/Caddyfile:ro
      - ./caddy-data:/data
      - ./caddy-config:/config
    depends_on:
      - vaultwarden
    restart: unless-stopped
# Caddyfile
{
	skip_install_trust
}

https://localhost:8443 {
	tls internal
	reverse_proxy vaultwarden:80
}
Then tell your Mac to trust Caddy’s certificate (it asks for your password once):
security add-trusted-cert -r trustRoot -k ~/Library/Keychains/login.keychain-db \
  ./caddy-data/caddy/pki/authorities/local/root.crt
🔒 ./caddy-data now holds a private key your Mac trusts, so keep it private (chmod 700 caddy-data) and never share or commit it. This works only on the Mac itself. Phones need the Tailscale HTTPS address, so switch DOMAIN once Serve is running.
DOMAIN must exactly match the URL you use, including the port.
Creating your first account: briefly set SIGNUPS_ALLOWED: "true", create your account, then set it back to "false" and run docker compose up -d again.
Back up ./vw-data encrypted and off-site, and update promptly when security releases come out.
Quick Reference
Part 1: Local AI and the apps that use it
| Service |
Port |
What it’s for |
Remember |
| Ollama (on the Mac, GPU) / LM Studio |
11434 / 1234 |
Local AI |
Containers use host.docker.internal; Docker Ollama would be CPU-only |
| LM Link (LM Studio ↔ Locally on phone) |
n/a (built-in Tailscale) |
Chat with Mac models from your phone |
Same LM Studio account on both; Mac must stay awake |
| GPT-OSS 20B (in LM Studio) |
1234 |
Everyday chat model |
~12 GB; set Reasoning Effort; don’t load alongside big Ollama models |
| Open WebUI |
3001 |
Chat + model downloads; phone chat for Ollama via tailscale serve |
First account becomes admin; turn off sign-ups |
| Paperless-ngx |
8000 |
Document archive |
Back up data, media, Postgres + export |
| Paperless-AI |
3000 |
Titles/tags/dates |
Writes changes automatically; test first |
| Paperless-GPT |
3002 |
Vision OCR + metadata |
No login, so bind to 127.0.0.1 |
| Dozzle |
8080 |
Log viewer |
No login by default; localhost only |
| Immich |
2283 |
Photos |
Back up originals + backups/ folder |
| Jellyfin |
8096 |
Movies & TV |
Transcoding is CPU-only in Docker on Mac |
| Home Assistant |
8123 |
Smart home |
Expose only safe devices to the AI |
| Whisper / Piper (Wyoming) |
10300 / 10200 (internal) |
Voice: speech ↔ text |
Same compose as HA; CPU in Docker |
Part 2: Supporting services (no AI)
| Service |
Port |
What it’s for |
Remember |
| Portainer / Dockge |
9443 / 5001 |
Manage containers |
Docker socket = admin access; localhost only |
| Tailscale |
n/a |
Private remote access |
Use serve, never funnel, for these |
| Vaultwarden |
8443 (HTTPS via Caddy) |
Passwords |
Needs HTTPS; no AI access ever |
Wrapping Up
Running your own home server on a Mac is very doable. Three things will save you most of the headaches:
- Know the Mac’s Docker limits: no GPU in containers, and no local network discovery.
- Keep admin pages and login-less tools on localhost, and reach them through Tailscale.
- Let local AI help organize, but keep yourself in charge of what it can see and change.
Start with one service (Paperless is a great first pick), get comfortable, and grow from there. Have fun with it!
More from my blog