
No cloud. No monthly bills. No API keys. Just my Mac running AI models and my Dell laptop using them from anywhere, like they’re sitting right on the same desk.
The Problem Every Developer Hits Eventually
Here is a scenario most developers and students will recognize.
You have a powerful machine. In my case, a MacBook M5 Pro with 24GB of unified memory. It runs local AI models beautifully. The same setup works equally well on a Windows or Linux desktop with an NVIDIA GeForce RTX GPU (RTX 3080, 4090, etc.), an Intel Core machine with Arc graphics or an AMD Ryzen system with a Radeon GPU. If the hardware can run LM Studio, it can be your AI server. You download a model, load it, chat with it, build tools on top of it. Life is good. A Mac mini would also be a great option instead of a laptop if you’re a Mac user..
Then you sit down at your other machine, a Dell laptop running Windows and all of that disappears. The models are on the Mac. The Mac is on your desk at home. You are at a coffee shop, a classroom, a client meeting or just in another room. Your AI workflow is stuck on one physical machine.
The obvious solutions all have problems:
- Cloud AI APIs (OpenAI, Anthropic, Google): they cost money per token, your data leaves your control and you need API keys.
- SSH tunnels and reverse proxies: technically possible but fragile, complicated to set up and a nightmare to maintain.
- Install models on both machines: your Dell laptop probably doesn’t have the GPU or RAM to run the models you actually want to use.
What You Will Learn in This Article
- What LM Studio is and why it matters for local AI
- What LM Link is and how Tailscale makes it work under the hood
- Step-by-step setup: making the Mac the AI server and the Dell the client
- Simple code examples: asking your remote model “What is the capital of Kerala?” from Python, JavaScript, C# and more
- Integration with AI tools: OpenClaw, AutoGen Studio, coding assistants and automation platforms
- RAG with Embeddings: how to use LM Studio’s embedding endpoint to build a simple Retrieval-Augmented Generation pipeline in .NET
- How Tailscale makes this secure: encryption, NAT traversal and zero open ports
- Who this is for: students, developers, researchers and small teams
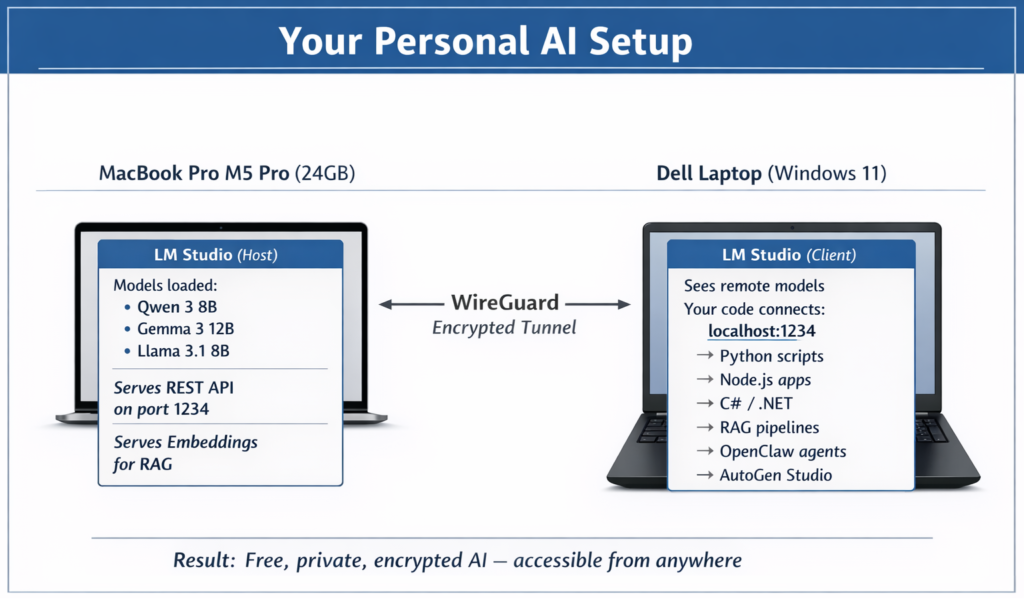
My Setup: Two Machines, One Goal
| Machine | Role | Specs |
|---|---|---|
| MacBook Pro M5 Pro | AI Server (Host) | 24GB unified memory, Apple Silicon, runs LM Studio with AI models loaded |
| Dell Laptop | Work Machine (Client) | Windows 11, used for coding, browsing, meetings. No powerful GPU. |
The Mac has the compute power. The Dell is where I actually work. LM Studio Link connects them.
Part 1: Understanding the Pieces
Before jumping into setup, let’s understand what each piece does. If you’re a college student or new to local AI, this section is for you
What Is a Large Language Model (LLM)?
An LLM is the AI behind tools like ChatGPT, Claude and Gemini. It’s a neural network trained on massive amounts of text data. When you ask it “What is the capital of Kerala?“, it generates the answer “Thiruvananthapuram” by predicting the most likely next words based on everything it has learned.
Normally, these models run on cloud servers owned by big companies. Local AI means running those models directly on your own computer. Your data never leaves your machine.
What Is LM Studio?
LM Studio is a free desktop application that lets you download, load and run open-weight LLMs on your own hardware. Think of it as a “local ChatGPT” that runs entirely on your machine.
Key things LM Studio does:
- Browse and download models from Hugging Face (a public model repository): models like Qwen 3, Llama 3, Gemma 3, Phi-4 and hundreds more
- Chat with models through a built-in chat interface, just like ChatGPT, but running on your hardware
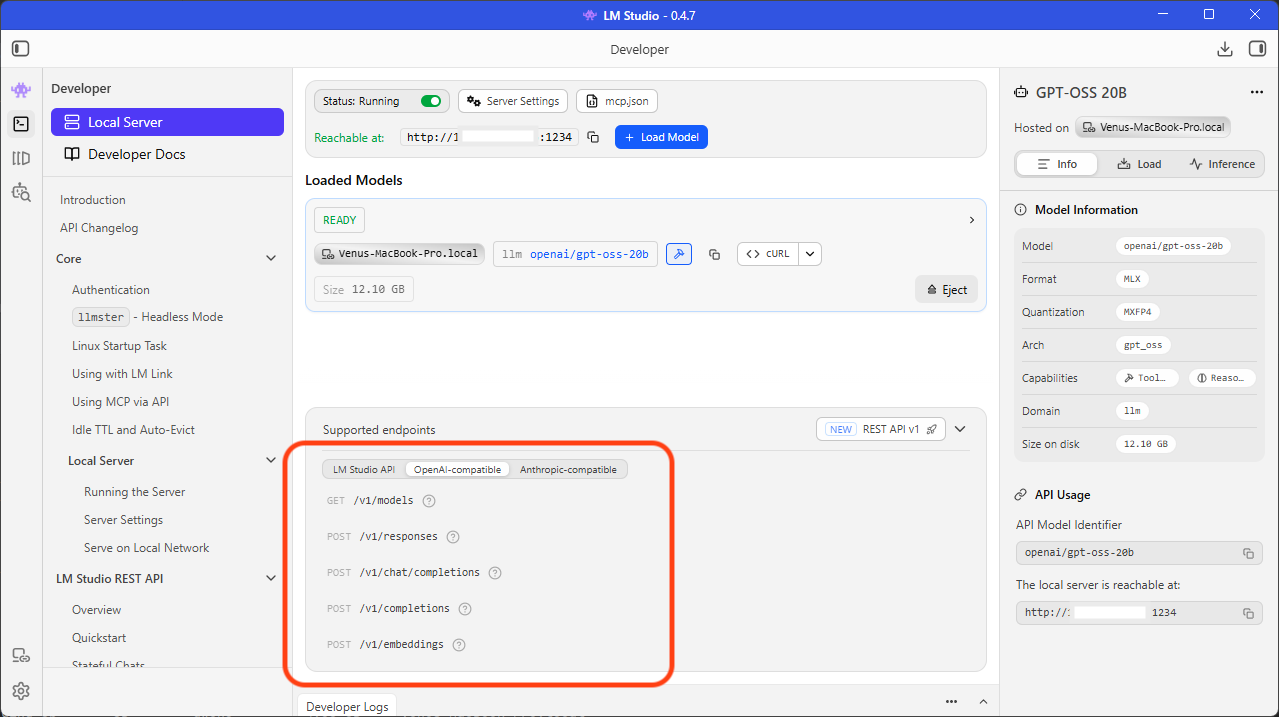
- Serve models as an API: LM Studio runs a local web server at http://localhost:1234 that speaks the same language as the OpenAI API. Any code that works with OpenAI’s API works with LM Studio by changing one URL.
This is important: LM Studio turns your computer into an AI server. Any program, Python, JavaScript, C#, R, cURL, anything, can send a question to http://localhost:1234/v1 and get an AI response back. No cloud. No API keys. No cost per token.
What Is Tailscale?
Tailscale is a networking tool that creates a private, encrypted network between your devices, even when they are on completely different networks, behind firewalls or in different cities.
Normally, if you want two computers to talk to each other over the internet, you need to deal with:
- Port forwarding: opening holes in your router’s firewall
- Public IP addresses: which most home internet connections don’t have (or they change)
- VPN setup: traditionally complex and error-prone
Tailscale handles all of this automatically using a protocol called WireGuard, which is one of the most secure and efficient VPN protocols available. Your devices get private IP addresses (like `localhost`) and can talk to each other directly, as if they were on the same local network.
You don’t need to install Tailscale separately. LM Studio Link has Tailscale’s technology built in.
What Is LM Link?
LM Link (https://lmstudio.ai/link) is a feature inside LM Studio that uses Tailscale’s technology to create a private, encrypted connection between your devices. Once enabled:
- The host machine (my Mac) runs LM Studio with models loaded and serves them
- The client machine (my Dell) runs LM Studio and sees those remote models as if they were local
- All communication is end-to-end encrypted: nobody, not even Tailscale or LM Studio’s servers, can see your data
- No ports are opened, no public IP is needed, no firewall rules need to change
Here is a simple diagram of how it works:
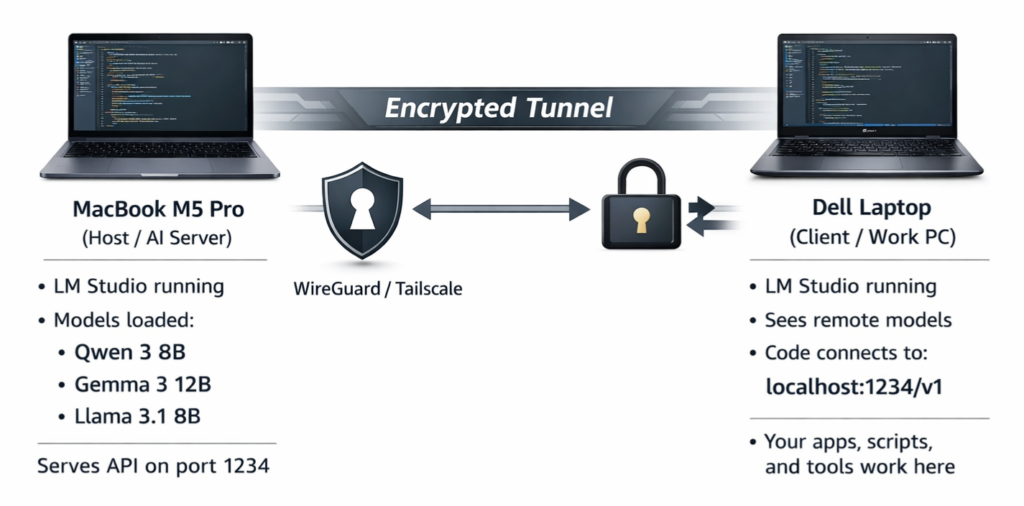
The Mac does the heavy lifting (running the AI model). The Dell sends questions and receives answers. The tunnel between them is private and secure.
Part 2: Setting Up LM Link Step by Step
Prerequisites
- LM Studio 0.4.6 or later installed on both machines
- An LM Studio account (free, sign up at lmstudio.ai)
- LM Link access: currently in beta preview, request at lmstudio.ai/link
- Both machines connected to the internet (they do NOT need to be on the same Wi-Fi network)
Step 1: Install LM Studio on the Mac (Host)
- Go to lmstudio.ai and download LM Studio for macOS
- Install and open it
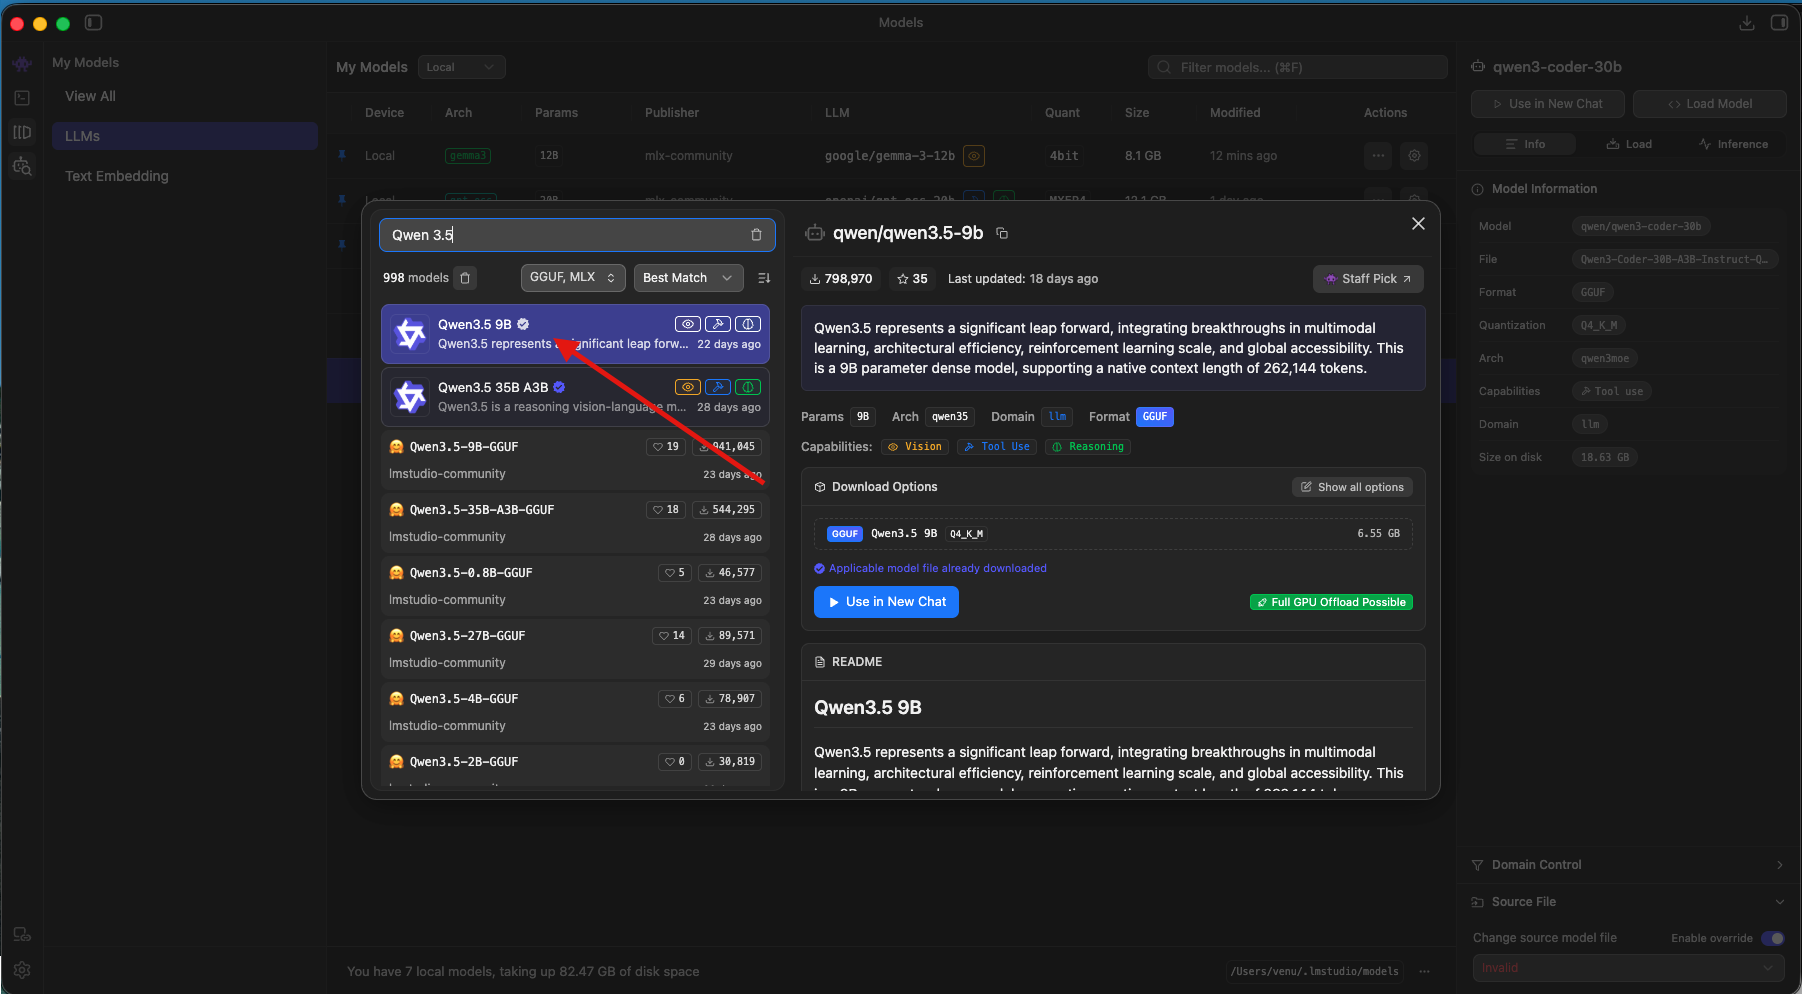
- Download at least one model: I recommend starting with Qwen 3.5-9B or Gemma 3 12B, which run well within 24GB of memory. Use the built-in search to find and download them from Hugging Face.
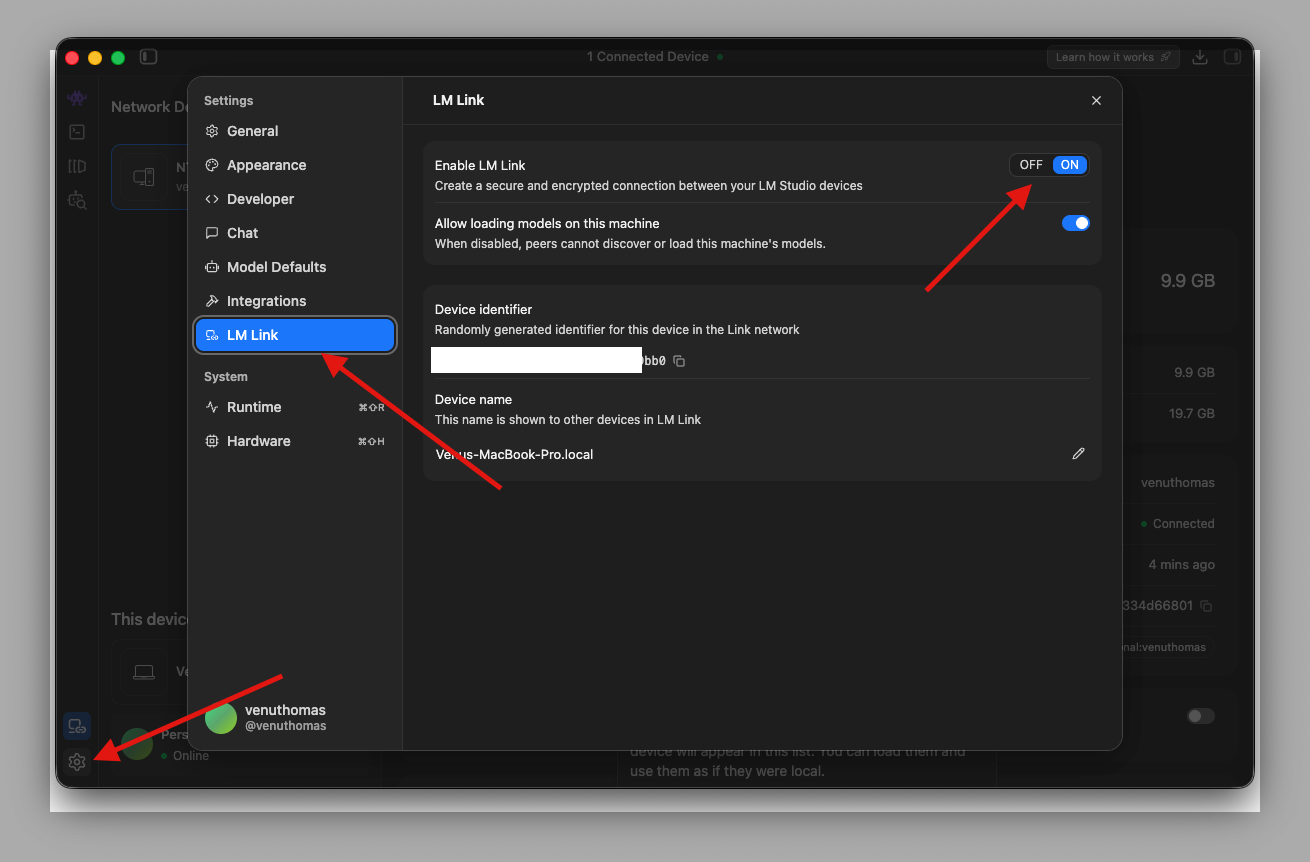
Step 2: Enable LM Link on the Mac
This is the step that turns your Mac into a remote AI server.
Option A: Using the GUI
- In LM Studio, find the LM Link section (look for a link/chain icon in the sidebar)
- Click “Login & Request Access“
- Sign in with your LM Studio account (Google, GitHub or email)
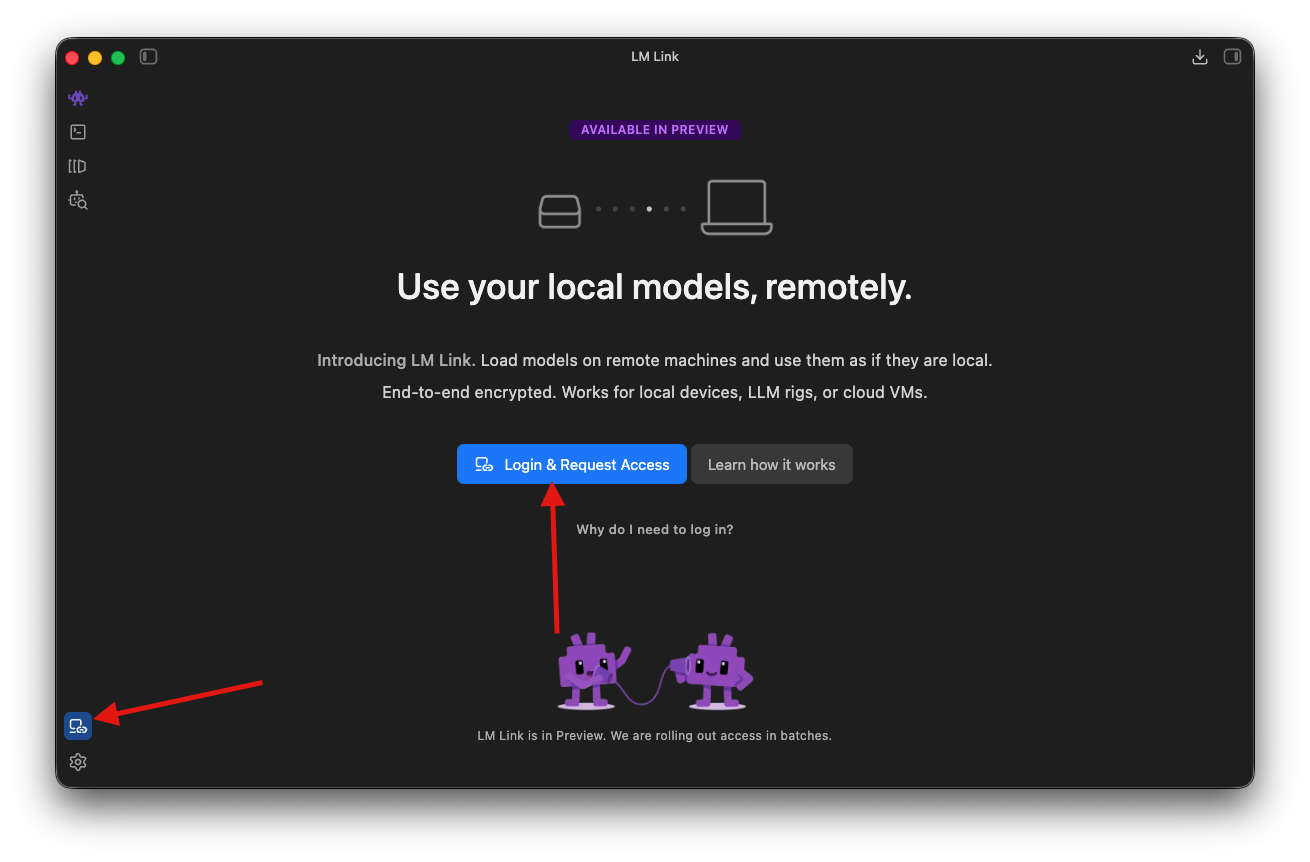
Done, the Mac is now a Link host!
Later, We can disable or enable LM Link through Settings, as shown in the screenshot below.
Option B: Using the Terminal (CLI)
Open Terminal on the Mac and run:
What these commands do:
- lms login: authenticates your identity. LM Link uses this to know which devices belong to you. Only devices logged in to the same account can see each other.
- lms link enable: starts the Link service. This activates the built-in Tailscale networking layer, assigns a private IP to your Mac (like `localhost`) and makes the Mac’s loaded models visible to other linked devices.
After running these commands, your Mac is serving models and waiting for connections. No ports were opened. No firewall rules changed. Tailscale’s technology handles the networking automatically.
Step 3: Install LM Studio on the Dell (Client)
- Go to lmstudio.ai and download LM Studio for Windows
- Install and open it
- You do NOT need to download any models on the Dell, you will use models from the Mac remotely
Step 4: Connect the Dell to the Mac via LM Link
- In LM Studio on the Dell, go to the LM Link section
- Log in with the same LM Studio account you used on the Mac
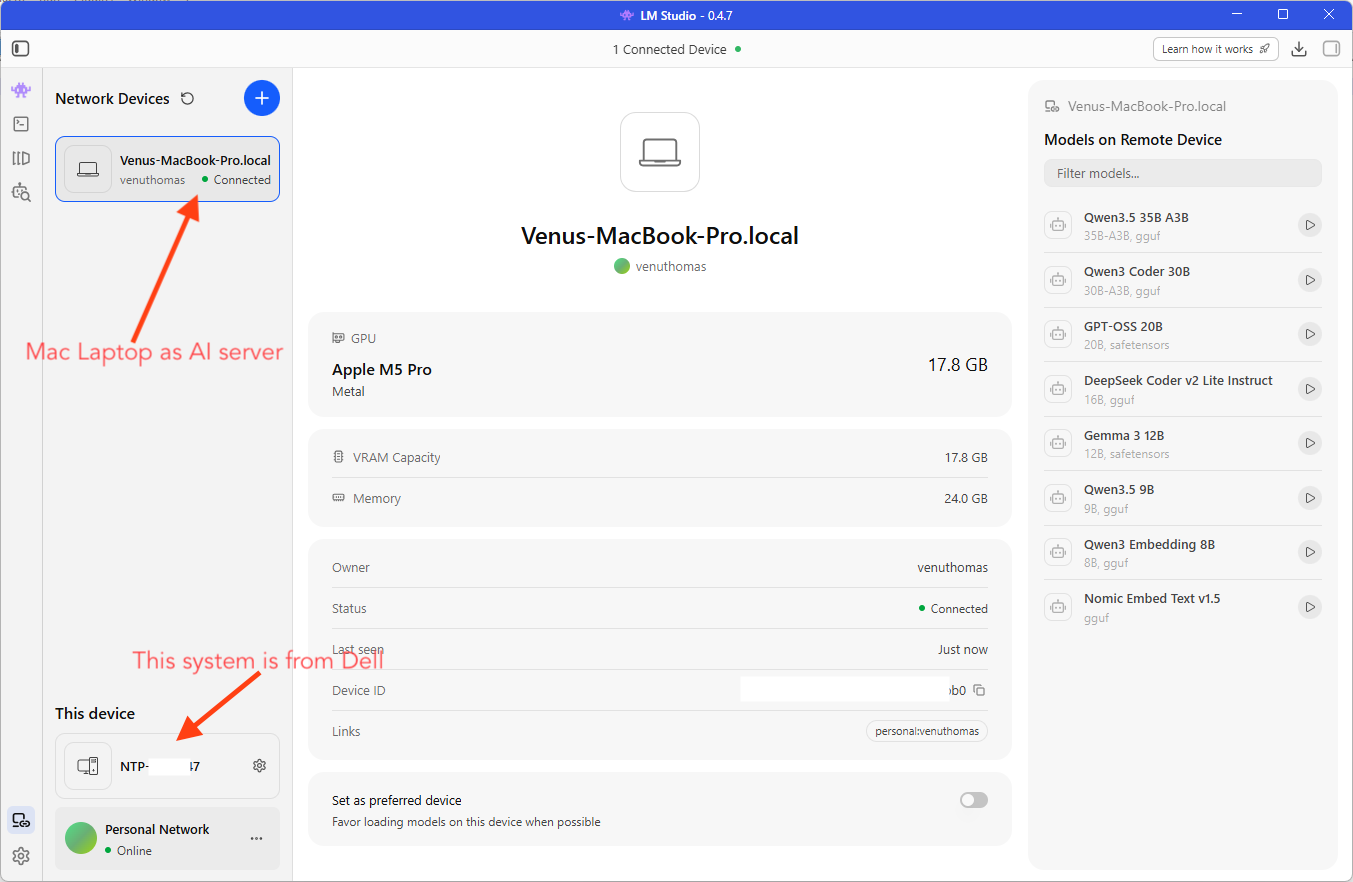
- Your MacBook Pro should appear under “Network Devices” within a few seconds
- You will see a list of models available on the Mac, identified by a small link icon next to the model name
That’s it. The Dell and Mac are now connected over an encrypted tunnel. The Dell can see and use any model loaded on the Mac.
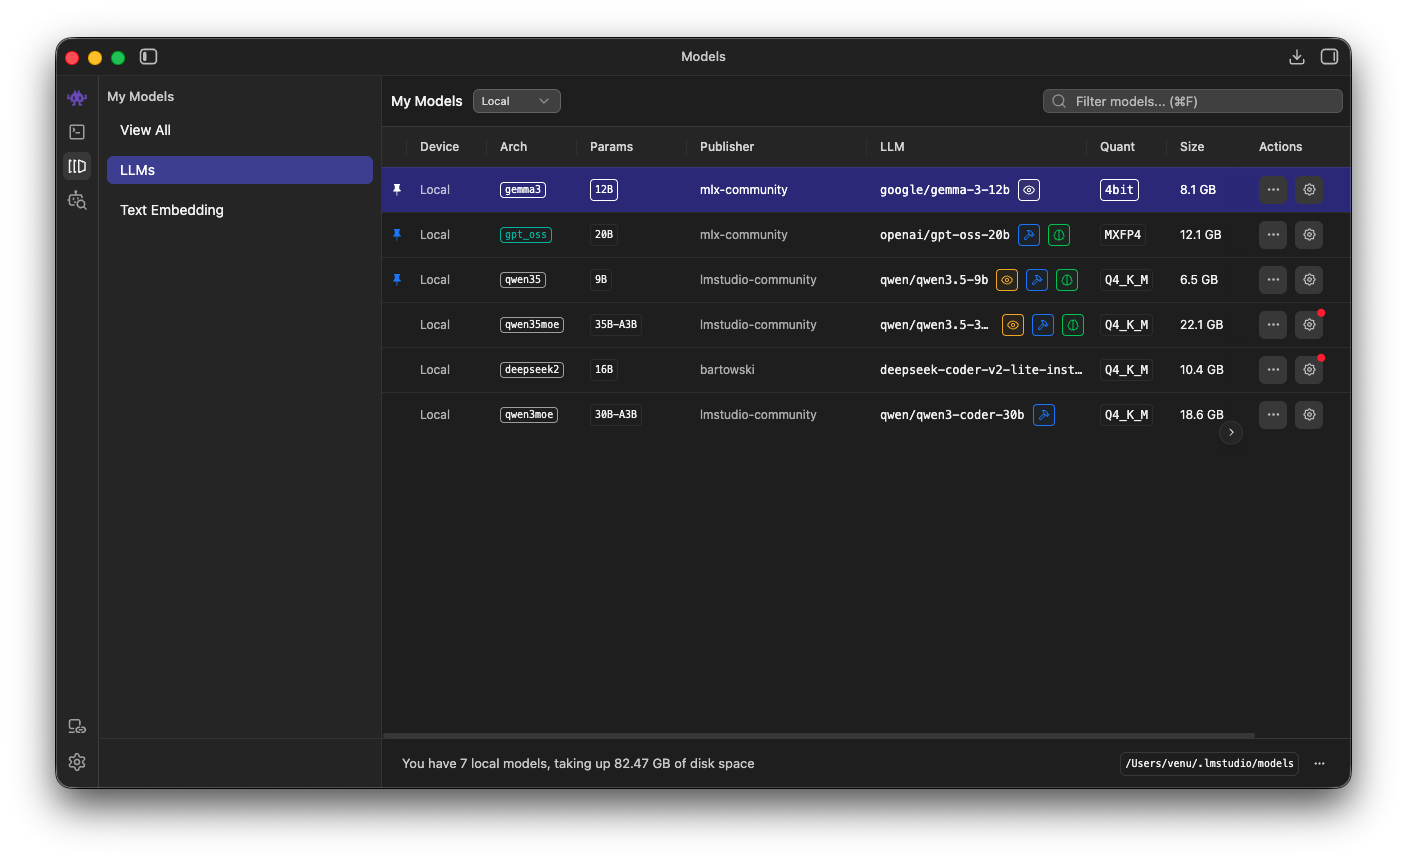
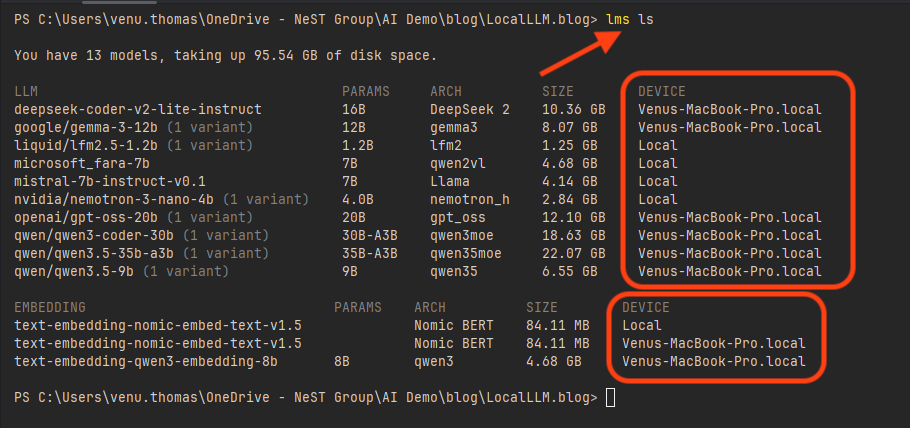
We can also use the lms ls command to see all models on all devices. (I had already downloaded models on my Dell laptop earlier for another task.)
Step 5: Load a Remote Model and Start Chatting
- In the LM Studio model loader on the Dell, select a model from the Mac (e.g., Qwen 3.5-9B or GPT-OSS-20B)
- Click Load — the model loads into memory on the Mac, not on the Dell
- Open the Chat tab and start typing — for example: “What is the capital of Kerala?”
- The response comes back: “Thiruvananthapuram (also known as Trivandrum) is the capital of Kerala.”
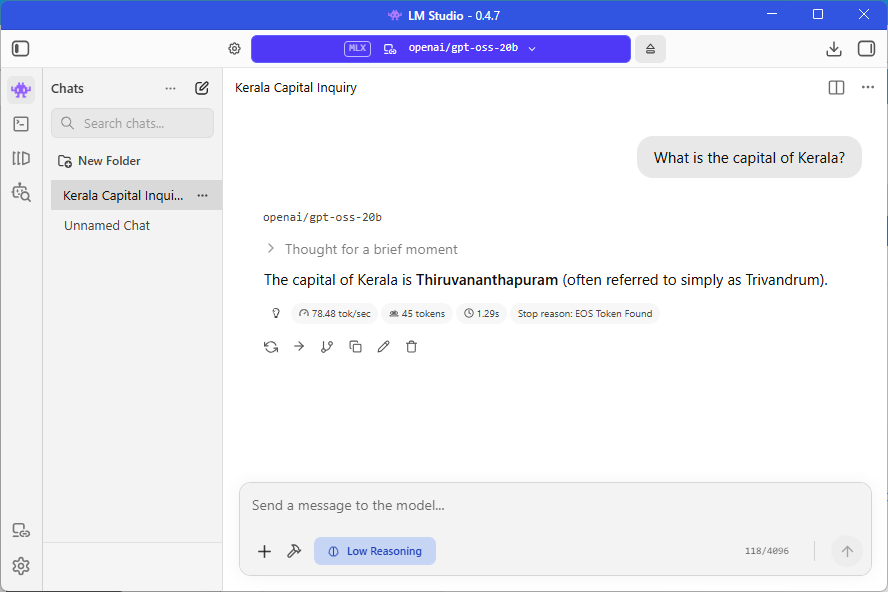
The chat feels instant. The response appears just like it would if the model were running locally on the Dell. But behind the scenes, your question traveled over an encrypted tunnel to the Mac, the Mac’s M5 Pro chip processed it and the answer came back through the same tunnel.
Key detail: Your conversations are stored locally on the Dell. Only the inference (the actual AI computation) happens on the Mac. Your chat history never leaves the Dell’s disk.
Part 3: Accessing the Remote Model from Code — The Developer API
This is where LM Studio Link becomes a serious development tool.
When LM Studio runs on the Mac with a model loaded, it serves an OpenAI-compatible REST API. The endpoint is:
http://localhost:1234/v1
Note: localhost is the Tailscale private IP assigned to my Mac. Your IP will be different. Check the LM Link section in LM Studio to find your host’s IP address. If both machines are on the same local network, you can also use the Mac’s local IP address.
What Does “OpenAI-compatible” Mean?
It means any code written for the OpenAI API (ChatGPT, GPT-4, etc.) works with LM Studio by changing just the URL. The request format, the response format, the libraries, everything is the same. This is a huge advantage because thousands of tools, libraries and frameworks already support the OpenAI API format.
The api_key parameter is required by most libraries, but LM Studio does not validate it. You can pass any string: “lm-studio“, “not-needed“, “any-text“. It doesn’t matter. It’s just there to satisfy the library’s requirements.
JavaScript / Node.js Console Example
Prerequisites: Initialize a project and install the OpenAI library:
npm init -y
npm install openai
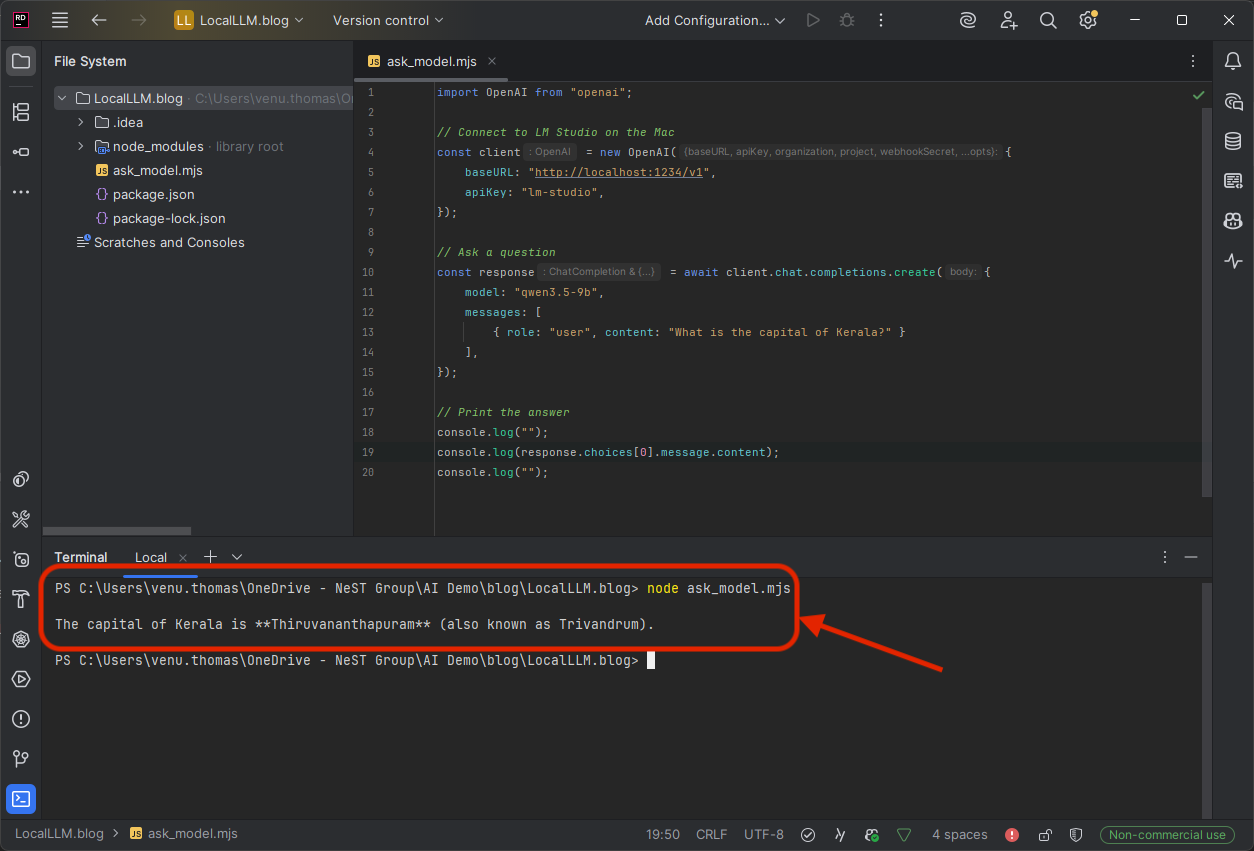
Code — save as ask_model.mjs:
import OpenAI from "openai";

// Connect to LM Studio on the Mac
const client = new OpenAI({
  baseURL: "http://localhost:1234/v1",
  apiKey: "lm-studio",
});

// Ask a question
const response = await client.chat.completions.create({
  model: "qwen3.5-9b",
  messages: [
    { role: "user", content: "What is the capital of Kerala?" }
  ],
});

// Print the answer
console.log(response.choices[0].message.content);
Run it from the Dell’s terminal:
node ask_model.mjs
Expected output:
The capital of Kerala is Thiruvananthapuram (also known as Trivandrum).That's it. Three lines of meaningful code. The question traveled from the Dell to the Mac over an encrypted tunnel, the Mac's M5 Pro processed it using the loaded model and the answer came back. No cloud involved. Zero cost.
C# / .NET Console Example
Prerequisites: Create a new console project and add the OpenAI NuGet package:
dotnet new console -n AskModel
cd AskModel
dotnet add package OpenAI

Code : replace Program.cs:
using OpenAI;
using OpenAI.Chat;

// Connect to LM Studio running on the Mac via the encrypted tunnel
var client = new ChatClient(
    model: "qwen3.5-9b",
    credential: new ApiKeyCredential("lm-studio"),
    options: new OpenAIClientOptions
    {
        Endpoint = new Uri("http://localhost:1234/v1")
    }
);

// Ask a question
var response = await client.CompleteChatAsync(
    new ChatMessage[]
    {
        new UserChatMessage("What is the capital of Kerala?")
    }
);

// Print the answer
Console.WriteLine(response.Value.Content[0].Text);
Run it from the Dell’s terminal:
dotnet run
cURL Example (Works from Any Terminal)
You don’t even need a programming language. From any terminal on the Dell:
curl http://localhost:1234/v1/chat/completions ^
  -H "Content-Type: application/json" ^
  -H "Authorization: Bearer lm-studio" ^
  -d "{\"model\": \"qwen3.5-9b\", \"messages\": [{\"role\": \"user\", \"content\": \"What is the capital of Kerala?\"}]}"
Note: The ^ character is the line continuation for Windows Command Prompt. Use \ on Mac/Linux terminals or write the entire command on one line.
The Pattern Is Always the Same
No matter what language you use, the pattern is identical:
- Set the base URL to http://localhost:1234/v1
- Set the API key to “lm-studio” (or any string, it’s not validated)
- Specify the model name (whatever is loaded on the Mac)
- Send your message and get a response
If your code already works with OpenAI’s API, the only change is the URL.
Part 4: RAG with Embeddings — Make Your AI Answer from Your Own Documents
So far, every example asks the model a general knowledge question. “What is the capital of Kerala?” The model already knows the answer from its training data.
But what if you want the model to answer questions about your own files, your notes, your company docs, your research papers? The model has never seen those. It will either guess wrong or make something up (hallucinate).
This is the problem RAG (Retrieval-Augmented Generation) solves.
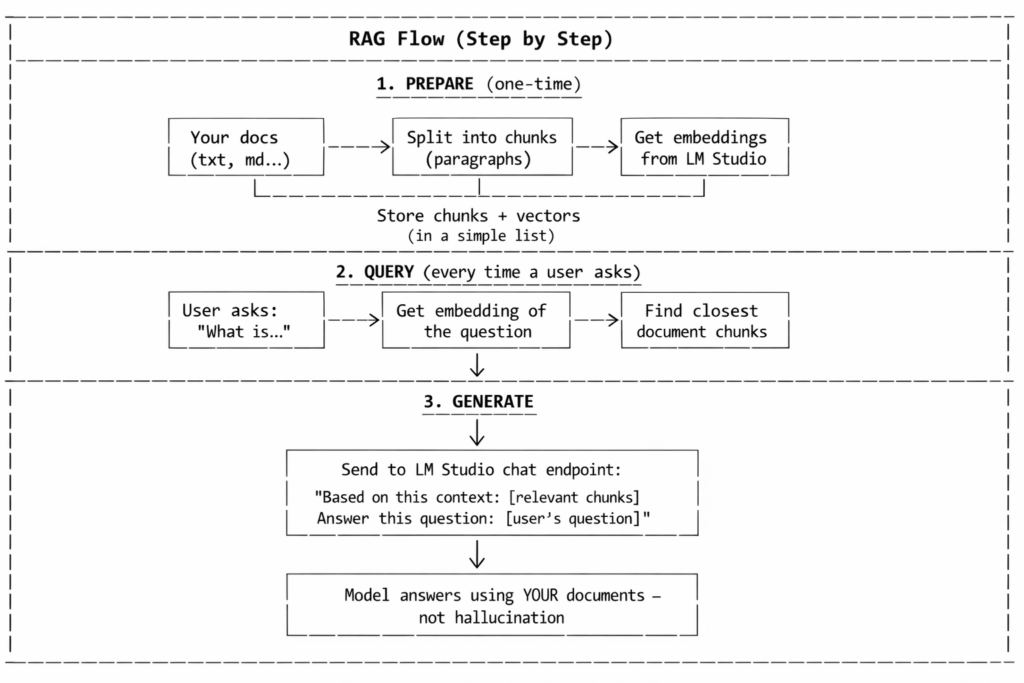
What Is RAG? (Simple Explanation)
RAG is a two-step pattern:
- Retrieve: find the most relevant pieces of your documents that relate to the user’s question
- Generate: send those pieces to the AI model along with the question, so the model answers based on your actual data
Think of it like this: instead of asking a student to answer from memory, you hand them the relevant pages from the textbook and say “answer based on this.“
What Is RAG Used For?
RAG is everywhere in modern AI applications. Here are real-world examples:
| Use Case | How RAG Helps |
|---|---|
| Chatbots for your company | A customer asks about your product’s return policy. The AI searches your internal docs and answers based on the actual policy, not a guess. |
| Searching legal or medical documents | A lawyer asks “What does clause 7.3 say about liability?” RAG finds the exact clause and summarizes it. |
| Personal knowledge base | You feed your own notes, bookmarks and research papers. Ask “What did I read about Kubernetes networking?” and get an answer from your own files. |
| News and current events | AI models are trained on old data. Feed them today’s news and they can answer questions about events they were never trained on. |
| Customer support | An AI agent searches your FAQ, help docs and ticket history to answer support questions accurately instead of making things up. |
| Code documentation | Point RAG at your codebase or API docs. Ask “How does the authentication middleware work?” and get an answer grounded in your actual code. |
| Education and studying | Upload your textbook chapters. Ask questions about specific topics and get answers sourced from the material, like a study buddy that actually read the book. |
The pattern is always the same: you have documents the AI has never seen. RAG lets the AI answer questions about them accurately.
What Are Embeddings?
Embeddings are the trick that makes the “Retrieve” step work.
An embedding is a list of numbers (a vector) that represents the meaning of a piece of text. Similar texts get similar numbers.
For example:
| Text | Embedding (simplified) |
|---|---|
| “Kerala is a state in India” | [0.12, 0.85, 0.33, ...] |
| “Thiruvananthapuram is the capital of Kerala” | [0.14, 0.82, 0.35, ...] (very close!) |
| “How to bake chocolate cake” | [0.91, 0.05, 0.72, ...] (very different) |
When a user asks a question, you convert the question into an embedding too, then find which document chunks have the closest embeddings. Those are your most relevant chunks.
LM Studio serves an embeddings endpoint, just like OpenAI’s POST /v1/embeddings, so you can generate these vectors using a model running on your Mac.
How the Full RAG Flow Works
Loading an Embedding Model in LM Studio
Before running the code, you need an embedding model loaded on the Mac in LM Studio. Embedding models are small and fast, they don’t generate text, they just convert text into vectors.
Good options:
| Model | Size | Notes |
|---|---|---|
| Qwen3-Embedding-8B | ~8 GB | High quality, same Qwen family as the chat model, excellent multilingual support |
| nomic-embed-text | ~270 MB | Fast, popular, good for quick experiments |
| mxbai-embed-large | ~670 MB | Mid-range quality, still small |
I use Qwen3-Embedding-8B because it pairs naturally with the Qwen 3.5 chat model, produces high-quality vectors and the Mac’s 24GB unified memory can comfortably hold both the 8B embedding model and the 9B chat model at the same time, with plenty of room to spare.
In LM Studio on the Mac:
- Search for an embedding model (e.g., text-embedding-qwen3-embedding-8b)
- Download it
- Load it. LM Studio can serve both a chat model and an embedding model at the same time
The embedding endpoint is:
POST http://localhost:1234/v1/embeddings
Why 2026 News? — The Perfect RAG Use Case
Here’s the thing: most AI models were trained on data up to 2024 or early 2025. Ask the model “Who won the 2026 T20 World Cup?” and it will either hallucinate an answer or say it doesn’t know. The model has no knowledge of 2026 events.
But if you feed it a few short news snippets as context, using RAG, it can answer accurately. This is the real power of RAG: giving the model knowledge it was never trained on.
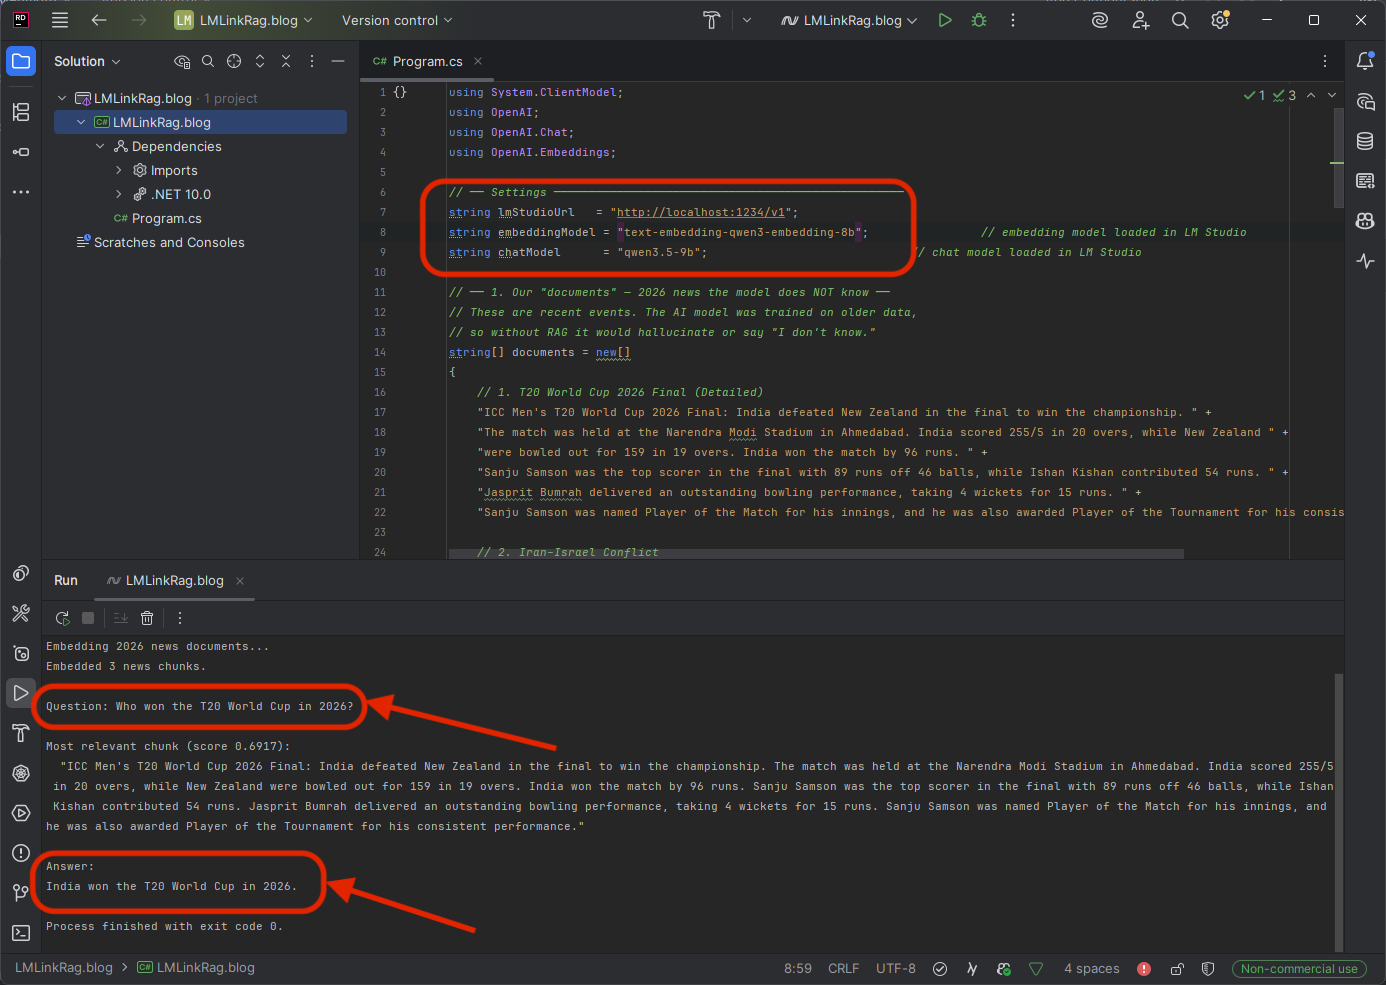
.NET Console Example — Simple RAG with 2026 News
This is a complete, easy-to-follow .NET console app. No vector database needed, just a simple in-memory list. Perfect for learning.
What this example does:
- Defines a few 2026 news snippets (the model doesn’t know about these events)
- Converts each snippet into an embedding using LM Studio
- When you ask a question, it finds the most relevant snippet
- Sends that snippet + your question to the chat model for a grounded answer
Prerequisites:
dotnet new console -n SimpleRag
cd SimpleRag
dotnet add package OpenAI
Code — replace Program.cs:
using System.ClientModel;
using OpenAI;
using OpenAI.Chat;
using OpenAI.Embeddings;

// ── Settings ──────────────────────────────────────────────────
string lmStudioUrl   = "http://localhost:1234/v1";
string embeddingModel = "text-embedding-qwen3-embedding-8b";                // embedding model loaded in LM Studio
string chatModel      = "qwen3.5-9b";                             // chat model loaded in LM Studio

// ── 1. Our "documents" — 2026 news the model does NOT know ──
// These are recent events. The AI model was trained on older data,
// so without RAG it would hallucinate or say "I don't know."
string[] documents = new[]
{
    // 1. T20 World Cup 2026 Final (Detailed)
    "ICC Men's T20 World Cup 2026 Final: India defeated New Zealand in the final to win the championship. " +
    "The match was held at the Narendra Modi Stadium in Ahmedabad. India scored 255/5 in 20 overs, while New Zealand " +
    "were bowled out for 159 in 19 overs. India won the match by 96 runs. " +
    "Sanju Samson was the top scorer in the final with 89 runs off 46 balls, while Ishan Kishan contributed 54 runs. " +
    "Jasprit Bumrah delivered an outstanding bowling performance, taking 4 wickets for 15 runs. " +
    "Sanju Samson was named Player of the Match for his innings, and he was also awarded Player of the Tournament for his consistent performance.",

    // 2. Iran–Israel Conflict
    "Iran–Israel Conflict 2026 Detailed: In early 2026, tensions between Iran and Israel escalated into direct confrontation " +
    "involving missile strikes, drone warfare, and cyber attacks. The conflict significantly impacted global energy markets, " +
    "especially oil and gas supply routes through the Strait of Hormuz. Several countries, including the United States, urged " +
    "de-escalation while increasing military readiness. The conflict also contributed to rising global fuel prices and economic uncertainty. " +
    "The situation remains volatile with ongoing diplomatic negotiations.",

    // 3. Kerala Assembly Election 2026
    "Kerala Assembly Election 2026 Full Schedule: The Election Commission of India announced the election schedule in March 2026. " +
    "Notification was issued on 16 March 2026. The last date for nominations was 23 March, with scrutiny on 24 March. " +
    "The last date for withdrawal was 26 March. Voting will be conducted on 9 April 2026 in a single phase. " +
    "The counting of votes and declaration of results will take place on 4 May 2026. " +
    "The main political alliances are the LDF led by CPI(M) and the UDF led by Congress, with the NDA also contesting."
};

// ── 2. Create clients ────────────────────────────────────────
var options = new OpenAIClientOptions { Endpoint = new Uri(lmStudioUrl) };
var credential = new ApiKeyCredential("lm-studio");

var embeddingClient = new EmbeddingClient(embeddingModel, credential, options);
var chatClient      = new ChatClient(chatModel, credential, options);

// ── 3. Embed all documents (one-time preparation) ────────────
Console.WriteLine("Embedding 2026 news documents...");

var docEmbeddings = new List<(string Text, float[] Vector)>();

foreach (string doc in documents)
{
    var result = await embeddingClient.GenerateEmbeddingAsync(doc);
    docEmbeddings.Add((doc, result.Value.ToFloats().ToArray()));
}

Console.WriteLine($"Embedded {docEmbeddings.Count} news chunks.\n");

// ── 4. Ask a question about 2026 ─────────────────────────────
string question = "Who won the T20 World Cup in 2026?";
Console.WriteLine($"Question: {question}\n");

// ── 5. Embed the question ────────────────────────────────────
var questionResult = await embeddingClient.GenerateEmbeddingAsync(question);
float[] questionVector = questionResult.Value.ToFloats().ToArray();

// ── 6. Find the most similar document (cosine similarity) ────
var best = docEmbeddings
    .Select(d => (d.Text, Score: CosineSimilarity(questionVector, d.Vector)))
    .OrderByDescending(d => d.Score)
    .First();

Console.WriteLine($"Most relevant chunk (score {best.Score:F4}):");
Console.WriteLine($"  \"{best.Text}\"\n");

// ── 7. Send question + context to the chat model ─────────────
var chatResponse = await chatClient.CompleteChatAsync(new ChatMessage[]
{
    new SystemChatMessage(
        "Answer the user's question using ONLY the provided context. " +
        "If the context does not contain the answer, say you don't know."),
    new UserChatMessage(
        $"Context:\n{best.Text}\n\nQuestion:\n{question}")
});

Console.WriteLine("Answer:");
Console.WriteLine(chatResponse.Value.Content[0].Text);

// ── Helper: cosine similarity ────────────────────────────────
static float CosineSimilarity(float[] a, float[] b)
{
    float dot = 0, magA = 0, magB = 0;
    for (int i = 0; i < a.Length; i++)
    {
        dot  += a[i] * b[i];
        magA += a[i] * a[i];
        magB += b[i] * b[i];
    }
    return dot / (MathF.Sqrt(magA) * MathF.Sqrt(magB));
}
Run it:
dotnet run
Expected output:
Embedding 2026 news documents...
Embedded 3 news chunks.
Question: Who won the T20 World Cup in 2026?
Most relevant chunk (score 0.6917):
  "ICC Men's T20 World Cup 2026 Final: India defeated New Zealand in
   the final to win the championship. The match was held at the Narendra
   Modi Stadium in Ahmedabad. India scored 255/5 in 20 overs..."
Answer:
India won the T20 World Cup in 2026.
Try other questions! Change the question variable to:
- “When is the Kerala election voting date in 2026?” -> picks the Kerala Assembly Election chunk
- “What is happening between Iran and Israel?” -> picks the Iran–Israel conflict chunk
- “Who was Player of the Match in the T20 World Cup 2026 final?” -> picks the T20 chunk and answers “Sanju Samson”
Without RAG, the model would have no idea about any of these 2026 events. With RAG, it answers accurately every time, because you gave it the context.
What Just Happened — Step by Step
| Step | What the code did | Where it ran |
|---|---|---|
| 1 | Defined 3 detailed 2026 news chunks | Dell (in memory) |
| 2 | Sent each chunk to POST /v1/embeddings. |
Mac (embedding model converted text to vectors) |
| 3 | Stored the vectors alongside the text | Dell (simple list in memory) |
| 4 | User asked “Who won the T20 World Cup in 2026?” | Dell |
| 5 | Sent the question to /v1/embeddings. |
Mac (converted question to vector) |
| 6 | Compared the question vector to all news vectors using cosine similarity | Dell (pure math, no AI needed) |
| 7 | Found the best matching chunk and sent it with the question to /v1/chat/completions. |
Mac (chat model generated the answer) |
| 8 | Printed the grounded answer | Dell |
The model does not know who won the 2026 T20 World Cup from its training data. But because we fed it the relevant news snippet as context, it answered correctly. That’s the entire point of RAG: giving AI knowledge it was never trained on.
Why This Matters
| Without RAG | With RAG |
|---|---|
| Model has no idea about 2026 events | Model answers about T20 World Cup, Kerala elections, Iran–Israel accurately |
| May hallucinate facts it doesn’t know | Grounded in the actual news text you provided |
| Can’t know about private/recent data | Works with any text: news, docs, notes, PDFs |
| One-size-fits-all answers | Answers specific to your context |
Scaling Up
This example uses a simple in-memory list. For real applications:
| Need | Solution |
|---|---|
| Hundreds of documents | Use a vector database like ChromaDB, Qdrant or Milvus |
| Automatic file loading | Read .txt, .md or .pdf files and split them into chunks |
| Better chunk splitting | Split by paragraphs or sentences, with overlap between chunks |
| Multiple relevant chunks | Retrieve top 3–5 chunks instead of just 1 |
But the core pattern is always the same: embed, search, generate. And all of it runs through your Mac’s LM Studio over the encrypted tunnel. No cloud, no cost.
Part 5: Integrating with AI Development Tools
The real power of this setup is that your Dell laptop becomes a gateway to serious AI capabilities, through tools that are already designed to work with OpenAI-compatible endpoints.
OpenClaw
OpenClaw (openclaw.ai) is an open-source AI agent framework that lets you build autonomous agents capable of browsing the web, running code and completing complex multi-step tasks.
Because OpenClaw supports custom OpenAI-compatible endpoints, you can point it at your Mac’s LM Studio server and run agents entirely on your own hardware:
# OpenClaw configuration pointing at your remote Mac
# Place this in your OpenClaw config or pass as environment variables
OPENAI_API_BASE=http://localhost:1234/v1
OPENAI_API_KEY=lm-studio
MODEL_NAME=qwen3.5-9b
With this configuration, OpenClaw agents run on the Dell but use the Mac’s GPU for inference. All data stays on your devices. The agent’s reasoning, web browsing results and task plans never touch a cloud provider.
This is especially valuable for:
- Students building agent projects without paying for API credits
- Researchers who need private, reproducible AI agent experiments
- Developers prototyping autonomous workflows before deciding on a production model
AutoGen Studio
AutoGen Studio (by Microsoft: https://microsoft.github.io/autogen/stable/user-guide/autogenstudio-user-guide/index.html) is a visual interface for building multi-agent AI systems. Multiple AI agents collaborate to solve problems. One agent writes code, another reviews it, a third tests it.
AutoGen Studio supports custom model endpoints. To use your Mac’s models:
1. Open AutoGen Studio’s model configuration
2. Add a new model provider with these settings:
| Setting | Value |
|---|---|
| API Base URL | http://localhost:1234/v1 |
| API Key | lm-studio |
| Model Name | qwen3.5-9b (or whatever is loaded on the Mac) |
3. Create your agent workflow, the agents will use the model on the Mac for reasoning
With 24GB on the M5 Pro, you can run models capable enough for multi-agent conversations. A typical AutoGen setup with two agents (a coder and a reviewer) works well with 9B to 14B parameter models, which the Mac handles comfortably.
Part 6: How Tailscale Makes This Secure
If you’re a software engineer or security-conscious developer, you may be wondering: how secure is this, really?
The Encryption
LM Studio Link uses Tailscale’s tsnet library, which implements the WireGuard VPN protocol. WireGuard is:
- Peer-reviewed and audited: it’s a well-established protocol used by millions of users
- End-to-end encrypted: data is encrypted on the sender and decrypted only on the receiver. No one in between, not your ISP, not your Wi-Fi provider, not Tailscale, not LM Studio, can read your prompts or responses
- Minimal attack surface: WireGuard’s codebase is roughly 4,000 lines of code, compared to OpenVPN’s 100,000+. Less code means fewer potential vulnerabilities.
What Tailscale/LM Studio Servers See
Tailscale’s coordination servers handle device discovery only, they help your Mac and Dell find each other. Once connected, all data flows directly between the two devices (peer-to-peer). Tailscale servers never see your AI prompts, model responses or conversation content.
LM Studio’s servers handle account authentication and Link device registration. They do not relay any inference data.
No Open Ports
Traditional remote access requires opening ports on your router (e.g., port forwarding port 1234). This exposes your machine to the entire internet. LM Link never opens any ports. The Tailscale mesh VPN uses a technique called NAT traversal to establish direct connections without any router configuration.
Runs in Userspace
The Tailscale networking layer runs entirely in userspace, it does not modify your system’s global network settings, routing tables or firewall rules. It does not interfere with any existing VPN or Tailscale installation you might already have.
Part 7: Who Is This For?
College Students
- Run AI models for free, no OpenAI subscription, no API credits to manage
- Build projects that use AI (chatbots, summarizers, code generators) without cloud dependencies
- Learn about APIs, networking, encryption and AI inference, all with hands-on experience on your own hardware
Software Engineers
- Replace expensive cloud API calls during development with local inference
- Prototype AI features without committing to a cloud provider
- Keep sensitive code and data off third-party servers
- Use the same OpenAI-compatible API format you already know
Researchers and Data Scientists
- Run reproducible experiments with full control over the model and data
- No data leaves your devices, critical for sensitive datasets
- Switch between models quickly by loading different ones on the host
Small Teams and Startups
- One powerful machine serves the entire team, no need to buy expensive hardware for every developer
- Free for up to 2 users with 5 devices each (10 devices total)
- No ongoing cloud costs, the only expense is the hardware you already own
Pricing and Limits
| Tier | Users | Devices | Cost |
|---|---|---|---|
| Free (Current Preview) | 2 | 5 per user (10 total) | Free |
| Expanded Tiers | TBD | TBD | Pricing coming after preview ends |
LM Studio itself has been free for commercial use since 2025. There is no licensing cost for using LM Studio in professional or enterprise settings.
Things to Keep in Mind
| Consideration | Detail |
|---|---|
| Beta status | LM Link is in preview. Access is being rolled out in batches. Request at lmstudio.ai/link |
| No remote model downloads | You can only use models already downloaded on the host Mac. Download them on the Mac first. |
| Host must be online | If the Mac is off or disconnected, the Dell loses access to remote models. |
| Model loading time | Loading a model into memory on the Mac takes the same time as local loading. The tunnel doesn’t change that. |
| Works across any network | Same Wi-Fi, different networks or different cities — the Tailscale backbone handles it all. |
| Latency | On the same local network, latency is negligible. Across the internet, expect minor but noticeable delays depending on your connection. |
Summary: What We Built
Getting Started — Quick Checklist
- Download LM Studio from lmstudio.ai — install on both machines
- Request LM Link access at lmstudio.ai/link (beta rollout)
- On the Mac: Sign in -> Enable LM Link -> Download and load a model
- On the Dell: Sign in with the same account -> See the Mac appear in Network Devices -> Select and load a remote model
- In your code: Point at http://localhost:1234/v1 and start asking questions
No cloud. No API bills. No data leaving your devices. Just your machines, your models and an encrypted tunnel between them.
If you have any more questions or need further clarification, feel free to ask!