In this tutorial we will create a CRUD (Create, Read, Update, Delete) application with MongoDB & Express as Back-end and ReactJS as Front-end. NodeJS can be used both on the front-end and the back-end.
Node.js
Node.js is an open source Javascript interpreter that works on all operating systems. It is based on the migration of Javascript from the client to the server side. Its objective is to help programmers create highly scalable applications, with codes able to manipulate tens of thousands of simultaneous connections in a single physical machine. Thats wow right? Node.Js is based on Google’s V8 interpreter. To start the project, you need to install it on your system http://nodejs.org/en/download/
Back-end
We will learn how to create a REST API in NodeJS with Express and consuming data from a non-relational MongoDB database. Postman will be used to check our endpoints.
REST architecture: A REST( REpresentational State Transfer) API is an application programming interface that allows, through specific HTTP methods, to create a CRUD in a database. In other words, using HTTP methods, one application can communicate with another using data manipulation. This is very helpful if you have the same database that serves different web apps, mobile apps, etc. Different methods execute different operations. https://restfulapi.net/
Express: This is a framework for Node that allows the development of web applications in a very simple way. https://expressjs.com/
We will use the MongoDB Atlas service for our Database as cloud server. If you want, you can choice any MongoDB service.
Is NodeJS installed and running? Let’s get to the code!
Is everything OK?!
In a folder of your choice, we’ll start the project with npm dependency managers using Terminal on macOS systems, or in the case of Windows, it could be CMD or Poweshell.
Let’s create API project for CRUD Employee for a company.
Returning to the terminal, let’s run the ‘npm init’ command. This command creates the ‘package.json’, a file that will help us handle the dependencies we install later in this tutorial.
npm init
Now we will create our main file, index.js and write the following code inside it:
Execute the following command and you will see the below output in your terminal.
For custom “npm” scripts, you have to edit the package.json file that way:
For this back-end project we will need to install the following modules. It’s quite simple, all we need is to execute code via CLI using npm package manager. express: Framework for Node that allows the development of web applications. body-parser: Package that can be used to manipulate JSON requests. mongoose: Support database. dotenv: Loads environment variables from a .env file into process.env ref: https://www.npmjs.com/package/dotenv
To install these packages you can use the command:
Let’s modify the index.js file, we associate the previously installed dependencies (express and body-parser) and we initialize the application. also add ‘Access Control Allow Origin’ headers
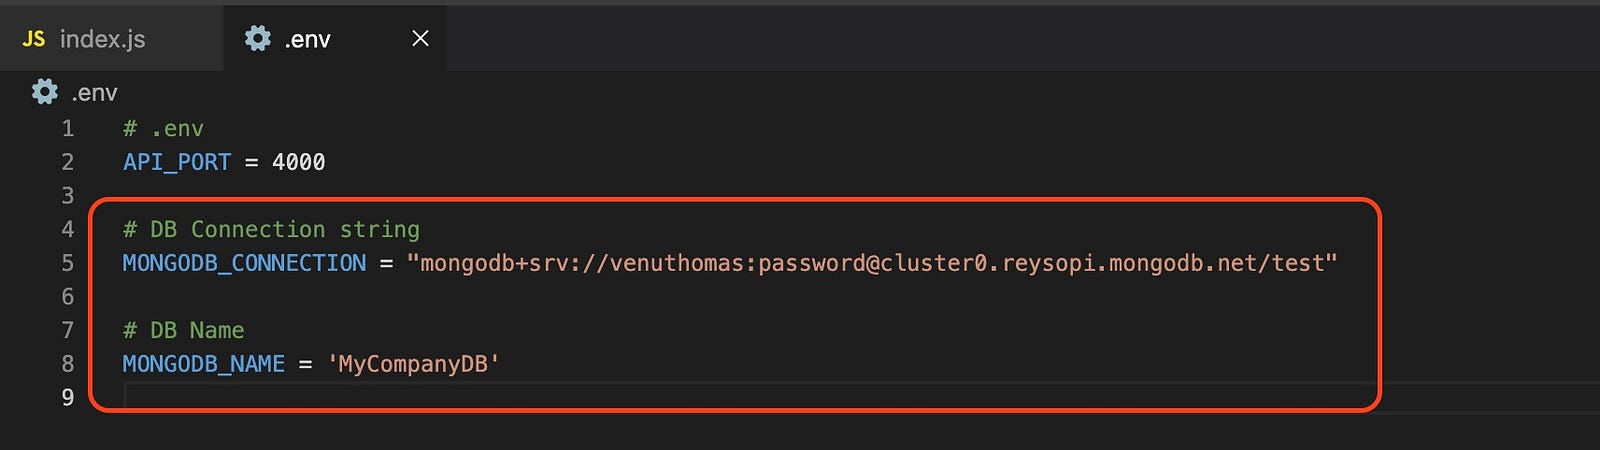
Next, create an .env file in the root directory of your application.
The next step consists of specifying the logical port that will be associated with the server created by Node.js. Let’s consider port 4000. I added the port’s variable and value to the .env file. In JS file, it will look like this: “process.env.API_PORT”
# ~/.env
API_PORT = 4000
We need to make sure that our server and browser can communicate with each other. We can do this with the help of the listen method file provided by ExpressJS. The following code should be added to the index.js file:
let port = process.env.API_PORT;
app.listen(port, () => {
console.log('Server running on port: ' + port);
});
index.js and .env files looks will be like this:
.env
Exec this command npm start, we will access the path localhost:4000 in our browser. You will see the following message:
That’s a good sign. The message “Cannot GET /” means that the browser is communicating with the express server. In the following step, I will explain the GET, POST/DELETE methods and later on the configuration of our database and the codes for running CRUD operations.
Using Express, this request is made with the GET method and can be written as follows:
Note that we include that code above in our index.js file, exec command again npm start. Then, access localhost:4000 in your browser. You must be selling a string that says: Hello World!.
Great!
MongoDB
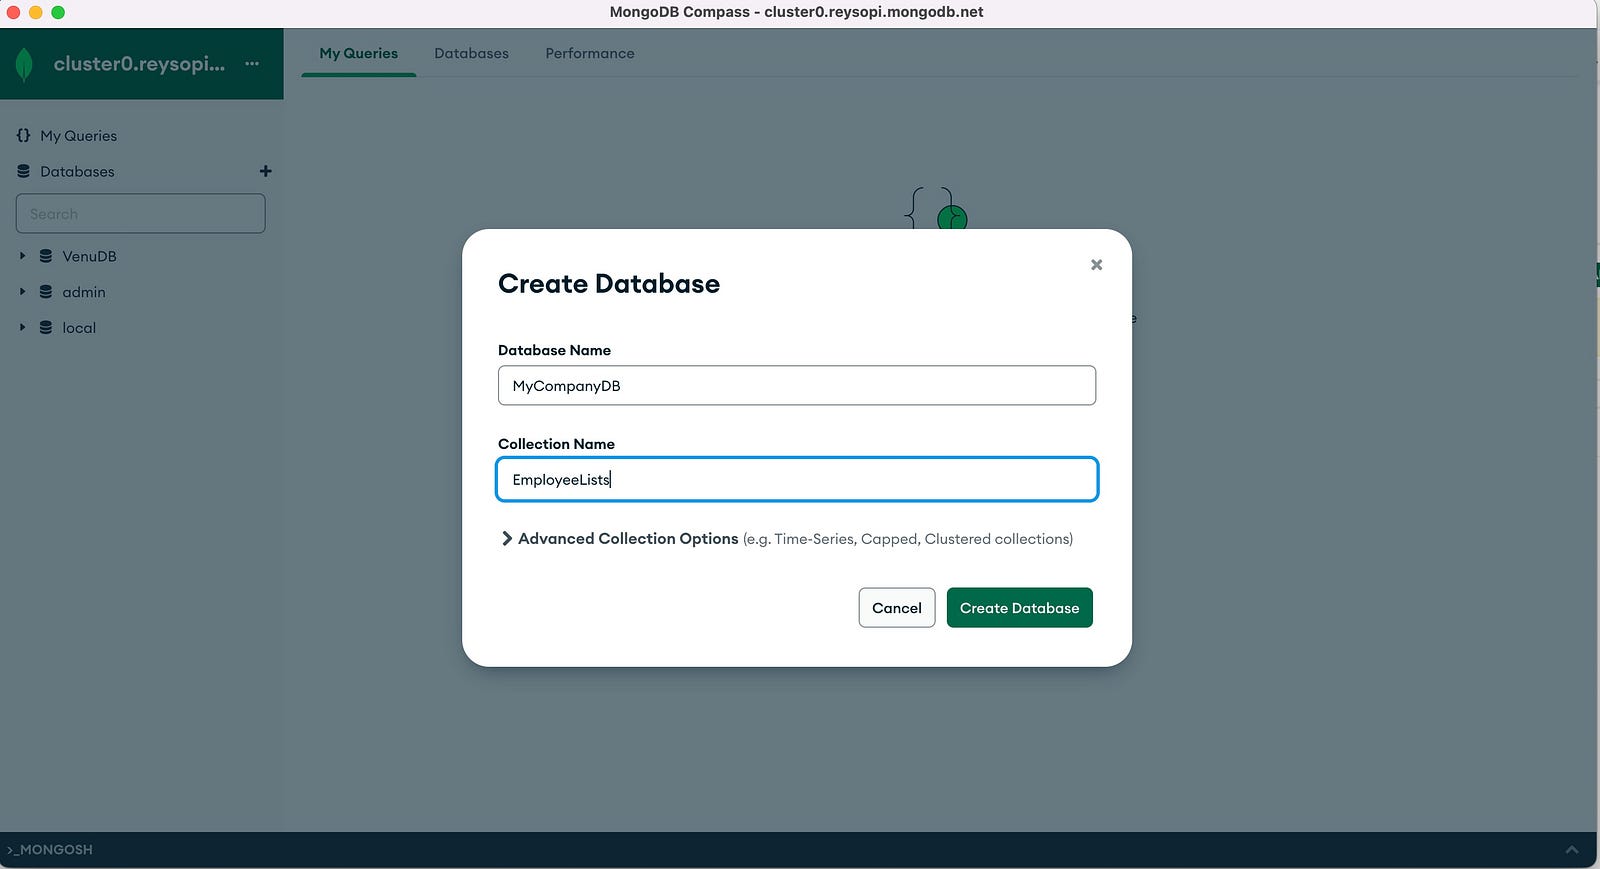
Connect your MongoDB server via MongoDB Compass and set up the database and collection as follows.
Connecting our application to the database is an easy process. Be sure to have the mongoose package installed. For database connection, place the following code into a new file that you need to create. (~/DBConnections/mongoDBConnection.js)
// ~/DBConnections/mongoDBConnection.js // Configure access to the database. const mongoose = require("mongoose"); require("dotenv").config();
Also added environment variables and values to the .env file for MongoDB connect details and database name
# DB Connection string
MONGODB_CONNECTION = ""

# DB Name
MONGODB_NAME = ''
like this.
We should now call it in our index.js to test whether MongoDb is connected or not. For temporary, modify the index.jscode as below. If the database is connected successfully, you can remove these 2 lines of code from the index.js file and we will call from another file. We will see.
Exec command again npm start and make sure that our database is connected successfully.
Great! That message came! (~/DBConnections/mongoDBConnection.js)
So the database is connected successfully, you can remove the added 2 lines of code from the index.js file.
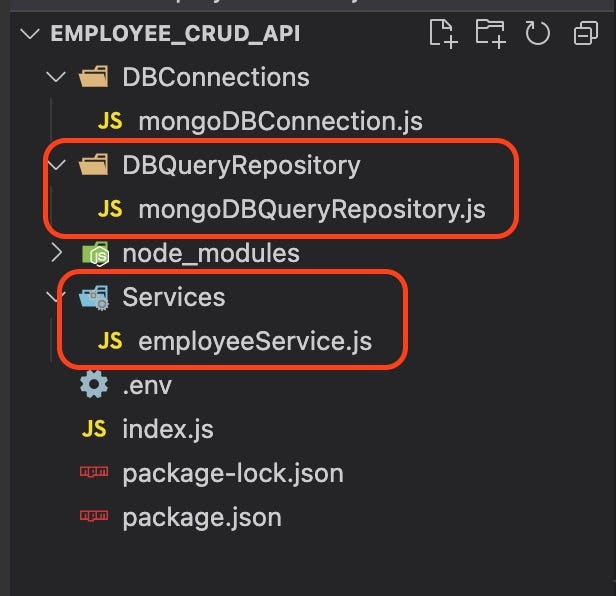
We are now in the latter part of our server configuration. We only need to link our MongoDB Query Repository to our index.js. To do this, create a directory structure as shown below.
Repository and Servies
Place the following code in the mongoDBQueryRepository.js file. In this mongoDBQueryRepository class, we are just connecting to our Mongo Database and we expose some APIs that allow us to do CRUD operations on our database entries.
class mongoDBQueryRepository { constructor(collectionName) { employeeListCollection = connectMongoDB().collection(collectionName); }
// Function to list all data getAllData() { return new Promise((resolve, reject) => { employeeListCollection.find().toArray((err, data) => { if (err) { reject(new Error("Something went wrong!")); } resolve(data); }); }); }
// Function to create a new data createData(opt) { return new Promise((resolve, reject) => { employeeListCollection.insertOne(opt, (err, data) => { if (err) { reject(new Error("Something went wrong!")); } resolve({ msg: "Inserted Successfully." }); }); }); }
// Function to retrieve data from a specific value getDataByID(id) { return new Promise((resolve, reject) => { employeeListCollection.findOne({ _id: ObjectId(id) }, (err, data) => { if (err) { reject(new Error("Something went wrong!")); } resolve(data); }); }); }
// Function to edit a specific data updateDataByID(id, opt) { return new Promise((resolve, reject) => { employeeListCollection.updateOne( { _id: ObjectId(id) }, { $set: opt }, (err, data) => { if (err) { reject(new Error("Something went wrong!")); } resolve({ msg: "Updated Successfully." }); } ); }); }
// Function to exclude a specific data deleteDataByID(id) { return new Promise((resolve, reject) => { employeeListCollection.deleteOne({ _id: ObjectId(id) }, (err, data) => { if (err) { reject(new Error("Something went wrong!")); } resolve({ msg: "Deleted Successfully." }); }); }); } } module.exports = { mongoDBQueryRepository };
I have posted about MongoDB Commands in my previous post that same thing can be used in NodeJS like find(), findOne(), updateOne(), deleteOne(), insertOne() etc used in above class file. https://medium.com/@VenuThomas/mongodb-commands-2fd93ee6f8e0
Add the collection name to the .env file. Where we store all our “employee” entries.
# Collection name of Employee lists
EMP_COLLECTIONNAME = "EmployeeLists"
Place the following code in the employeeService.js file. Here we use our mongoDBQueryRepository class to instantiate a Repository which is linked to the “EmployeeLists” collection. Note that it is only for a better extensibility of our code and a better abstraction of our data.
// ~/Services/employeeService.js
const {
    mongoDBQueryRepository,
  } = require("../DBQueryRepository/mongoDBQueryRepository");
  let mRespo;
  class EmployeeService {
    constructor() {
      mRespo = new mongoDBQueryRepository(process.env.EMP_COLLECTIONNAME);
    }
    // Function to list the Employee
    getAllEmployeeLists() {
      return mRespo.getAllData();
    }

    // Function to create a new Employee
    createEmp(opt) {
      return mRespo.createData(opt);
    }

    // Function to retrieve data from a specific Employee
    getEmpById(id) {
      return mRespo.getDataByID(id);
    }

    // Function to edit a specific Employee
    updateEmp(id, opt) {
      return mRespo.updateDataByID(id, opt);
    }

    // Function to exclude a specific Employee
    deleteEmp(id) {
      return mRespo.deleteDataByID(id);
    }
  }

  module.exports = { EmployeeService };
Yess! The API is almost done!
Now let’s modify our index.js code so that we connect to EmployeeService. Change the index.js code as follows.
// API to list the Employee app.get("/getEmpList", async (req, res) => { objEmployeeService = new EmployeeService(); const list = await objEmployeeService.getAllEmployeeLists(); res.send(list); });
// API to create a new Employee app.post("/createEmployee", async (req, res) => { objEmployeeService = new EmployeeService(); opt = requestToObject(req) const list = await objEmployeeService.createEmp(opt); res.send(list); });
// API to retrieve data from a specific Employee app.get("/getEmpDetailsByID", async (req, res) => { objEmployeeService = new EmployeeService(); let empID =req.query._id const list = await objEmployeeService.getEmpById(empID); res.send(list); });
// API to edit a specific Employee app.post("/updateEmpDataByID", async (req, res) => { objEmployeeService = new EmployeeService(); opt = requestToObject(req) const list = await objEmployeeService.updateEmp(req.body._id, opt); res.send(list); });
// API to exclude a specific Employee app.delete("/deleteEmpDataByID", async (req, res) => { objEmployeeService = new EmployeeService(); const list = await objEmployeeService.deleteEmp(req.body._id); res.send(list); });
// Function to convert to object from request body function requestToObject(req) { opt = {}; if (req.body.EmpNumber) opt.EmpNumber = req.body.EmpNumber; if (req.body.Name) opt.Name = req.body.Name; if (req.body.Destination) opt.Destination = req.body.Destination; if (req.body.Department) opt.Department = req.body.Department; if (req.body.DateOfJoin) opt.DateOfJoin = req.body.DateOfJoin; if (req.body.DateOfBirth) opt.DateOfBirth = req.body.DateOfBirth; if (req.body.BloodGroup) opt.BloodGroup = req.body.BloodGroup; if (req.body.Address) opt.Address = req.body.Address; if (req.body.PhoneNo) opt.PhoneNo = req.body.PhoneNo; if (req.body.Email) opt.Email = req.body.Email; return opt; }
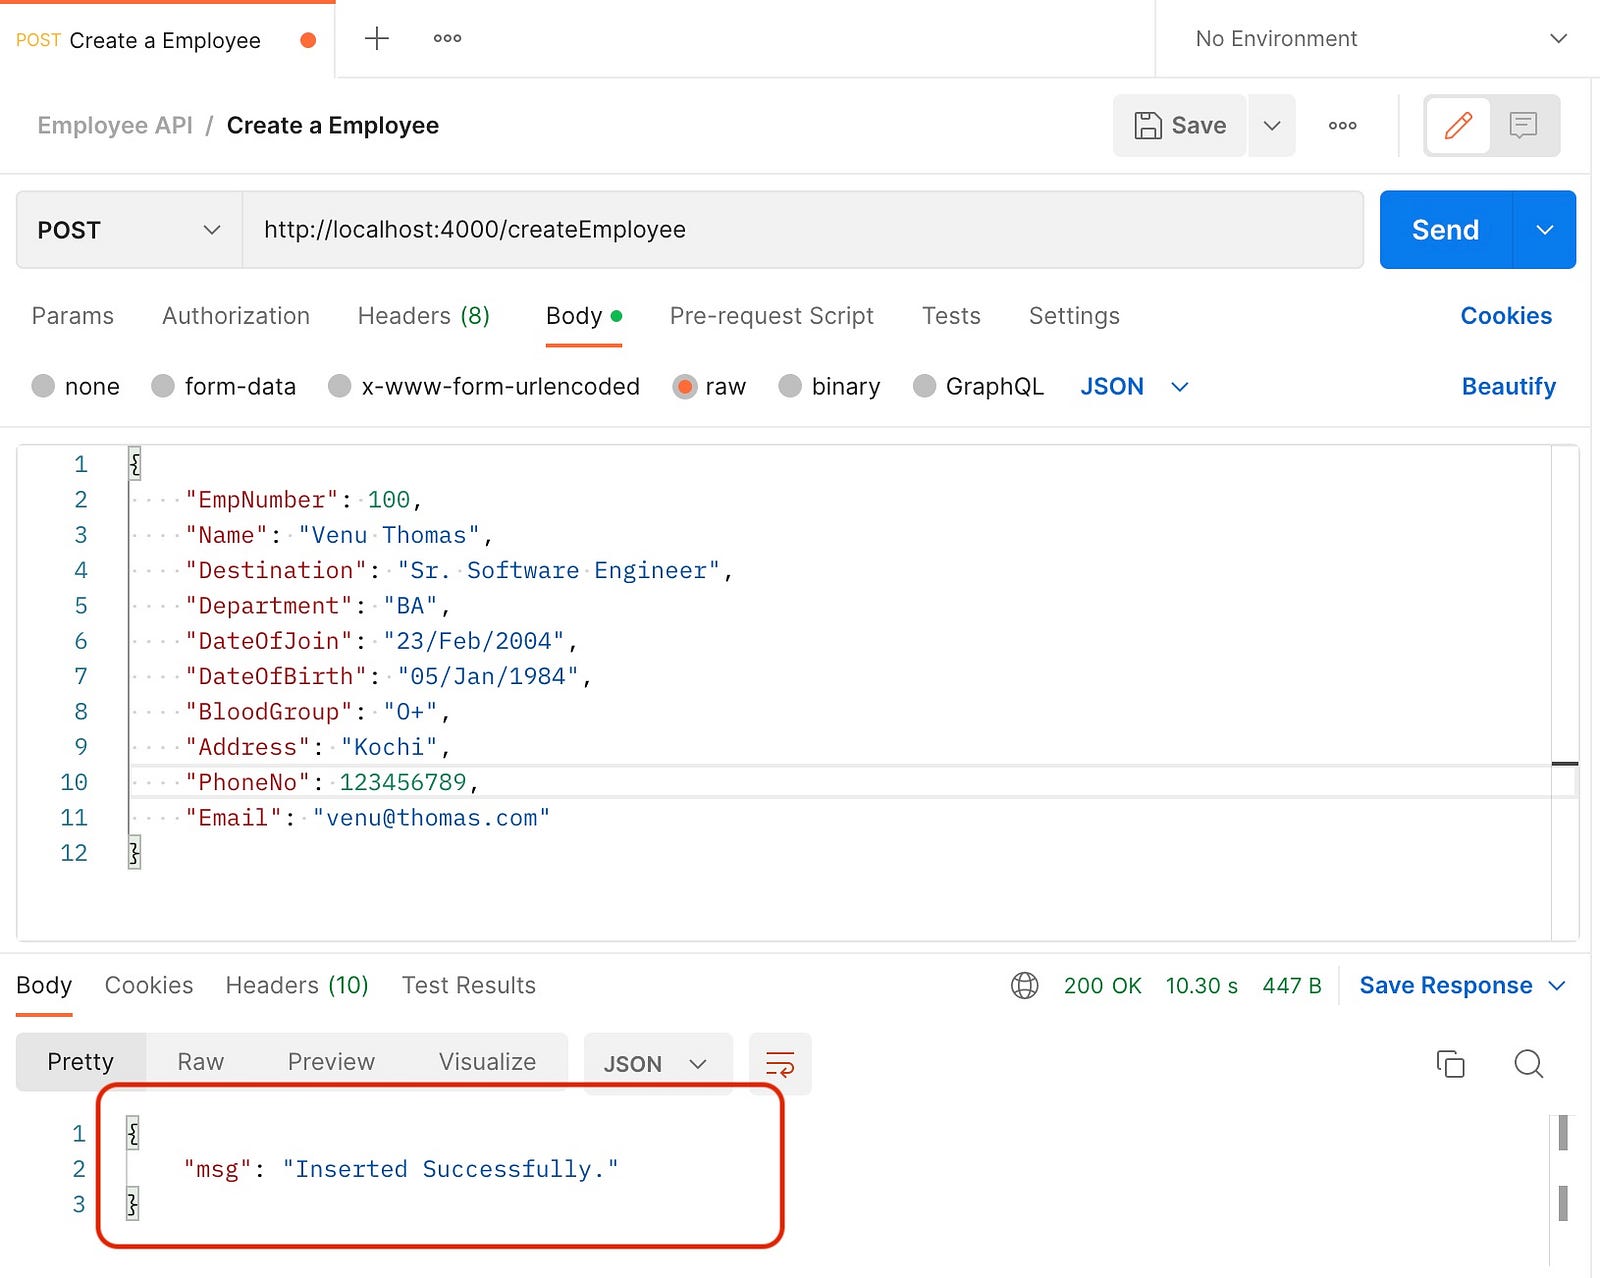
The API is DONE!! Lets to make the requests, you can use Postman. We can create a new request by clicking on the “+” button. There, we chose the query name and chose the method (we will start with createEmployee as POST) and the body selection as JSON. In our body, let’s write the attributes in JSON format, as follows:
Request in Postman
Once this is completed, we will click ‘Send’ to send the request. Voila! , you have entered data into the database and at the bottom you can see the answer.
Response in Postman
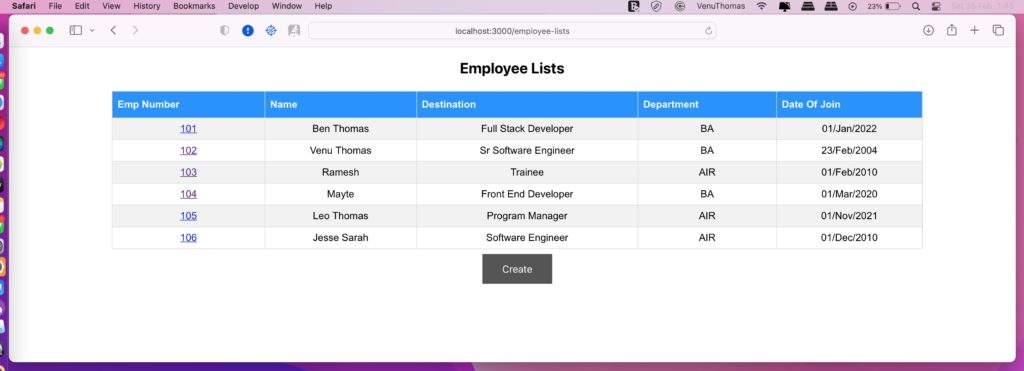
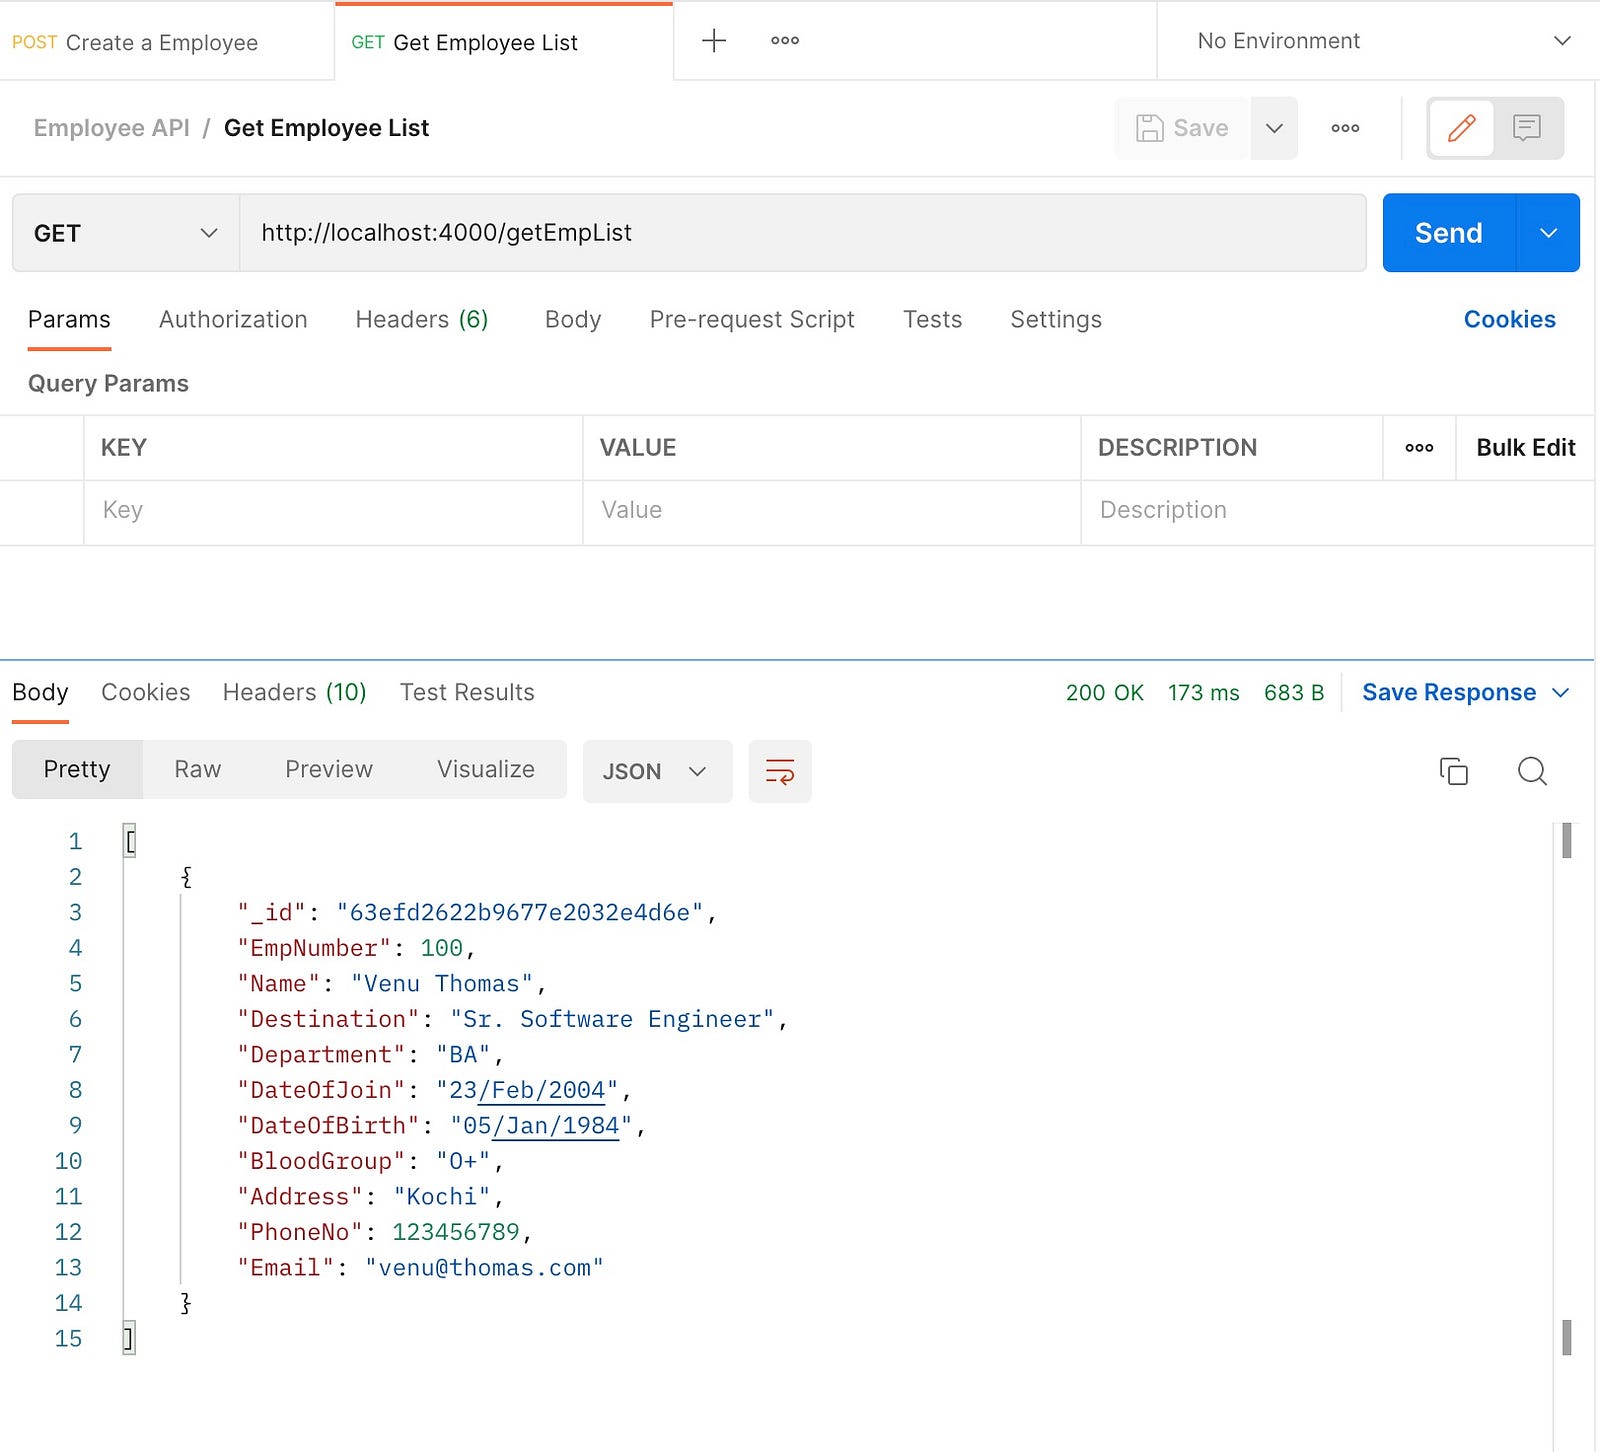
Once this is done, you can test in Postman with getEmpList. It will list the data we have inserted.
Employee List
Congratulations, you have just created your first REST API, using Express and Mongoose.
So, Back-end is done! Hey not over! Lets start Front-end. Take break if you want 😊
Front-End
We will learn how to create a CRUD Web App in NodeJS with ReactJS. React Developer Tools will help us a lot to debug, review or modify the components from the console.
React: It is a Javascript library that belongs to Facebook, and which was designed for the creation of User Interfaces (UI). The main idea when developing an application with React, is to divide the entire UI into small components, these components are small portions of code that have the ability to interact with each other and be reusable throughout the application.
In a folder of your choice(Not the root of the api we create earlier), We will start to create our first App with create-react-app. Exec below command to create React app. I suggest web project name be employee_crud_web
npx create-react-app
NOTE: Whenever we create a project with this command, it will always install the latest release of React and React-DOM, as well as the latest release of react-scripts. Which is a development dependency that will handle any other development dependencies that start, test and compile the application.
We must have something like this:
Now the next step is to go to our folder and there we will run:
cd employee_crud_web
npm start
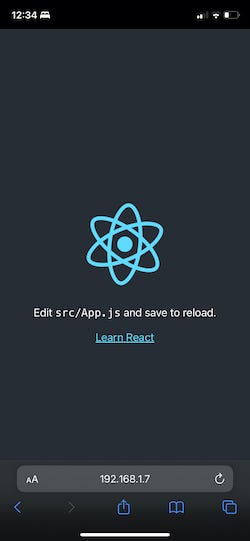
If we were successful, a new window or tab in our browser should be opened and we should see the following:
Now, if we go back to our terminal, we’ll see this:
Here’s an example from an iPhone:
This will give us the opportunity to test our application on various device. And this is how easy it is to create a project using the create-react-app.
Folder Structure
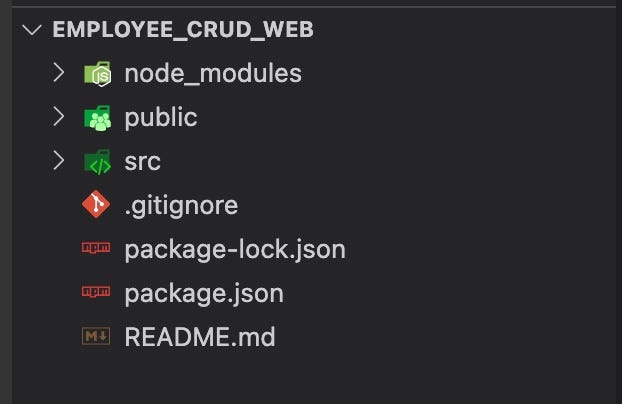
While creating the React app, we can see that we have several folders and files:
Folder structure
Let’s explain what each one is.
node_modules: Where all the dependencies of our project are installed, to see which dependencies you have installed, we can open the package.json file (in the dependencies property)
public: It is where the index.html file is located, which is the main entry to our application, it is rarely modified (unless we want to add styles). The other files there are, icons, react logo, basic metadata about its extension
src: This is the folder with all our components (we have to create folders, but we will do that later).
src\index.js: It’s the most important file within our application, in charge of executing and displaying our application.
src\App.js: It’s the second most important file, it is the main component. where we will load the other components that make up our web app.
src\App.test.js: It’s a file that will run tests on our App component, we’ll see in more detail later.
As an example let’s create a new component file.
The first thing we need to do is, inside the src folder, we’re going to create a folder called ‘components’ (this is where we’re going to add all our new components). Then we will create another folder ‘welcome-component’. Then we will create our first component file called ‘welcome.component.js’ (the extension will be ‘js’).
Place the following code in the new component file welcome.component.js
// src/components/welcome-component/welcome.component.js import React from "react";
function WelcomeComponent(props) { return
Hello, {props.name}
; } export default WelcomeComponent;
Now the next step is to add it to our application, then let’s go to the App.js file, which currently looks like this:
Let’s clear it and place the following code:
// src/App.js
import React from "react";
import "./App.css";
import WelcomeComponent from "./components/welcome-component/welcome.component";

function App() {
  return (


  );
}

export default App;
Remember to give you the name attribute, since this is the one that will read our WelcomeComponent as a property (put your name).
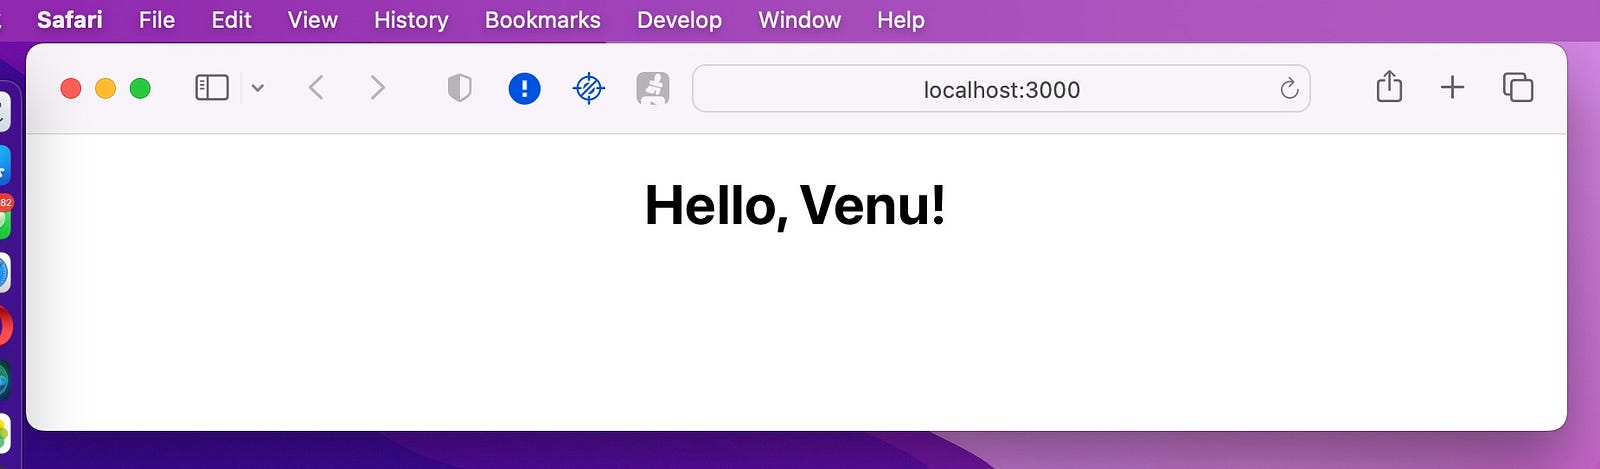
Now let’s go to the terminal and start our application: npm start. In case you are already running the app, we just have to go into the browser and see our changes. If we have done everything properly. we should see the following:
Congratulations! We have created our first app with the create-react-app!! So, let’s create CRUD web app!
For this front-end project we will need to install axios package. All we need is to execute code via CLI using npm package manager.
Axios: It’s a client HTTP API based on XMLHttpRequest, which can be used within the browser as well as on a server with Node.js. Axios runs on an asynchronously basics for REST API calls with JSON return. It is also one of the most popular promise-based clients, this is simple, lightweight, and very easily customizable. https://axios-http.com/docs/intro
You can use the following command in terminal to install this package:
npm install --save axios
Axios also supplies a set of shorthand methods to perform various HTTP requests:
Next is to create the .env file for the front-end in the same way as I mentioned for the back-end part above and place the following code in the .env file. These are the CRUD API paths we created earlier on the back-end part. But, prefix must be REACT_APP on every variable in .env file for React app.
# .env

# API PATH
REACT_APP_API_PATH = 'http://localhost:4000'

#List of Employee's CRUD API
REACT_APP_GET_EMPLOYEE_LISTS_API = "${REACT_APP_API_PATH}/getEmpList"
REACT_APP_CREATE_EMPLOYEE_API = "${REACT_APP_API_PATH}/createEmployee"
REACT_APP_GET_EMPLOYEE_DETAILS_BY_ID_API = "${REACT_APP_API_PATH}/getEmpDetailsByID"
REACT_APP_UPDATE_EMPLOYEE_DETAILS_API = "${REACT_APP_API_PATH}/updateEmpDataByID"
REACT_APP_DELETE_EMPLOYEE_DETAILS_API = "${REACT_APP_API_PATH}/deleteEmpDataByID"
Create a folder called “services” inside “src” and inside it create a file (src/services/employee.service.js) as shown in the image below.
This file is used to receive the response from the REST API with Axios. It is imported as follows:
import axios from 'axios';
Place the following code in the employee.service.js file.
// src/services/employee.service.js
import axios from "axios";


const employeeService = {
    // Function to list the Employee
    async list() {
        const api_url = process.env.REACT_APP_GET_EMPLOYEE_LISTS_API;
        return axios.get(api_url);
    },

    // Function to retrieve data from a specific Employee
    async getOne(empId) {
        const api_url =
            process.env.REACT_APP_GET_EMPLOYEE_DETAILS_BY_ID_API + "?_id=" + empId;
        return axios.get(api_url);
    },

    // Function to create a new Employee
    async create(data) {
        const api_url = process.env.REACT_APP_CREATE_EMPLOYEE_API;
        return axios.post(api_url, data);
    },

    // Function to edit a specific Employee
    async edit(data) {
        const api_url = process.env.REACT_APP_UPDATE_EMPLOYEE_DETAILS_API;
        return axios.post(api_url, data);
    },

    // Function to exclude a specific Employee
    async delete(empId) {
        const api_url = process.env.REACT_APP_DELETE_EMPLOYEE_DETAILS_API;
        return axios.delete(api_url, { data: { _id: empId } });
    },
};

export default employeeService;
For this project we will need 3 components, which will become pages when we implement the routes. The following is a list of components and their functionality:
EmployeeListComponent: List Employee coming from the API;
EmployeeDetailComponent: Display details or delete data of a specific employee;
EmployeeEditComponent: Create a new employee or edit a specific employee;
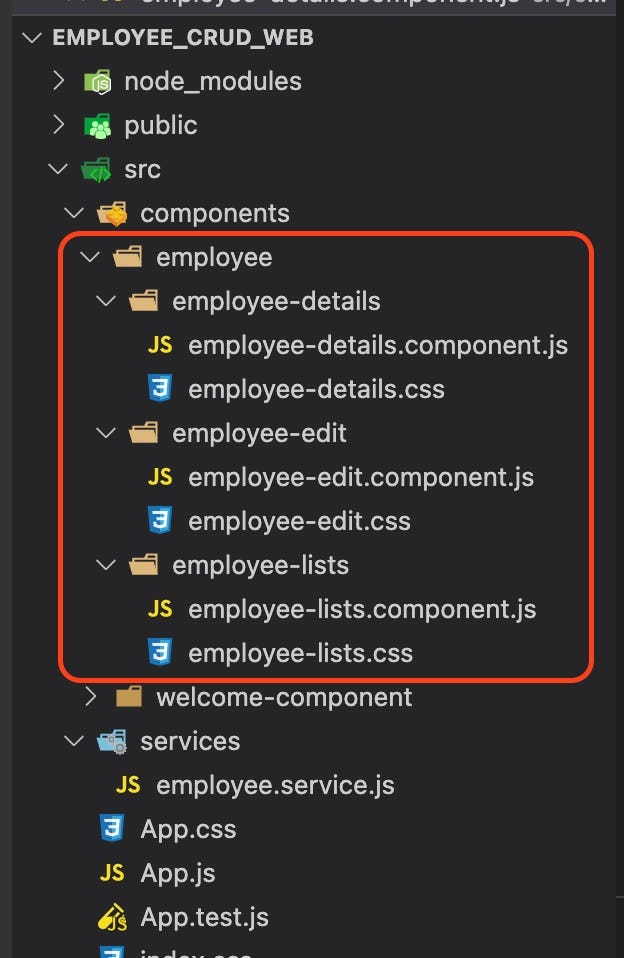
Create a folder inside “src/components” called “employee”, and inside it create the following folders and files:
Next, in the “.js” file of each component create the following structure, placing the component’s name in the
tag:
import React from "react";

class EmployeeListComponent extends React.Component {
    render() {
        return (

                This is Employee List Page

        );
    }
}

export default EmployeeListComponent;
Now, in the App import these components and call your tags inside the class render:
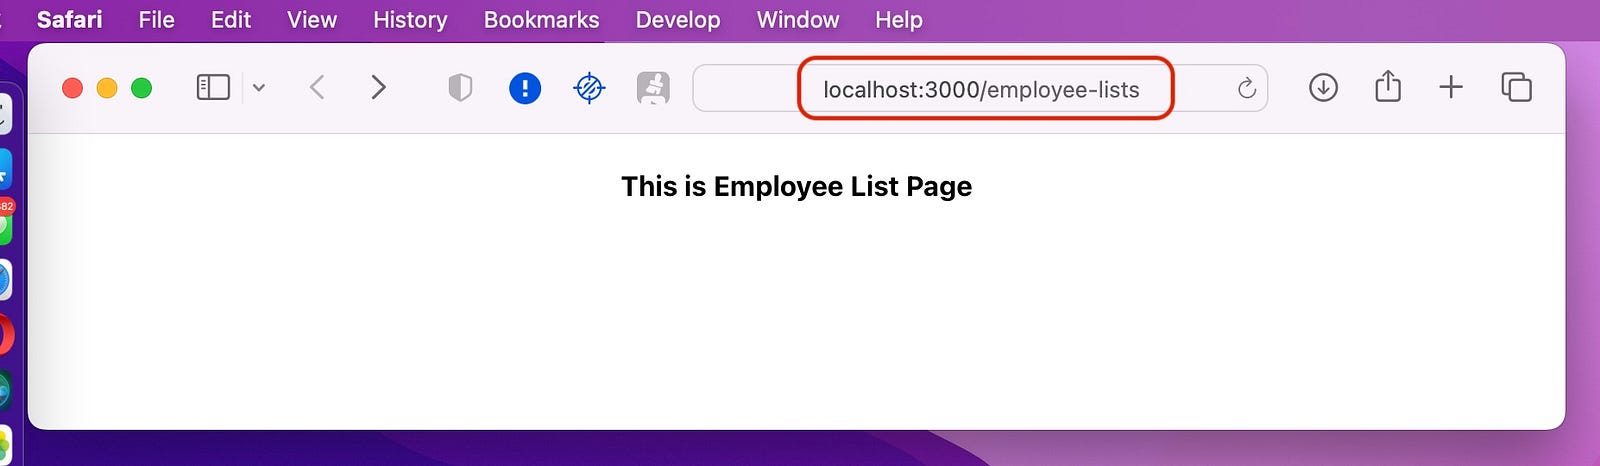
And exec command again npm start . Then, access localhost:3000 in your browser. You will see something like this:
Well great!
React Root makes managing routes in our React applications very simple. It has been split into three packages:
react-router
react-router-dom
react-router-native
You will almost never have to install react-router directly as this package provides the main routing components and functions for React Router applications. The other two offer environmentally specific components (web and mobile). You have to choose the right package for your application environment, in our case we will use react-router-dom because it is a web application. You can use the following command in terminal to install this package:
npm install --save react-router-dom
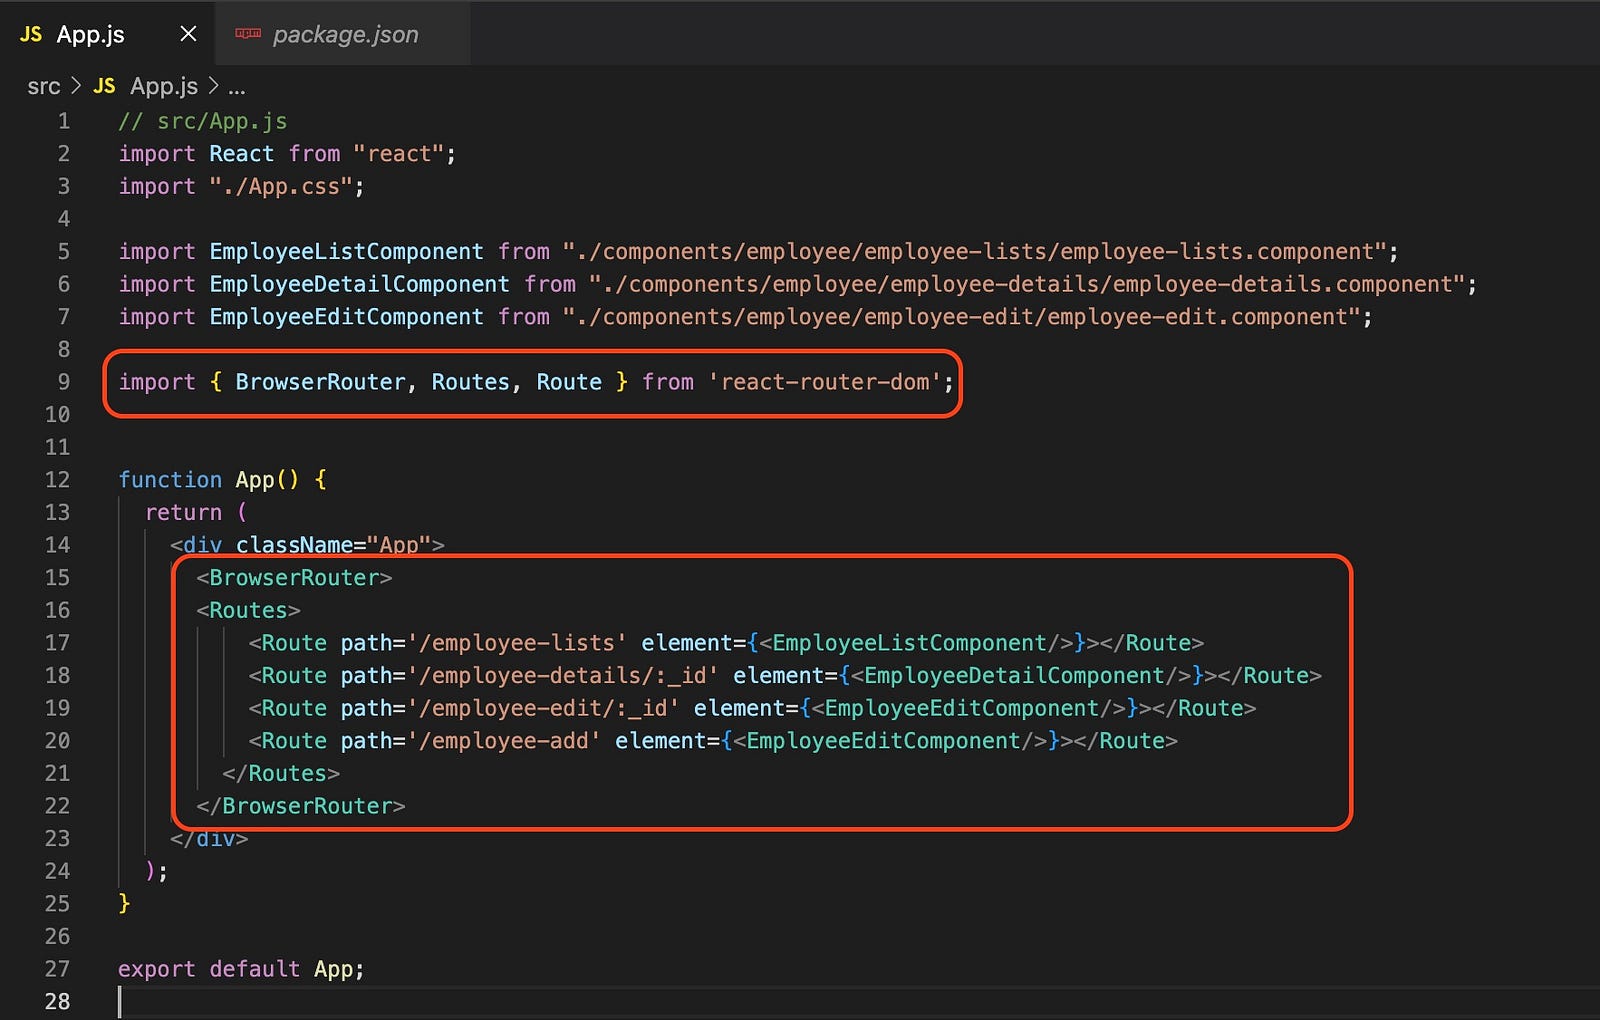
And then we import the elements we will need, within the App.js file:
import { BrowserRouter, Routes, Route } from 'react-router-dom';
And now, we apply these elements in the render, to define our routes:
Notice that the “/employee-add” and “/employee-edit/:_id” routes call the same component. The idea is that EmployeeEditComponent is used both to create a employee as well as to modify an existing employee. The component will know what to do, depending on whether the “_id” argument exists in the URL. We will discuss how to setup this in advance.
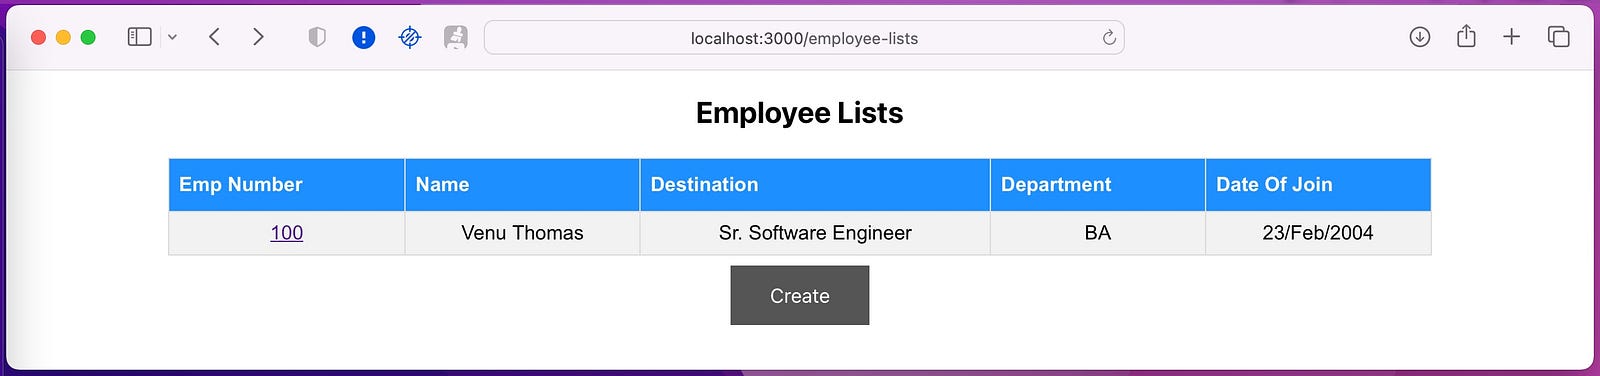
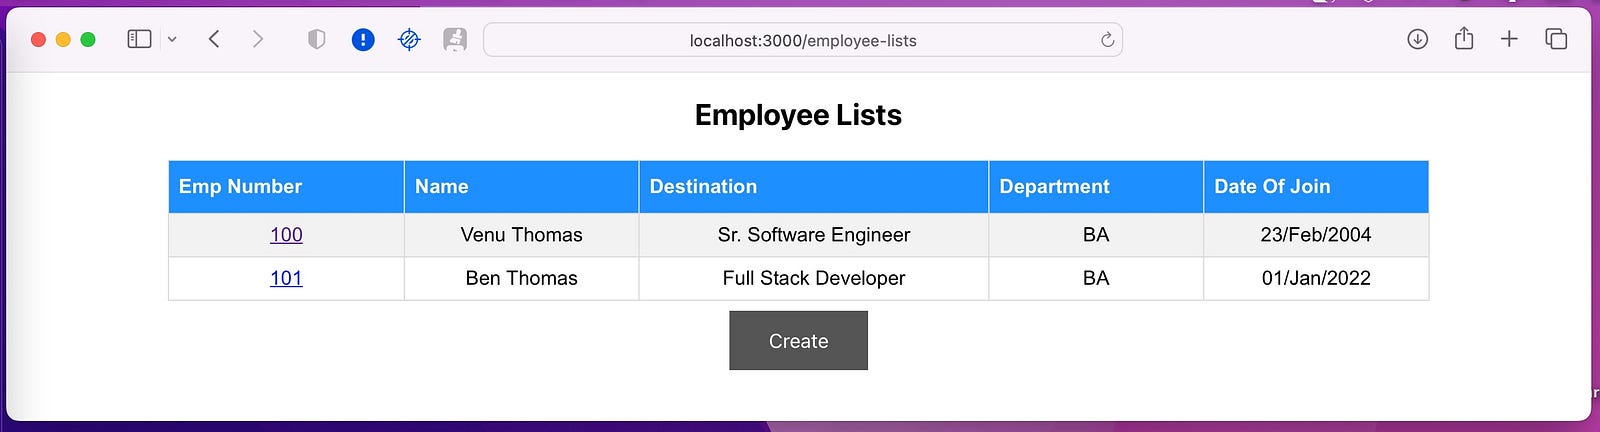
Employee List
Let’s now set up the EmployeeListComponent to list employees from the API. This component should call the service as soon as it loads, store the employees in the state, and then list them within the render.
Place the following code in the employee-lists.component.js file.
// src/components/employee/employee-lists/employee-lists.component.js import React from "react"; import { Link, useLocation, useNavigate, useParams } from "react-router-dom"; import employeeService from "../../../services/employee.service"; import "./employee-lists.css";
function withParams(Component) { return props => }
class EmployeeListComponent extends React.Component { constructor(props) { super(props); // Employee's store this.state = { employee: [], }; }
// Function that is executed as well as this component loads. componentDidMount() { this.fetchEmployees(); }
// Function responsible for calling the service and uploading the employees to store. async fetchEmployees() { try { let res = await employeeService.list(); this.setState({ employee: res.data });
} catch (error) { console.log(error); alert("Unable to list employee."); } }
render() { return (
Employee Lists
Emp Number
Name
Destination
Department
Date Of Join
{this.state.employee.map((details) => (
{" "}
{details.EmpNumber}
{details.Name}
{details.Destination}
{details.Department}
{details.DateOfJoin}
))}
); } }
export default withParams(EmployeeListComponent);
this.setState sets a new object to existing state object (employee: []).
Place the following code in the employee-lists.css file.
Next, we will see a list of employees on this page:
And when you click on an Emp Number, you will be redirected to “/employee-details/:_id”, whose loaded component will be configured in the following step.
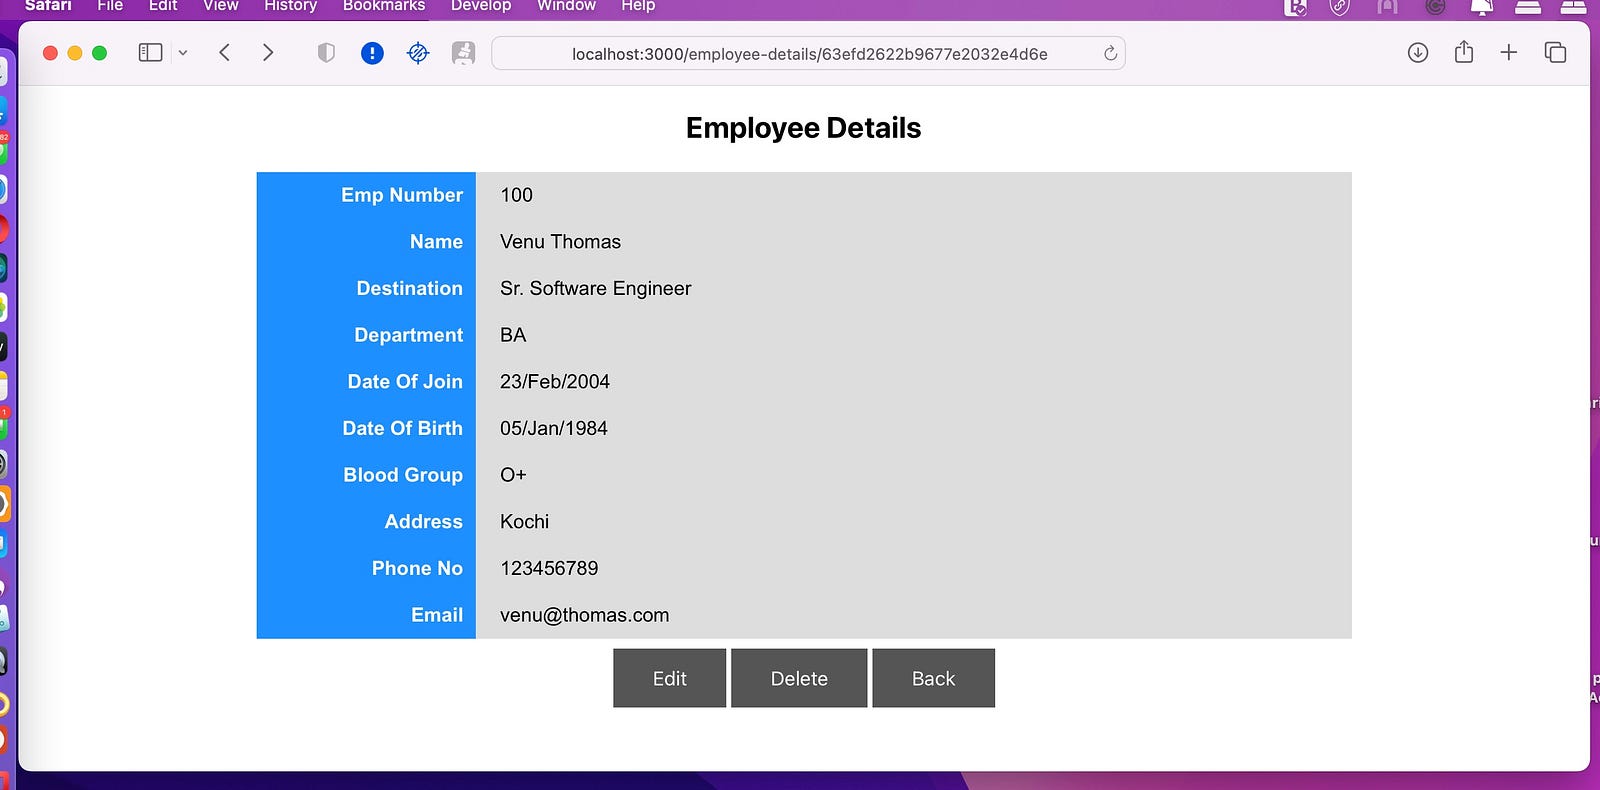
Employee Detail
Now let’s set up the EmployeeDetailComponent, responsible for displaying data from a specific employee. In addition to showing the actions that can be performed with this record such as “Delete” and “Edit”. As soon as it loads, this component needs to retrieve the Employee ID (“_Id”), go through the URL, and search all their data in the API. To do this, it must call the service and store the response in the state. Then, in the render, the component must display the employee data, delete button and edit button to the edit page. This component will also be responsible for calling the service feature that removes the employee from the back-end.
Place the following code in the employee-details.component.js file.
// src/components/employee/employee-details/employee-details.component.js import React from 'react'; import { useLocation, useNavigate, useParams } from 'react-router-dom'; import employeeService from '../../../services/employee.service'; import './employee-details.css'
function withParams(Component) { return props => }
class EmployeeDetailComponent extends React.Component { constructor(props) { super(props) console.log('sss', props) this.state = { // Attribute to store the data of employee employee: null } }
// Function that is executed as well as the component loads componentDidMount() { // Retrieving employee id from url let empId = this.props.params._id // Calling the function that loads the employee details this.fetchEmployeeDetail(empId) }
// Function that loads the employee details from the API and saves to state async fetchEmployeeDetail(empId) { try { let res = await employeeService.getOne(empId) this.setState({ employee: res.data }) } catch (error) { console.log(error); alert("It was not possible to load the employee details.") } }
//Function that delete a specific employee, called by clicking the "Delete" button async deleteEmployee(empId) { if (!window.confirm("Are you sure you want to delete this employee?")) return; try { await employeeService.delete(empId) alert("Employee deleted with success") this.props.navigation('/employee-lists') } catch (error) { console.log(error); alert("It was not able to delete the employee") } }
Then when you click on the Emp Number in the employee list, it will be redirected to employee details page:
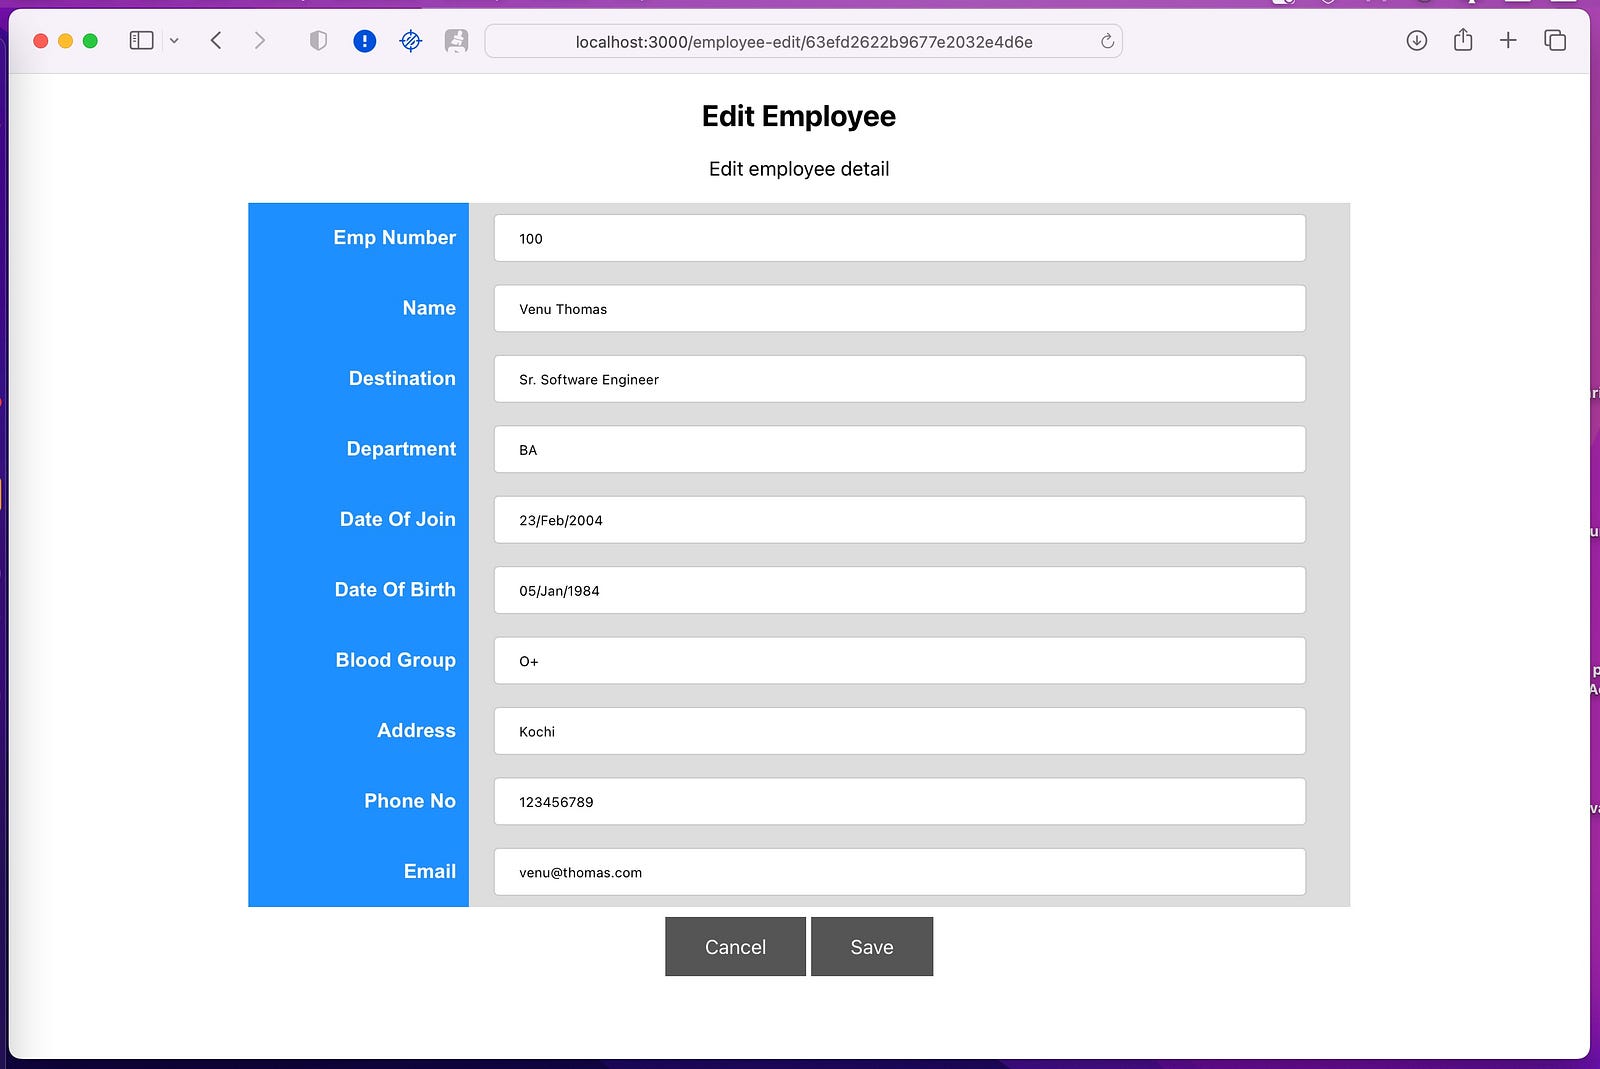
Employee Edit
Now it’s time for EmployeeEditComponent. This component will be used both to create a employee, and to edit an already created employee. Being called by two routes, the “/employee-add” and “/employee-edit/:_id”. The component, as soon as it is loaded, should check if the “_id” parameter has been passed in the URL If the parameter exists, the component must fetch the employee data in the API and save it to the state. At rendering, the component will display a form that has already been completed with the employee’s data. Upon registration, the component will know that this is an edit, calling the correct function of the service. If the “_id” parameter is not passed, the component will just make the fields without data and, at the time of registration, will call the “create” function of the service.
Place the following code in the employee-edit.component.js file.
// src/components/employee/employee-edit/employee-edit.component.js import React from 'react'; import { useNavigate, useParams } from 'react-router-dom'; import employeeService from '../../../services/employee.service'; import './employee-edit.css'
function withParams(Component) { return props => }
class EmployeeEditComponent extends React.Component { constructor(props) { super(props)
// Function executed as well as the component loads componentDidMount() { if (this.props?.params?._id) { let empId = this.props.params._id this.loadEmployee(empId) } }
// Function that recovers the employee's data case is an edition async loadEmployee(empId) { try { let res = await employeeService.getOne(empId) let empData = res.data this.setState(empData) } catch (error) { console.log(error); alert("It was not possible to load the employee details.") } }
// Function responsible for saving async saveEmployee() {
// Verifications if (!data.EmpNumber || data.EmpNumber === '') { alert("Emp Number is mandatory!"); return; } if (!data.Name || data.Name === '') { alert("Name is mandatory!"); return; } if (!data.Destination || data.Destination === '') { alert("Destination is mandatory!"); return; } if (!data.Department || data.Department === '') { alert("Department is mandatory!"); return; } if (!data.DateOfJoin || data.DateOfJoin === '') { alert("Date Of Join is mandatory!"); return; } if (!data.DateOfBirth || data.DateOfBirth === '') { alert("Date Of Birth is mandatory!"); return; } if (!data.BloodGroup || data.BloodGroup === '') { alert("Blood Group is mandatory!"); return; } if (!data.Address || data.Address === '') { alert("Address is mandatory!"); return; } if (!data.PhoneNo || data.PhoneNo === '') { alert("Phone No is mandatory!"); return; } if (!data.Email || data.Email === '') { alert("Email is mandatory!"); return; }
try { // If there is an edition, call the "edit" of the service if (this.state._id) { await employeeService.edit(data, this.state._id) alert("Employee edited with success!") } // If there is an addition, call the "create" of the service else { await employeeService.create(data) alert("Employee created with success!") } this.props.navigation('/employee-lists') } catch (error) { console.log(error) alert("Error in save!") } }
If you would like to ask me questions, please feel free! I’ll always have my mailbox open. Whether you have a question or would like to simply say hello. I will do my utmost to respond!