Introduction to Aspire.NET for Distributed Applications
NET Aspire, introduced with .NET 8, is a groundbreaking platform for building distributed, cloud-native applications. Designed specifically for production-ready, microservice-based architectures, Aspire simplifies complex cloud tasks like service discovery, telemetry, and health monitoring. Through its comprehensive set of NuGet packages, it equips developers to easily manage databases, messaging, caching, and other cloud interactions.
Key Features of .NET Aspire:
- Service Discovery: Automatically identifies and connects services within the application.
- Telemetry: Integrated monitoring and logging for detailed visibility into application performance.
- Resiliency: Robust error-handling and fault-tolerance mechanisms to ensure application stability.
- Health Checks: Ongoing monitoring of services to detect and resolve issues early.
Getting started with .NET Aspire:
Today we are going to see what .NET Aspire is and of course how to use it to our advantage with the e-CoffeeShop project. As always the code will be available on GitHub.
https://github.com/venuthomas/vT.eCoffeeShopAspireProject
Note: The projects must be in NET8 for everything to work properly.
For this post, we’ll need you to have the following items on your local machine:
Begin by updating your .NET workloads with:
dotnet workload updateThen install the Aspire workload using:
<code>dotnet workload install aspireIf you’re using Visual Studio, I recommend you read this part! https://learn.microsoft.com/en-us/dotnet/aspire/fundamentals/setup-tooling?tabs=windows&pivots=visual-studio#install-net-aspire
To build the default .NET Aspire template, let’s run the following command:
dotnet new aspire-starterThis will create the structure of the solution:
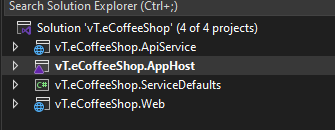
- ServicesDefault: Configures dependencies like cache, database, and general settings.
- AppHost: Orchestrates services, kickstarting the entire solution.
- ApiService: This is the backend project, which is a minimal API type application.
- Web: This is the frontend project, built using Blazor.
Explanation of .NET Aspire Projects
First, let’s explain the backend and the frontend, as they are the simplest ones. In both cases, everything is like any other normal project, except for two exceptions.
The first one, common for both, is that once we create the builder for our web application, we call the method <strong>AddServiceDefaults()</strong>:
var builder = WebApplication.CreateBuilder(args);

// Add service defaults & Aspire components.
builder.AddServiceDefaults();
In the case of the frontend (and similarly for the backend, though it doesn’t have any dependency), when we specify the URL of the backend, we don’t specify a URL or an IP address as usual. Instead, we specify an application name:
builder.Services.AddHttpClient<WeatherApiClient>(client => client.BaseAddress = new Uri("http://apiservice"));Now, let’s move on to the first of the two purely .NET Aspire projects. This is where we specify telemetry, health checks, etc., and this is done through the AddServiceDefaults extension method.
 public static IHostApplicationBuilder AddServiceDefaults(this IHostApplicationBuilder builder)
    {
        builder.ConfigureOpenTelemetry();

        builder.AddDefaultHealthChecks();

        builder.Services.AddServiceDiscovery();

        builder.Services.ConfigureHttpClientDefaults(http =>
        {
            // Turn on resilience by default
            http.AddStandardResilienceHandler();

            // Turn on service discovery by default
            http.AddServiceDiscovery();
        });

        return builder;
    }
This method, as well as the methods it uses, come by default with the template.
If we continue investigating, you can see it has a new property, which specifies that it is a shared Aspire project:
<Project Sdk="Microsoft.NET.Sdk">
  <PropertyGroup>
    <IsAspireSharedProject>true</IsAspireSharedProject>
  </PropertyGroup>
</Project>
AppHost Project
Finally, the project that makes all this make sense is the AppHost. This is where we reference the projects that we are going to run. Not only that, but this is also where we define the name that we specified before, <strong><em>apiservice</em></strong>. This is where it is specified.
For the example project, this is the code:
var builder = DistributedApplication.CreateBuilder(args);

var apiService = builder.AddProject<Projects.vT_eCoffeeShop_ApiService>("apiservice");

builder.AddProject<Projects.vT_eCoffeeShop_Web>("webfrontend")
    .WithExternalHttpEndpoints()
    .WithReference(apiService);

builder.Build().Run();
We observe that the AppHost is referencing the projects it will use, and in the frontend, it specifies that we use the API as a reference.
When we run this project, two things happen:
- All the referenced applications will start up.
- The AppHost itself contains a dashboard, which is super cool.
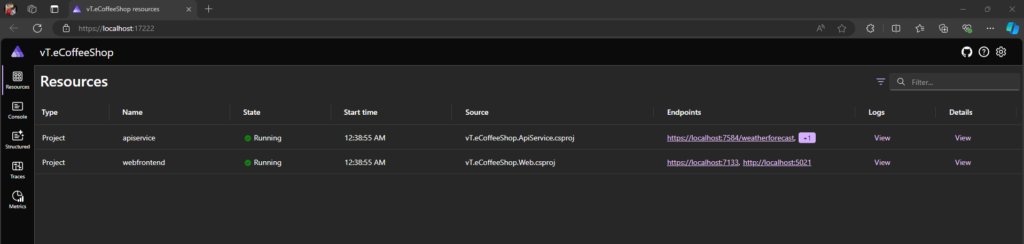
In this image, you can see the projects that are being used and their respective URLs to access them. Additionally, if you look at the menu on the left, you can see a monitoring section where we have logs, traces, and metrics for each one.
Next, we’ll explore how Aspire.NET was used to build the e-Coffee Shop, a real-time ordering system featuring Angular frontend and .NET Core backend. Key components like PostgreSQL, SQL, Redis, RabbitMQ, and Microsoft SignalR work together to provide a seamless experience for customers and admins
Overview of the e-Coffee Shop Project
The e-Coffee Shop application has two main services:
- Order Service: Allows customers to enter their name, view available coffee options, and place orders.
- Admin Service: Enables admins to view orders in real time via an order dashboard, supported by Microsoft SignalR for live updates.
System Architecture and Workflow
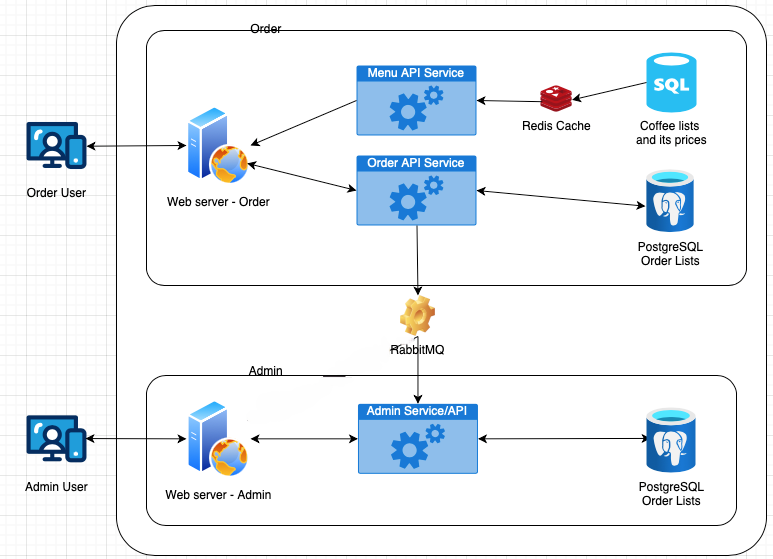
Order Process:
- Customer Registration: Customers input their names, stored in SQL.
- Coffee Selection: Coffee lists fetched from Redis (or SQL fallback).
- Order Placement: Orders are stored in PostgreSQL and queued via RabbitMQ.
Admin Experience:
- Order/Admin Dashboard: Displays order lists synced from RabbitMQ and stored in PostgreSQL on the admin’s database server. SignalR provides real-time order alerts, updating the dashboard as new orders come in.
Key Components
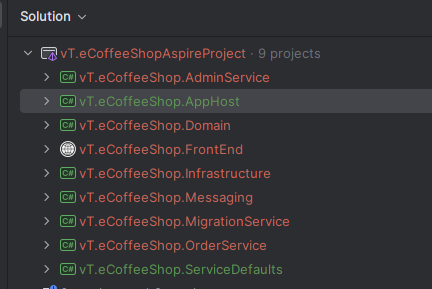
Each project in the e-CoffeeShop solution has a unique role:
1. vT.eCoffeeShop.AdminService
The Admin Service handles administrative tasks, including order management. It provides:
<strong>"/api/admin/getallorders"</strong>API: Retrieves all orders for display on the order dashboard.<strong>"/api/Hub/orderHub"</strong>: A SignalR endpoint for real-time notifications on order updates.
2. vT.eCoffeeShop.OrderService
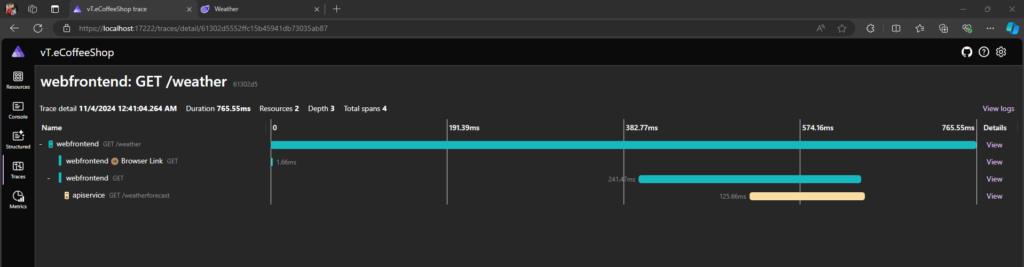
The Order Service manages customer and order processes. Key APIs include:
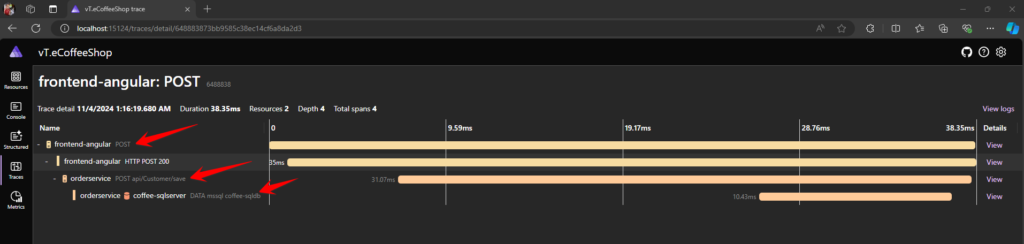
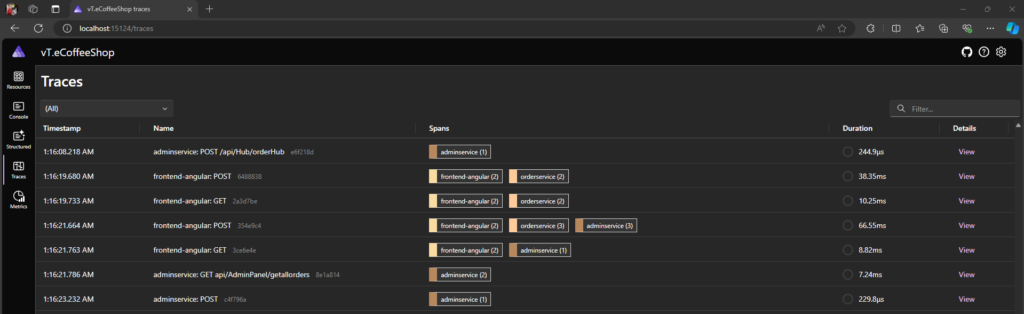
<strong>"/api/coffee/fetchallcoffee"</strong>: Fetches coffee list from Redis or SQL (if not cached). See below sample screenshot of Trace

<strong>"/api/customer/save"</strong>: Saves customer details to SQL.
<strong>"/api/order/place-order"</strong>: Places customer orders, queues them in RabbitMQ, and saves order data in PostgreSQL in Order and Admin DBs.

3. vT.eCoffeeShop.FrontEnd
The Frontend Application is an Angular application that handles customer interactions. It consists of pages for customer registration, coffee selection, and order placement. The admin order dashboard also connects to this frontend to display orders.
4. vT.eCoffeeShop.Infrastructure
The Infrastructure project includes Data Transfer Objects (DTOs) and Entity Framework configurations for SQL Server and PostgreSQL, centralizing data models and database configurations for consistency across services.
5. vT.eCoffeeShop.Messaging
The Messaging project manages RabbitMQ communication, handling message queues used by both Order and Admin services. It provides the necessary configuration for sending and receiving messages, ensuring that orders are promptly processed and synchronized.
6. vT.eCoffeeShop.MigrationService
Migrates data for initial setup, creating SQL/Postgres Tables in both DBs Order and Admin, including coffee lists in SQL
7. vT.eCoffeeShop.Domain
This project shares model classes between the Order and Admin services. By centralizing models, it ensures that both services use consistent data structures, promoting easier maintenance and reducing redundancy.
8. vT.eCoffeeShop.AppHost and vT.eCoffeeShop.ServiceDefaults
- AppHost: Configures and initiates the core hosting environment for e-Coffee Shop, setting up essential services like SQL, PostgreSQL, Redis, and RabbitMQ. This configuration simplifies service management.
- ServiceDefaults: Defines default settings for services, such as retry policies, logging levels, and tracing configurations. This helps standardize configurations across the application, making services more resilient and observable.
Monitoring with .NET Aspire Dashboard
Resources: display key system assets like databases, message queues, and caches connected to your application. They help monitor resource usage, health, and performance in real time.
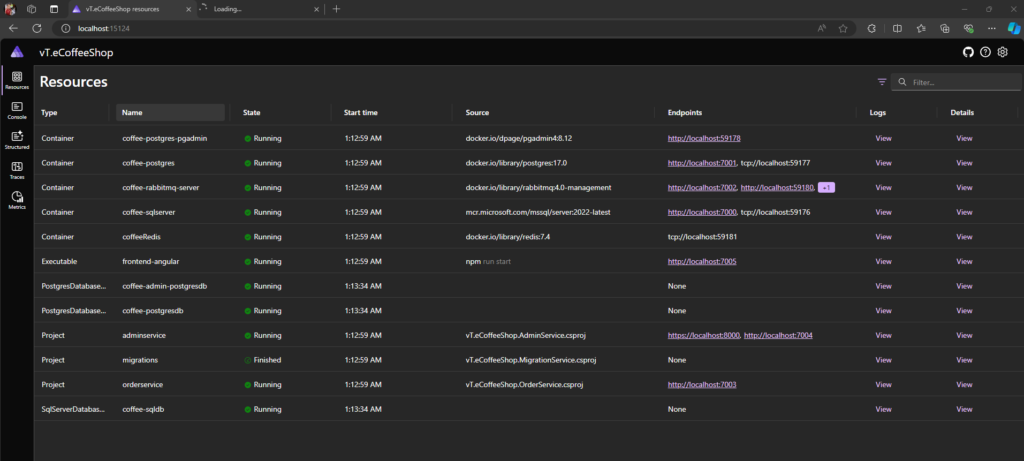
Traces: track the flow of requests through your application, providing a detailed record of operations and interactions. They help identify performance bottlenecks and debug issues, especially in complex, distributed systems.
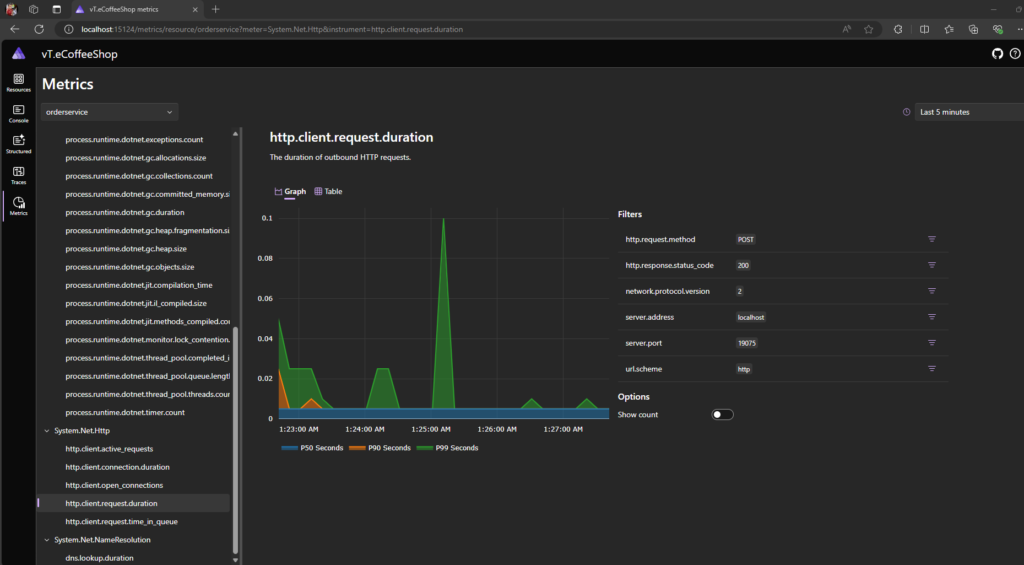
Metrics: are numerical data points collected over time, offering insights into the performance and health of your application. They help monitor system health, detect anomalies, and provide alerts for performance issues.
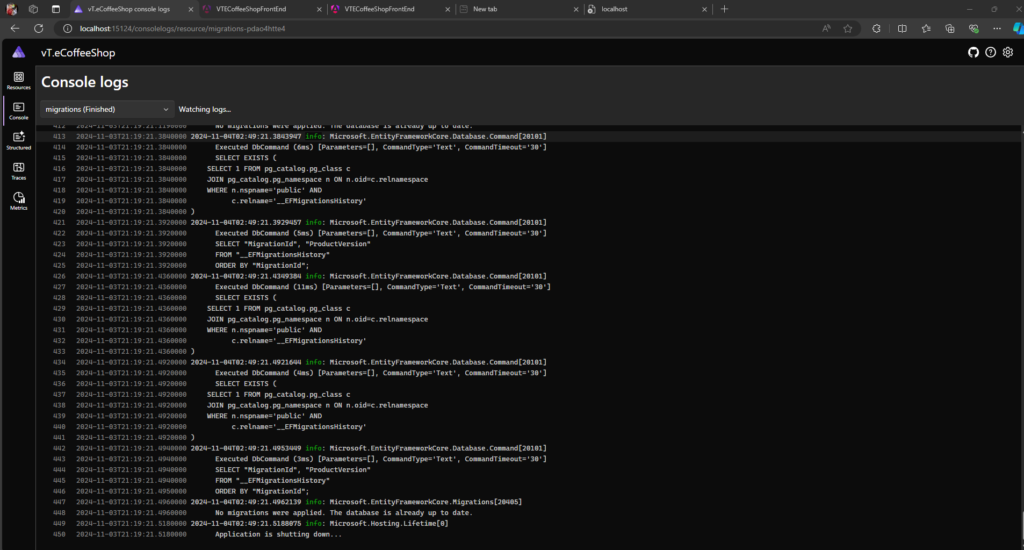
Console Logs: display real-time text logs directly in the terminal, helping track application flow and debug during development.
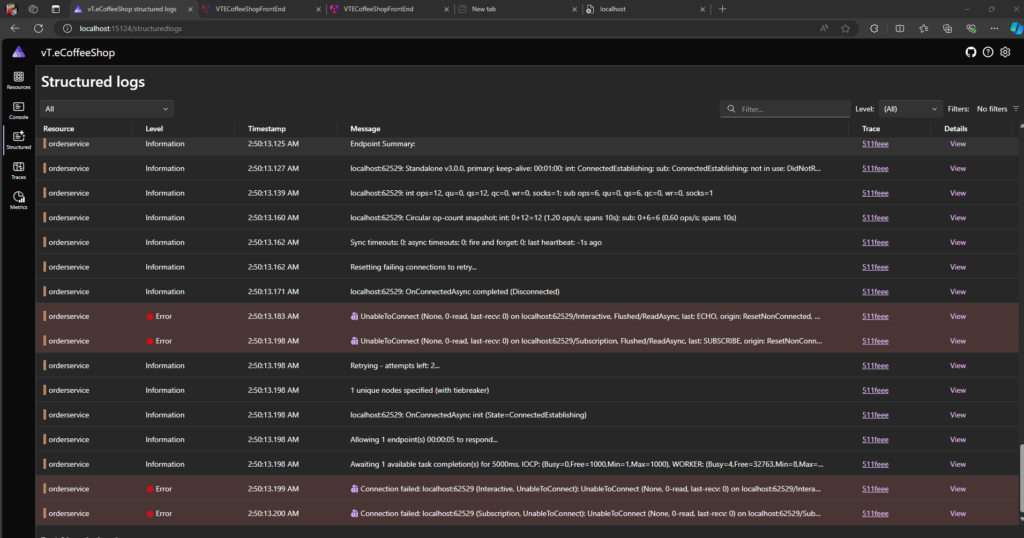
Structured Logs: format logs as key-value pairs (e.g., JSON), making it easy to filter, search, and analyze in log management systems, providing deeper insights and organized tracking across services.
Videos:
Practical Configuration in AppHost
Below is an outline of the configuration code for the e-Coffee Shop in AppHost:
var builder = DistributedApplication.CreateBuilder(args);

// Configure SQL Server with existing instance
var sql = builder.AddSqlServer("coffee-sqlserver")
    .WithDataVolume()
    .WithHttpEndpoint(port: 7000, targetPort: 1433) // Assuming 1433 is the default SQL Server port
    .AddDatabase("coffee-sqldb"); // Use existing database

// Configure PostgreSQL with existing instance
var postgres = builder.AddPostgres("coffee-postgres")
    .WithDataVolume()
    .WithHttpEndpoint(port: 7001, targetPort: 5432) // Assuming 5432 is the default PostgreSQL port
    .WithPgAdmin(); // Ensure PgAdmin is used for management

// Connect to existing PostgreSQL databases
var postgresdb = postgres.AddDatabase("coffee-postgresdb");
var postgresAdmindb = postgres.AddDatabase("coffee-admin-postgresdb");

builder.AddProject<Projects.vT_eCoffeeShop_MigrationService>("migrations")
    .WithReference(sql)
    .WithReference(postgresdb)
    .WithReference(postgresAdmindb);

// Configure RabbitMQ with existing instance
var rabbitmq = builder.AddRabbitMQ("coffee-rabbitmq-server")
    .WithHttpEndpoint(port: 7002, targetPort: 15672) // Assuming 15672 is the default RabbitMQ management port
    .WithManagementPlugin(); // Use management plugin for RabbitMQ

// Configure Redis with existing instance
var cache = builder.AddRedis("coffeeRedis").WithDataVolume(); // Connect to existing Redis

// Configure the Order Service
var oederservice = builder.AddProject<Projects.vT_eCoffeeShop_OrderService>("orderservice")
    .WithHttpEndpoint(port:7003)
    .WithReference(cache)
    .WithReference(sql)
    .WithReference(postgresdb)
    .WithReference(rabbitmq)
    .WithExternalHttpEndpoints();

// Configure the Admin Service
var adminservice = builder.AddProject<Projects.vT_eCoffeeShop_AdminService>("adminservice")
    .WithHttpEndpoint(port:7004)
    .WithHttpsEndpoint(port: 8000)
    .WithReference(postgresAdmindb)
    .WithReference(rabbitmq)
    .WithExternalHttpEndpoints();

// Configure the Angular Frontend
builder.AddNpmApp("frontend-angular", "../vT.eCoffeeShop.FrontEnd")
    .WithReference(oederservice)
    .WithReference(adminservice)
    .WithHttpEndpoint(port: 7005, env: "PORT")
    .WithExternalHttpEndpoints()
    .PublishAsDockerFile(); // This publishes the frontend as a Dockerfile

// Build and run the application
builder.Build().Run();
Below is an explanation of each section in your <strong>AppHost</strong> code
SQL Server Configuration
var sql = builder.AddSqlServer("coffee-sqlserver")
    .WithDataVolume()
    .WithHttpEndpoint(port: 7000, targetPort: 1433)
    .AddDatabase("coffee-sqldb");
This segment configures a SQL Server instance, setting up data volume persistence, and exposes HTTP management on port 7000, mapping to the default SQL port 1433. It also references an existing database (coffee-sqldb) to store customer information.
PostgreSQL Configuration
var postgres = builder.AddPostgres("coffee-postgres")
    .WithDataVolume()
    .WithHttpEndpoint(port: 7001, targetPort: 5432)
    .WithPgAdmin();
PostgreSQL is configured similarly, using port 7001 for management. This includes PgAdmin for administrative tasks. Databases are referenced for both customer (coffee-postgresdb) and admin orders (coffee-admin-postgresdb).
RabbitMQ Configuration
var rabbitmq = builder.AddRabbitMQ("coffee-rabbitmq-server")
    .WithHttpEndpoint(port: 7002, targetPort: 15672)
    .WithManagementPlugin();
RabbitMQ is set up with HTTP management on port 7002, using its management plugin for easier monitoring and configuration. This setup enables message queuing for order processing and updates.
Redis Cache Configuration
var cache = builder.AddRedis("coffeeRedis").WithDataVolume();Redis caching is initialized for fast data retrieval of the coffee list. WithDataVolume() ensures data persistence between application restarts.
Service Configurations
- Order Service:
var orderservice = builder.AddProject("orderservice")
    .WithHttpEndpoint(port: 7003)
    .WithReference(cache)
    .WithReference(sql)
    .WithReference(postgresdb)
    .WithReference(rabbitmq)
    .WithExternalHttpEndpoints();
This configures the Order Service with HTTP access on port 7003 and references to Redis, SQL Server, PostgreSQL, and RabbitMQ for inter-service communication
- Admin Service:
var adminservice = builder.AddProject<Projects.vT_eCoffeeShop_AdminService>("adminservice")
    .WithHttpEndpoint(port: 7004)
    .WithHttpsEndpoint(port: 8000)
    .WithReference(postgresAdmindb)
    .WithReference(rabbitmq)
    .WithExternalHttpEndpoints();
The Admin Service is configured similarly, with both HTTP and HTTPS endpoints, enabling secure access and communication with RabbitMQ and PostgreSQL.
- Frontend Configuration:
builder.AddNpmApp("frontend-angular", "../vT.eCoffeeShop.FrontEnd")
    .WithReference(orderservice)
    .WithReference(adminservice)
    .WithHttpEndpoint(port: 7005, env: "PORT")
    .WithExternalHttpEndpoints()
    .PublishAsDockerFile();
The Angular frontend is set up to communicate with both Order and Admin services, with port 7005 exposing HTTP access. This configuration also publishes the frontend as a Dockerfile for deployment.
Additional Configurations for Enhanced Observability
- MassTransit Integration with OpenTelemetry
To enable distributed tracing specifically for MassTransit operations within your e-Coffee Shop project, include <strong>.AddSource("MassTransit")</strong> in your OpenTelemetry tracing configuration. This setup captures the trace context for MassTransit’s message handling, allowing you to follow messages as they flow across services and monitor message processing performance and laten
Using the MassTransit NuGet package, you can build robust, message-based applications while enhancing observability. Capturing trace context offers valuable insights, helping you debug efficiently and optimize system performance, ensuring a seamless experience for your users
Looks like:
- Front-End Integration with OpenTelemetry
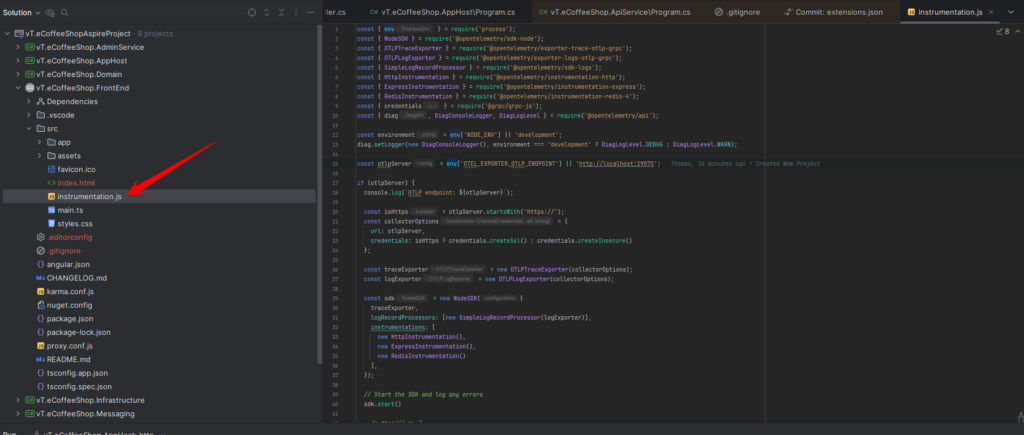
For observability on the frontend, adding <strong>instrumentation.js</strong> (this is available in my GitHub) to your Angular application enables you to capture telemetry data, such as traces and metrics, directly from the user interface. This file initializes OpenTelemetry and sets up necessary instrumentation, like monitoring user interactions and HTTP requests, sending collected data to a backend tracing system.
Integrating frontend telemetry into your e-Coffee Shop project provides a complete view of application performance across both frontend and backend, offering valuable insights into user behavior, system responsiveness, and any potential issues. This setup complements your backend observability, bringing full-stack transparency to your application’s performance.
The following script in <strong>package.json</strong> launches your Angular application with OpenTelemetry instrumentation, ensuring consistent telemetry data capture for performance monitoring.
"start": "node --require ./src/instrumentation.js ./node_modules/@angular/cli/bin/ng serve --port %PORT%",Looks like:

Conclusion
Aspire.NET enables developers to build resilient, scalable distributed applications with ease. With features like service discovery, telemetry, and health checks built-in, and a powerful dashboard for monitoring, Aspire offers a one-stop solution for modern cloud-native development. The e-Coffee Shop project demonstrates how easily developers can harness Aspire’s capabilities to create real-time, distributed applications that offer robust performance and real-time insights for both customers and administrators.
If you have any more questions or need further clarification, feel free to ask!