In this article, I will give a brief introduction to CQRS and MediatR. We will also see a practical example of how to implement a CRUD (Create, Read, Update, Delete) web API in a .NET 7 Core application using these patterns.
The Command and Query Segregation of Responsibility (CQRS) pattern separates the query and update operations of a data store.
This maximises the performance, scalability and security of an application.
In traditional architectures, the same data model is used to query and update a database. It is simple and works well for basic CRUD operations. However, in more complex applications, this approach can be unwieldy.
CQRS separates reads and writes into different models, using “Command” to update data and “Query” to read data.
Queries
- Queries never modify the database. A query returns a DTO that does not encapsulate any domain knowledge;
Commands
- Commands should be task-based, not data-centred;
- Commands can be queued for asynchronous processing instead of being processed synchronously
If we think of a CRUD, the Commands (the ones that change the state) will be Create, Update and Delete. The Quieries, then the Read.
The following image shows the main idea of how it works:
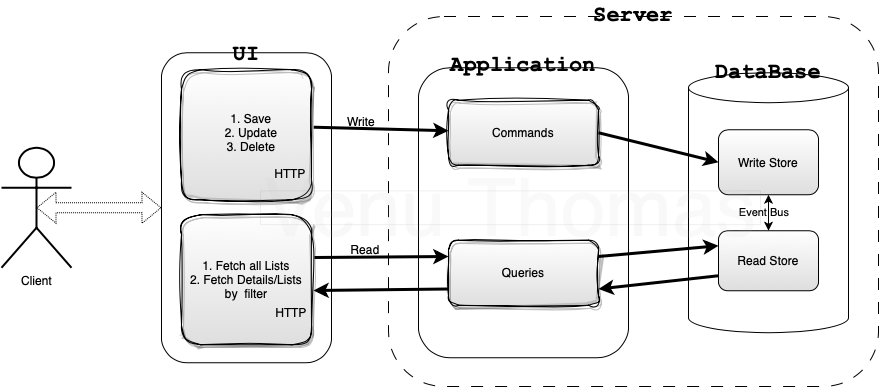
As we can see, the application simply splits into two main concepts, Queries and Commands. The main idea of CQRS is also to split that datastore in two (one master and one replicated) to read from one and write to the other, but the idea of splitting it in a logical way works very well in the design of the system, even if the same database is used (which could easily be implemented using physically separate databases).
Why use CQRS?
Here are some advantages of CQRS:
- Independent scaling: Read and write workloads can be scaled independently in CQRS, which can result in fewer lock contention;
- Optimised data schemas: The read side has the option to use a schema designed for queries, while the write side has the option to use a schema designed for updates.
- Security: It’s easier to ensure that only the correct domain entities are performing writes to the data;
- Separation of responsibilities: Models can become more flexible and easier to maintain by separating the read and write sides. The write model is where most of the complex business logic is located. The read model can be quite simple;
- Simpler queries: Complex joins during the query can be avoided by storing a materialized view in the read database.
- Independent scaling: CQRS allows read and write workloads to be scaled independently and can result in fewer lock contention;
What is Mediator?
Reducing chaotic dependencies between objects is achieved by using this behavioral pattern. The pattern restricts direct communications between objects and forces them to collaborate only through a mediating object. An object that encapsulates how a set of objects interact with each other is defined by the mediator pattern.
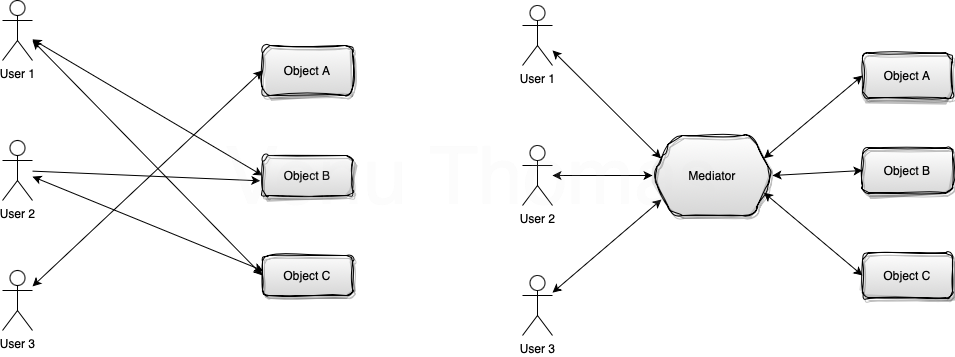
Objects don’t communicate directly with each other, but rather through the mediator. The code dependency is reduced by reducing the dependencies between the communicating objects.
MediatR is a way to implement the Mediator pattern in.NET. It supports requests/responses, commands, queries, notifications, and events, both synchronous and asynchronous, with intelligent dispatch via C# generic variance.
Implementing CQRS in ASP.NET Core
We will develop an application that demonstrates how to utilize CQRS patterns and Mediator. We will simplify the application to concentrate on building the CQRS pattern with MediatR. I will create a sample project ‘UserCRUDWebAPI_CQRS_MediatR‘ with .NET 7 for this article.
Entities
There is really nothing to explain here, we will simply create a ‘Users’ class in the ‘Entity‘ folder to do this example.
using System.ComponentModel.DataAnnotations;

namespace UserCRUDWebAPI_CQRS_MediatR.Entity
{
    public class Users
    {
        [Key]
        public Guid UserID { get; set; }
        public string FirstName { get; set; }
        public string LastName { get; set; }
        public string Department { get; set; }
        public string Email { get; set; }
        public string Password { get; set; }
    }
}
Defining the Context
In this project, we will use EF Core as an ORM tool and use it in the Code First approach to create the SQL Server DemoDB database and the User table that we will map in the context file.
So we will have to perform the following tasks in the CRUD project:
- Include references to the following EF Core packages:
- Microsoft.EntityFrameworkCore.SqlServer
- Microsoft.EntityFrameworkCore.Tools
Next, In the ‘Context‘ folder create the DemoDbContext class:
using Microsoft.EntityFrameworkCore;
using UserCRUDWebAPI_CQRS_MediatR.Entity;

namespace UserCRUDWebAPI_CQRS_MediatR.Context
{
    public class DemoDBContext : DbContext
    {
        public DemoDBContext(DbContextOptions<DemoDBContext> options) : base(options) { }

        public DbSet<Users> Users { get; set; }
    }
}
In this class we define the DbContext options in the builder and map the Users entity to the Users table.
In your appsettings.json, add the Database connection string.
{
 "ConnectionStrings": {
    "SQLConnectionStrings": "Data Source=localhost\\SQLEXPRESS;Initial Catalog=DemoDB;Integrated Security=True; TrustServerCertificate=True"
  }
}
Register DBContext:
To register the DemoDbContext in the services, add the following code to your Program.cs file.
var configuration = new ConfigurationBuilder()
               .SetBasePath(Directory.GetCurrentDirectory())
               .AddJsonFile("appsettings.json", false)
               .Build();

var sqlConnection = configuration.GetSection("ConnectionStrings")["SQLConnectionStrings"];
builder.Services.AddDbContext<DemoDBContext>(options=> options.UseSqlServer(sqlConnection));
Applying Migrations:
Now we can apply Migrations.
In Visual Studio activate the menu Tools-> Nuget Package Manager -> Package Manager Console
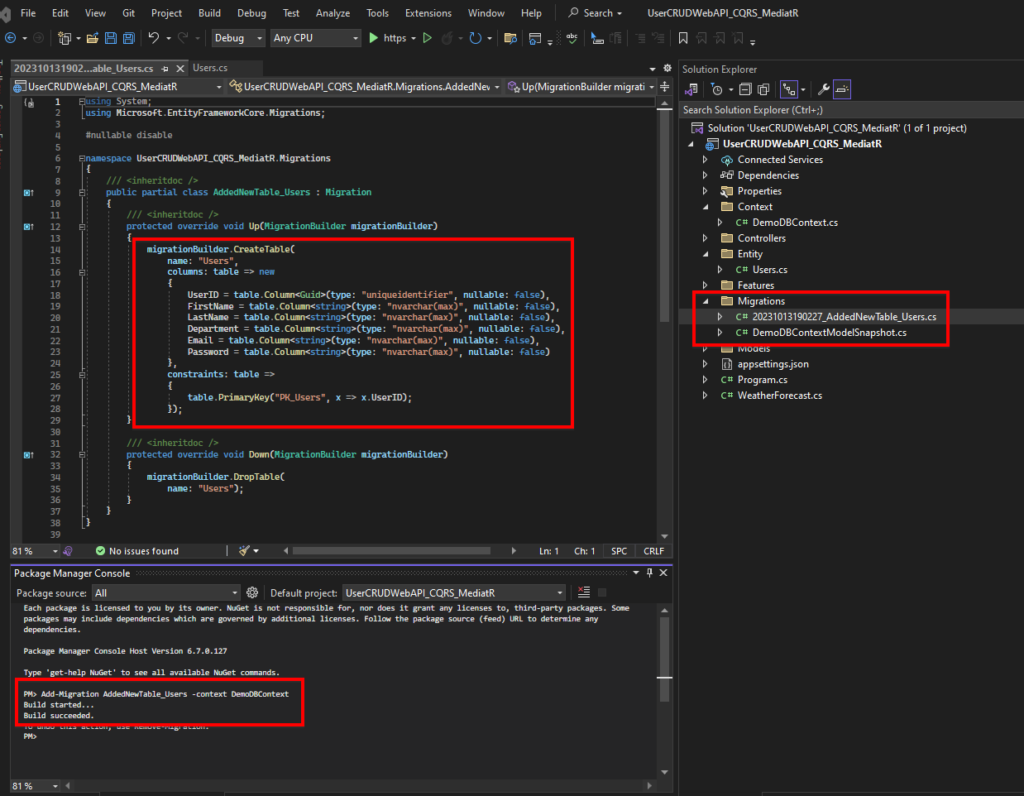
And in the Package Manager Console window select the UserCRUDWebAPI_CQRS_MediatR project and define the Migrations commands:
Add-Migration AddedNewTable_Users -context DemoDBContext
Result Looks like
Now let’s execute the update-database command to create the database and the Users table:
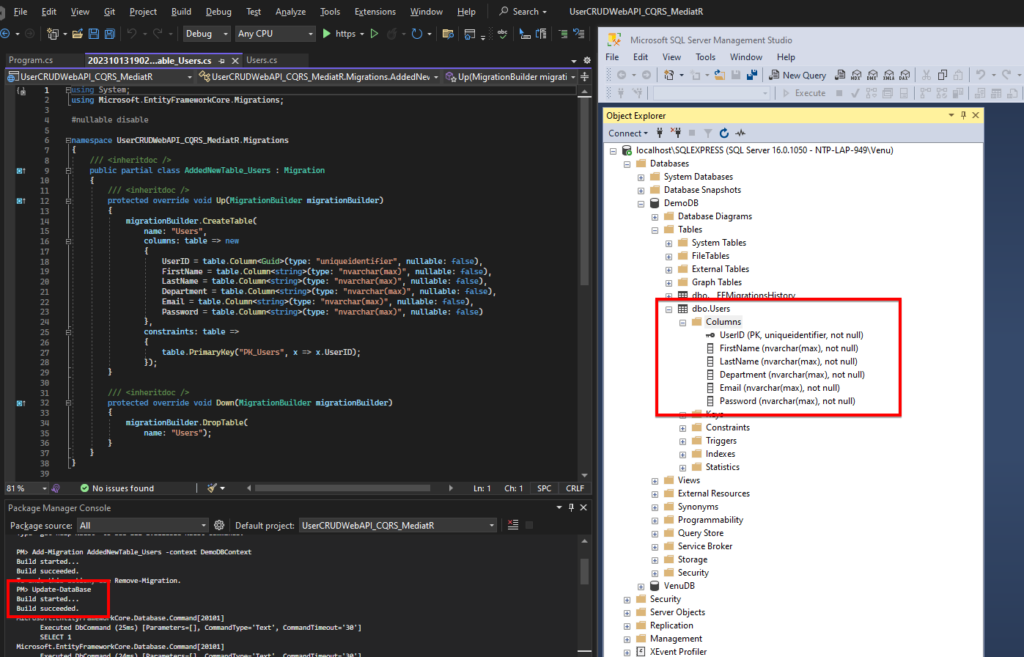
Now DB and Table created successfully!!!
MediatR
Next, we will continue with the Mediator pattern, which helps us to solve the following problems:
- Reducing the number of connections between classes.
- Encapsulation of objects using the mediator interface.
- Providing a unified interface to manage dependencies between classes.
We will need to install the MediatR package
First of all, when you start using the MediatR library, the first thing you need to define is “request”. Requests describe the behavior of your commands and queries. IRequest is the request or message that indicates the task to be performed, which is requested by some service and addressed to n Handlers. That is, the mediator will take the IRequest and send it to the registered handlers. These handlers know about the message they can receive and they know how the task will be carried out.
Register MediatR:
To register the MediatR in the services, add the following code to your Program.cs file.
builder.Services.AddMediatR(cfg => cfg.RegisterServicesFromAssembly(Assembly.GetExecutingAssembly())); Next we will create the following folders in the Application project:
- Commands: contains the commands
- Queries: contains the queries
I have created two model class under Models folder
UserDto This is a model class which is not linked to the EF table. It’s used for requests or responses.
using System.Text.Json.Serialization;

namespace UserCRUDWebAPI_CQRS_MediatR.Models
{
    public class UserDto
    {
        public Guid UserID { get; set; }
        public string FirstName { get; set; }
        public string LastName { get; set; }
        public string Department { get; set; }
        public string Email { get; set; }
        public string Password { get; set; }
    }
}
ResponseDto is another model class. I created it as a record. This record is used for responding to the status of command processes..
namespace UserCRUDWebAPI_CQRS_MediatR.Models
{
    public record ResponseDto(Guid UserID, string ActionMessage);
}Queries:
We’ll now create the queries in the Queries folder and we’ll do this by creating inner classes.
This query GetUserListsQuery will return all users from the table:
using MediatR;
using Microsoft.EntityFrameworkCore;
using UserCRUDWebAPI_CQRS_MediatR.Context;
using UserCRUDWebAPI_CQRS_MediatR.Models;

namespace UserCRUDWebAPI_CQRS_MediatR.Features.Queries
{
    public record GetUserListsQuery() : IRequest<List<UserDto>>;

    public class GetUserListsQueryHandler : IRequestHandler<GetUserListsQuery, List<UserDto>>
    {
        private readonly DemoDBContext demoDBCOntext;

        public GetUserListsQueryHandler(DemoDBContext _demoDBCOntext) => demoDBCOntext = _demoDBCOntext;

        public async Task<List<UserDto>> Handle(GetUserListsQuery request, CancellationToken cancellationToken) =>
            await demoDBCOntext.Users
                .AsNoTracking()
                .Select(u => new UserDto
                {
                    UserID = u.UserID,
                    FirstName = u.FirstName,
                    LastName = u.LastName,
                    Department = u.Department,
                    Email = u.Email,
                    Password = u.Password
                })
                .ToListAsync();
    }
}
Let’s understand the code:
Our first step is to create a record called GetUserListsQuery() that complies with IRequest<List>. Our Request will result in a list of users. This feature comes from the MediatR library.
Our next step is to create an inner class named GetUserListsQueryHandler that inherits from IRequestHandler<GetUserListsQuery, List>. The Query will be handled by this class, and it will return a list of users in this case.
We then inject the repository service defined by demoDBContext into the builder. An instance of our repository and mediator is injected into the constructor of this class, and we then implement a single method named Handle that returns the values from our repository.
The next query is GetUserDetailsByUserIDQuery, it will return user details by their user id, and will follow the same approach:
using Azure;
using MediatR;
using UserCRUDWebAPI_CQRS_MediatR.Context;
using UserCRUDWebAPI_CQRS_MediatR.Events;
using UserCRUDWebAPI_CQRS_MediatR.Models;

namespace UserCRUDWebAPI_CQRS_MediatR.Features.Queries
{
    public record GetUserDetailsByUserIDQuery(Guid userID) : IRequest<UserDto>;

    public class GetUserDetailsQueryHandler : IRequestHandler<GetUserDetailsByUserIDQuery, UserDto>
    {
        private readonly DemoDBContext demoDBCOntext;

        public GetUserDetailsQueryHandler(DemoDBContext _demoDBCOntext) { demoDBCOntext = _demoDBCOntext; }

        public async Task<UserDto> Handle(GetUserDetailsByUserIDQuery request, CancellationToken cancellationToken)
        {

            ResponseDto response;
            var _userDetails = await demoDBCOntext.Users.FindAsync(request.userID);
            if (_userDetails is not null)
            {
                return new UserDto
                {
                    UserID = _userDetails.UserID,
                    FirstName = _userDetails.FirstName,
                    LastName = _userDetails.LastName,
                    Department = _userDetails.Department,
                    Email = _userDetails.Email,
                    Password = _userDetails.Password
                };
            }
            return null;
        }
    }
}Commands:
We have already created the Queries. Next, we will then create the Commands.
In the Commands folder we will define the first Command by creating the SaveUserDetailsCommand class that will add a new user details:
using MediatR;
using UserCRUDWebAPI_CQRS_MediatR.Context;
using UserCRUDWebAPI_CQRS_MediatR.Entity;
using UserCRUDWebAPI_CQRS_MediatR.Models;

namespace UserCRUDWebAPI_CQRS_MediatR.Features.Commands
{
    public record SaveUserDetailsCommand(string FirstName, string LastName, string Department, string Email, string Password) : IRequest<ResponseDto>;

    public class SaveUserDetailsCommandHandler : IRequestHandler<SaveUserDetailsCommand, ResponseDto>
    {
        private readonly DemoDBContext demoDBCOntext;
        public SaveUserDetailsCommandHandler(DemoDBContext _demoDBCOntext) => demoDBCOntext = _demoDBCOntext;

        public async Task<ResponseDto> Handle(SaveUserDetailsCommand request, CancellationToken cancellationToken)
        {
            try
            {
                if (request is not null)
                {
                    var userID = Guid.NewGuid();
                    await demoDBCOntext.Users.AddAsync(new Users
                    {
                        UserID = userID,
                        FirstName = request.FirstName,
                        LastName = request.LastName,
                        Email = request.Email,
                        Department = request.Department,
                        Password = request.Password,
                    });
                    await demoDBCOntext.SaveChangesAsync();
                    return new ResponseDto(userID, "Saved Successfully");
                }
                return new ResponseDto(default, "Request is not found!");
            }
            catch
            {
                return new ResponseDto(default, "Failed!");
            }
        }
    }
}
Let’s understand the code:
The first step is to create the Command class is SaveUserDetailsCommand, and then implement IRequest, which indicates that we will return as ResponseDto. This resource is provided by the MediatR library.
The class has five properties FirstName, LastName, Department, Email and Password that represent the data we’re creating.
We proceed by creating the SaveUserDetailsCommandHandler inner class that is derived from the IRequestHandler class and indicating the Command to be handled and the expected return.
Next, we inject the repository service defined by demoDBContext into the constructor. Then, we implement the Handle method (Command request), adding the value to our data source using the Mediator instance.
Implementing the other two commands (Update/Delete) we’re going to create will involve following the same logic.
UpdateUserDetailsCommand: updating an existing user
using MediatR;
using Microsoft.EntityFrameworkCore;
using UserCRUDWebAPI_CQRS_MediatR.Context;
using UserCRUDWebAPI_CQRS_MediatR.Events;
using UserCRUDWebAPI_CQRS_MediatR.Models;

namespace UserCRUDWebAPI_CQRS_MediatR.Features.Commands
{
    public record UpdateUserDetailsCommand(Guid UserID, string FirstName, string LastName, string Department, string Email, string Password) : IRequest<ResponseDto>;

    public class UpdateUserDetailsCommandHandler : IRequestHandler<UpdateUserDetailsCommand, ResponseDto>
    {
        private readonly demoDBContext demoDBContext;
        public UpdateUserDetailsCommandHandler(demoDBContext _demoDBContext) { demoDBContext = _demoDBContext;  }

        public async Task<ResponseDto> Handle(UpdateUserDetailsCommand request, CancellationToken cancellationToken)
        {
            ResponseDto response;
            try
            {
                if (request is not null)
                {
                    var userDetails = await demoDBContext.Users.FirstOrDefaultAsync(x => x.UserID == request.UserID);
                    if (userDetails != null)
                    {
                        userDetails.FirstName = request.FirstName;
                        userDetails.LastName = request.LastName;
                        userDetails.Email = request.Email;
                        userDetails.Department = request.Department;
                        userDetails.Password = request.Password;

                        await demoDBContext.SaveChangesAsync();
                        response = new ResponseDto(userDetails.UserID, "Updated Successfully!");
                        return response;
                    }
                    else
                    {
                        response = new ResponseDto(request.UserID, "User ID not found in the Database!");
                        return response;
                    }
                }
                response = new ResponseDto(request.UserID, "User ID not found in the Database!");
                return response;
            }
            catch
            {
                response = new ResponseDto(default, "Failed!");
                return response;
            }
        }
    }
}DeleteUserDetailsCommand: removing an existing user
using MediatR;
using Microsoft.EntityFrameworkCore;
using UserCRUDWebAPI_CQRS_MediatR.Context;
using UserCRUDWebAPI_CQRS_MediatR.Models;

namespace UserCRUDWebAPI_CQRS_MediatR.Features.Commands
{
    public record DeleteUserDetailsCommand(Guid userID) : IRequest<ResponseDto>;

    public class DeleteUserDetailsCommandHandler : IRequestHandler<DeleteUserDetailsCommand, ResponseDto>
    {
        private readonly DemoDBContext demoDBCOntext;

        public DeleteUserDetailsCommandHandler(DemoDBContext _demoDBCOntext) { demoDBCOntext = _demoDBCOntext; }

        public async Task<ResponseDto> Handle(DeleteUserDetailsCommand request, CancellationToken cancellationToken)
        {
            try
            {
                if (request is not null)
                {
                    var userDetails = await demoDBCOntext.Users.FirstOrDefaultAsync(x => x.UserID == request.userID);
                    if (userDetails != null)
                    {
                        demoDBCOntext.Users.Remove(userDetails);
                        await demoDBCOntext.SaveChangesAsync();
                        return new ResponseDto(userDetails.UserID, null);
                    }
                    else
                        return new ResponseDto(request.userID, "User ID not found in the Database!");
                }
                return new ResponseDto(default, "Request is not found!");
            }
            catch
            {
                return new ResponseDto(default, "Failed!");
            }
        }
    }
}
Creating an API Controller:
Let’s create the UserController controller in the Controllers folder of the API project.
using MediatR;
using Microsoft.AspNetCore.Http;
using Microsoft.AspNetCore.Mvc;
using UserCRUDWebAPI_CQRS_MediatR.Features.Commands;
using UserCRUDWebAPI_CQRS_MediatR.Features.Queries;
using UserCRUDWebAPI_CQRS_MediatR.Models;

namespace UserCRUDWebAPI_CQRS_MediatR.Controllers
{
    [ApiController]
    [Route("[controller]")]
    public class UserController : ControllerBase
    {
        private readonly IMediator mediator;
        public UserController( IMediator _mediator)
        {
            mediator = _mediator;
        }

        [HttpGet("GetUserLists")]
        public async Task<List<UserDto>> GetUserLists() => await this.mediator.Send(new GetUserListsQuery());

        [HttpGet("GetUserDetailsByUserID")]
        public async Task<UserDto> GetUserDetailsByUserID(Guid userID) => await this.mediator.Send(new GetUserDetailsByUserIDQuery(userID));

        [HttpPost("SaveUserDetails")]
        public async Task<ResponseDto> SaveUserDetails(SaveUserDetailsCommand userDto) => await this.mediator.Send(userDto);

        [HttpPut("UpdateUserDetails")]
        public async Task<ResponseDto> UpdateUserDetails(UpdateUserDetailsCommand userDto) => await this.mediator.Send(userDto);

        [HttpGet("DeleteUserDetails")]
        public async Task<ResponseDto> DeleteUserDetails(Guid userID) => await this.mediator.Send(new DeleteUserDetailsCommand(userID));

    }
}
Let’s understand the code:
The IMediator interface is being injected in this controller to allow us to send requests to our Command objects using the Send method provided by this interface.
await this.mediator.Send(userDto);
The mediator class is responsible for calling the command handlers we defined via Send method, based on the object passed in.
The Mediator provides a clear separation of responsibilities, without the need to inject repositories, services, etc. into your controller.
This helps your controllers stay lightweight and focused on handling requests and routing them to your business logic.
So we have the following definitions:
- GET: this.mediator.Send(new GetUserListsQuery());
- GET(by UserID): await this.mediator.Send(new GetUserDetailsByUserIDQuery(userID));
- POST: await this.mediator.Send(userDto);
- PUT: await this.mediator.Send(new UpdateUserDetailsCommand(userDto));
- DELETE: await this.mediator.Send(new DeleteUserDetailsCommand(userID));
We use a command or query that is relevant to the task we want to perform for each HTTP method. We have no idea how the query will be handled and we are not considering a dependency on the repository. This is a principle of the Mediator standard.
Notification feature
One of the features that the MediatR library offers is the option to generate a notification in your code and then have various actions performed behind it.
For our article we will create the ResponseEvent record in the Events folder of the API project that will implement the INotification interface:
using MediatR;
using UserCRUDWebAPI_CQRS_MediatR.Models;

namespace UserCRUDWebAPI_CQRS_MediatR.Events
{
    public record ResponseEvent(ResponseDto response) : INotification;
}
Data insertion, modification and deletion message will be notified by this class.
Let’s create another notification record called ErrorEvent in the same folder :
using MediatR;
using UserCRUDWebAPI_CQRS_MediatR.Models;

namespace UserCRUDWebAPI_CQRS_MediatR.Events
{
    public record ErrorEvent(ResponseDto response) : INotification;
}
Errors that occur during requests will be detected through this record.
Now it’s time to create various implementations for the Notification Handler class that will listen to notifications. As a demonstration, we will display notifications on the console in this article:
To generate notifications for each type of notification, we’ll implement the Handle method and create the LogEventHandler class in the same folder.
using MediatR;

namespace UserCRUDWebAPI_CQRS_MediatR.Events
{
    public class LogEventHandler : INotificationHandler<ResponseEvent>, INotificationHandler<ErrorEvent>
    {
        public async Task Handle(ResponseEvent notification, CancellationToken cancellationToken) =>
            Console.WriteLine($"User ID {notification.response.UserID}:  Message {notification.response.ActionMessage}.");

        public async Task Handle(ErrorEvent notification, CancellationToken cancellationToken) =>
            Console.WriteLine($"Error: UserID: {notification.response.UserID} Error Message: {notification.response.ActionMessage}");
    }
}
The code of the Commands and Queries that are defined in the Commands and Queries folder can now be modified.
To demonstrate how notifications work, I will show you the implementation of the UpdateUserDetailsCommand class below, emphasizing the notifications used.
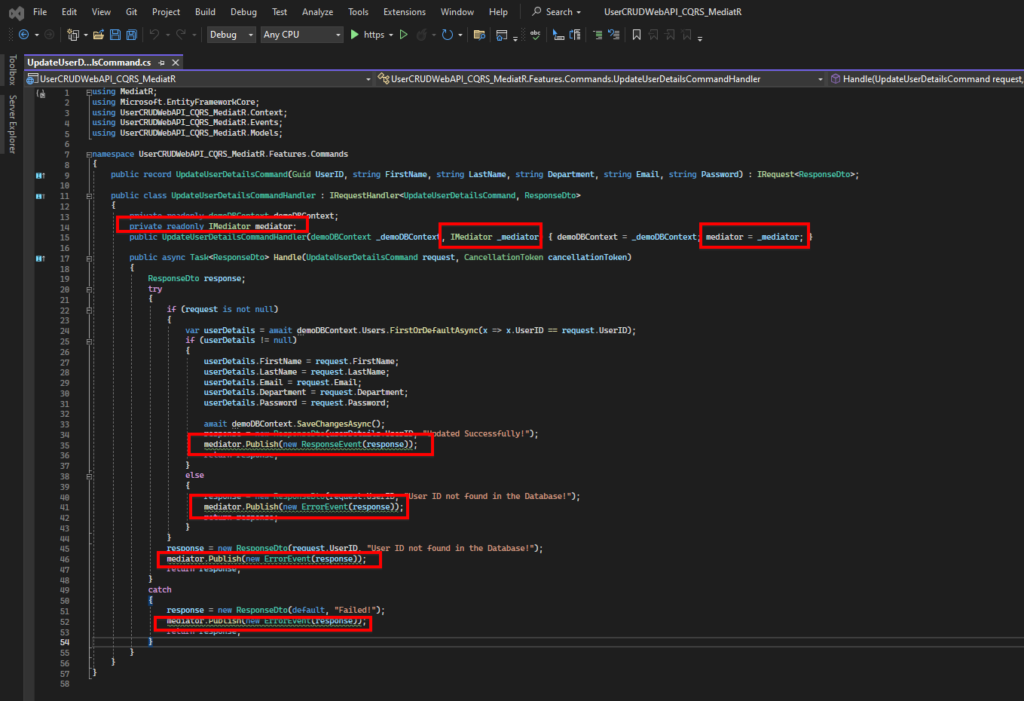
Code..
using MediatR;
using Microsoft.EntityFrameworkCore;
using UserCRUDWebAPI_CQRS_MediatR.Context;
using UserCRUDWebAPI_CQRS_MediatR.Events;
using UserCRUDWebAPI_CQRS_MediatR.Models;

namespace UserCRUDWebAPI_CQRS_MediatR.Features.Commands
{
    public record UpdateUserDetailsCommand(Guid UserID, string FirstName, string LastName, string Department, string Email, string Password) : IRequest<ResponseDto>;

    public class UpdateUserDetailsCommandHandler : IRequestHandler<UpdateUserDetailsCommand, ResponseDto>
    {
        private readonly demoDBContext demoDBContext;
        private readonly IMediator mediator;
        public UpdateUserDetailsCommandHandler(demoDBContext _demoDBContext, IMediator _mediator) { demoDBContext = _demoDBContext; mediator = _mediator; }

        public async Task<ResponseDto> Handle(UpdateUserDetailsCommand request, CancellationToken cancellationToken)
        {
            ResponseDto response;
            try
            {
                if (request is not null)
                {
                    var userDetails = await demoDBContext.Users.FirstOrDefaultAsync(x => x.UserID == request.UserID);
                    if (userDetails != null)
                    {
                        userDetails.FirstName = request.FirstName;
                        userDetails.LastName = request.LastName;
                        userDetails.Email = request.Email;
                        userDetails.Department = request.Department;
                        userDetails.Password = request.Password;

                        await demoDBContext.SaveChangesAsync();
                        response = new ResponseDto(userDetails.UserID, "Updated Successfully!");
                        mediator.Publish(new ResponseEvent(response));
                        return response;
                    }
                    else
                    {
                        response = new ResponseDto(request.UserID, "User ID not found in the Database!");
                        mediator.Publish(new ErrorEvent(response));
                        return response;
                    }
                }
                response = new ResponseDto(request.UserID, "User ID not found in the Database!");
                mediator.Publish(new ErrorEvent(response));
                return response;
            }
            catch
            {
                response = new ResponseDto(default, "Failed!");
                mediator.Publish(new ErrorEvent(response));
                return response;
            }
        }
    }
}
Let’s understand the code:
Once the Handler method of a UpdateUserDetailsCommandHandler class has fulfilled a request, we can call the mediator.Publish() method and specify the Notification object as a parameter, which will result in a notification being sent to the entire system.
The Handler() in the LogEventHandler class method will be invoked by the MediatR library to process a notification, after searching for a class that has implemented the INotificationHandler interface in the LogEventHandler class.
The Notification object will be sent to all event handlers who are listening for notifications about the type of the published object and can be processed.
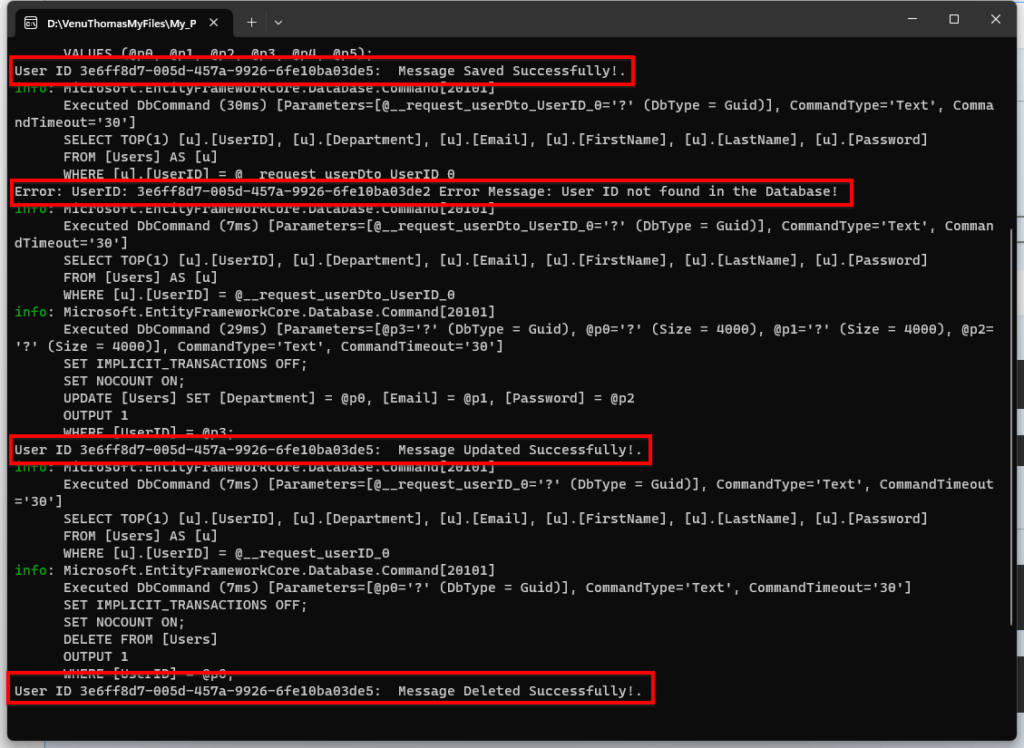
Response and Error Messages in the Console:
Validations with FluentValidation
We can improve the above by adding validations using FluentValidation, a free to use .NET validation library that helps us to make validations clean, easy to create and maintain. Let’s Install below packages for Validation setup
- FluentValidation.DependencyInjectionExtensions
- FluentValidation.AspNetCore
Register FluentValidation:
To register the FluentValidation in the services, add the following code to your Program.cs file.
builder.Services.AddFluentValidation(options=>
{
    options.RegisterValidatorsFromAssembly(Assembly.GetExecutingAssembly());
});
Read more about FluentValidation : https://docs.fluentvalidation.net/en/latest/
Now, let’s go ahead and add a new validator in Validations folder with our rule directly in the Queries and Command classes/records, SaveUserDetailsCommand and UpdateUserDetailsCommand.
We create a class called SaveUserDetailsValidation that inherits from the AbstractValidator class, specifying the SaveUserDetailsCommand type. This lets FluentValidation know that this validation is for the SaveUserDetailsCommand record.
using FluentValidation;
using UserCRUDWebAPI_CQRS_MediatR.Features.Commands;

namespace UserCRUDWebAPI_CQRS_MediatR.Validations
{
    public class SaveUserDetailsValidation : AbstractValidator<SaveUserDetailsCommand>
    {
        public SaveUserDetailsValidation()
        {
            RuleFor(x => x.FirstName).NotEmpty().WithMessage("The First Name field is required!")
                .MaximumLength(20).WithMessage("The First Name field's max length is 20")
                .MinimumLength(3).WithMessage("The First Name field's min length is 3");

            RuleFor(x => x.LastName).NotEmpty().WithMessage("The Last Name field is required!")
                .MaximumLength(20).WithMessage("The Last Name field's max length is 20")
                .MinimumLength(3).WithMessage("The Last Name field's min length is 3");
        }
    }
}
UpdateUserDetailsValidation for update:
using FluentValidation;
using UserCRUDWebAPI_CQRS_MediatR.Features.Commands;
using UserCRUDWebAPI_CQRS_MediatR.Features.Queries;

namespace UserCRUDWebAPI_CQRS_MediatR.Validations
{
    public class UpdateUserDetailsValidation : AbstractValidator<UpdateUserDetailsCommand>
    {
        public UpdateUserDetailsValidation() {
            RuleFor(x => x.UserID).NotEmpty().WithMessage("The User ID field is required!")
              .Must(ValidateGuid).WithMessage("Invalid Guid");

            RuleFor(x => x.FirstName).NotEmpty().WithMessage("The First Name field is required!")
                .MaximumLength(20).WithMessage("The First Name field's max length is 20")
                .MinimumLength(3).WithMessage("The First Name field's min length is 3");

            RuleFor(x => x.LastName).NotEmpty().WithMessage("The Last Name field is required!")
                .MaximumLength(20).WithMessage("The Last Name field's max length is 20")
                .MinimumLength(3).WithMessage("The Last Name field's min length is 3");
        }
        private bool ValidateGuid(Guid id)
        {
            return Guid.TryParse(id.ToString(), out _);
        }
    }
}
Hope this was valuable.
Thank you for reading this article! ❤️
I uploaded this source to git: https://github.com/venuthomas/UserCRUDWebAPI_CQRS_MediatR
If you would like to ask me questions, please feel free! I’ll always have my mailbox open. Whether you have a question or would like to simply say hello. I will do my utmost to respond!